

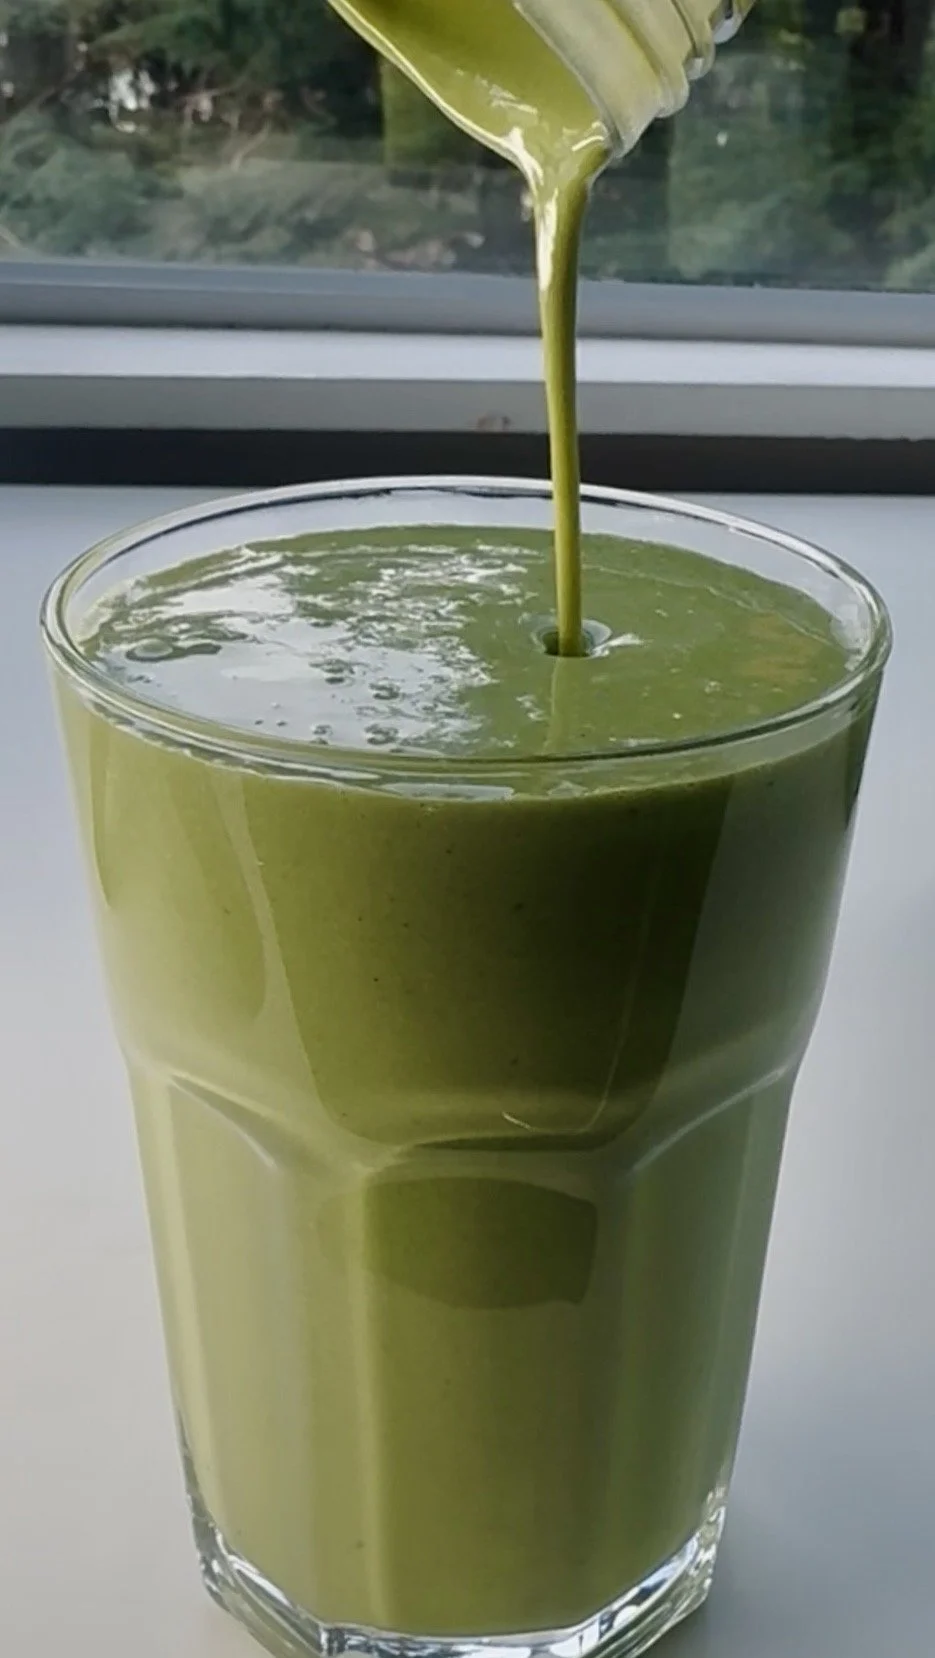
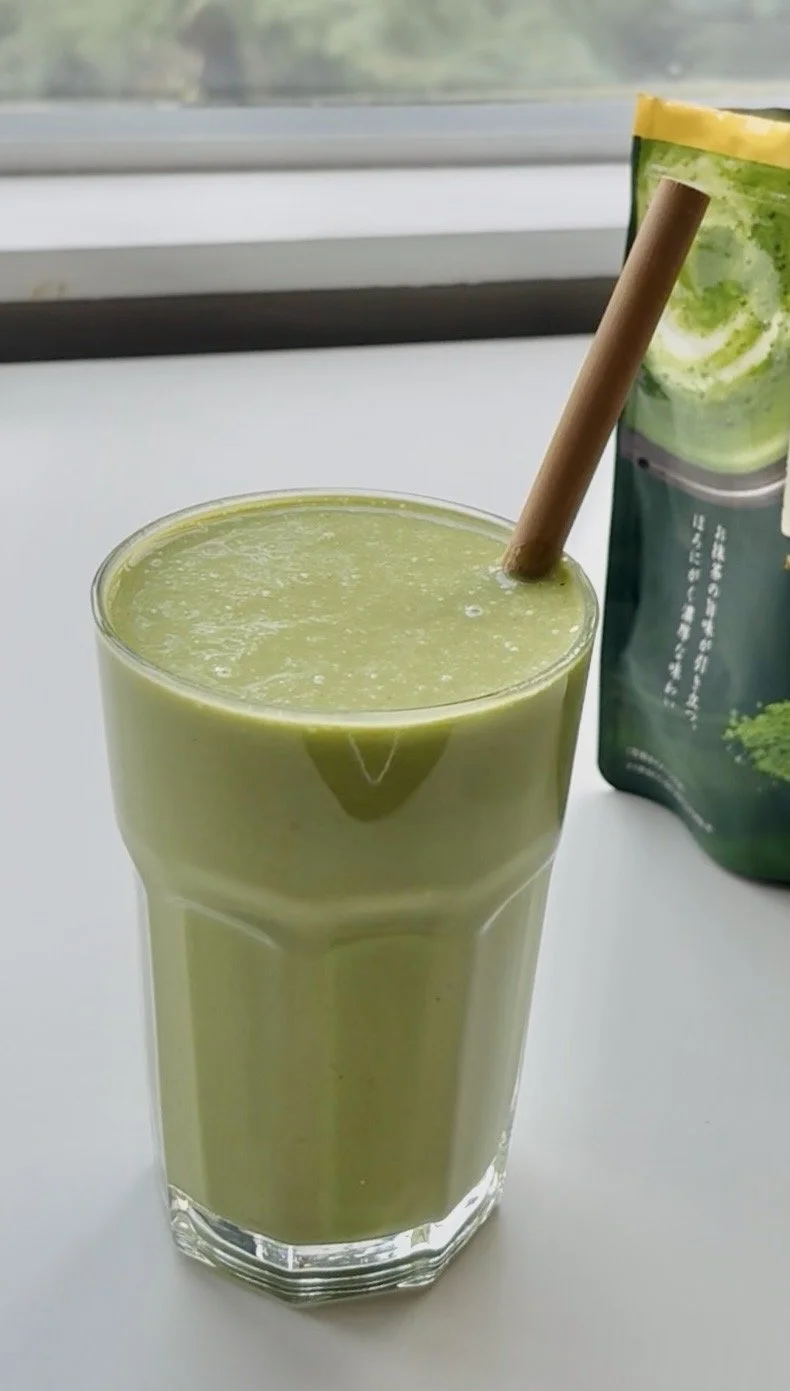
Creamy Matcha Protein Smoothie for Calm, Steady Energy
If you love the idea of matcha but don’t love the jittery, anxious feeling coffee can sometimes bring — this matcha protein smoothie is for you.
What makes matcha different isn’t just the caffeine. It’s the presence of L-theanine, an amino acid that helps promote calm focus and smoother energy.
(If you want the full breakdown of how that works, I explain the science in my blog post on L-theanine for brain health.)
This smoothie pairs matcha with protein, healthy fats, and fiber to support steady energy — not spikes and crashes.
🧠 Why This Matcha Smoothie Works
This recipe is intentionally balanced to support:
Calm, sustained focus
Nervous system regulation
Blood sugar stability
Steady morning energy
Instead of drinking caffeine alone, you’re giving your brain actual fuel.
Ingredient Benefits
Matcha: Contains caffeine and L-theanine. L-theanine helps promote alpha brain waves associated with calm alertness — which is why matcha often feels smoother than coffee.
Protein Powder + Greek Yogurt: Support neurotransmitter production and help prevent mid-morning crashes.
Banana: Provides carbohydrates for brain fuel and natural sweetness.
Spinach: Adds iron, magnesium, and antioxidants for brain and energy support.
Hemp Hearts: Provide healthy fats and omega-3s to support cognitive function.
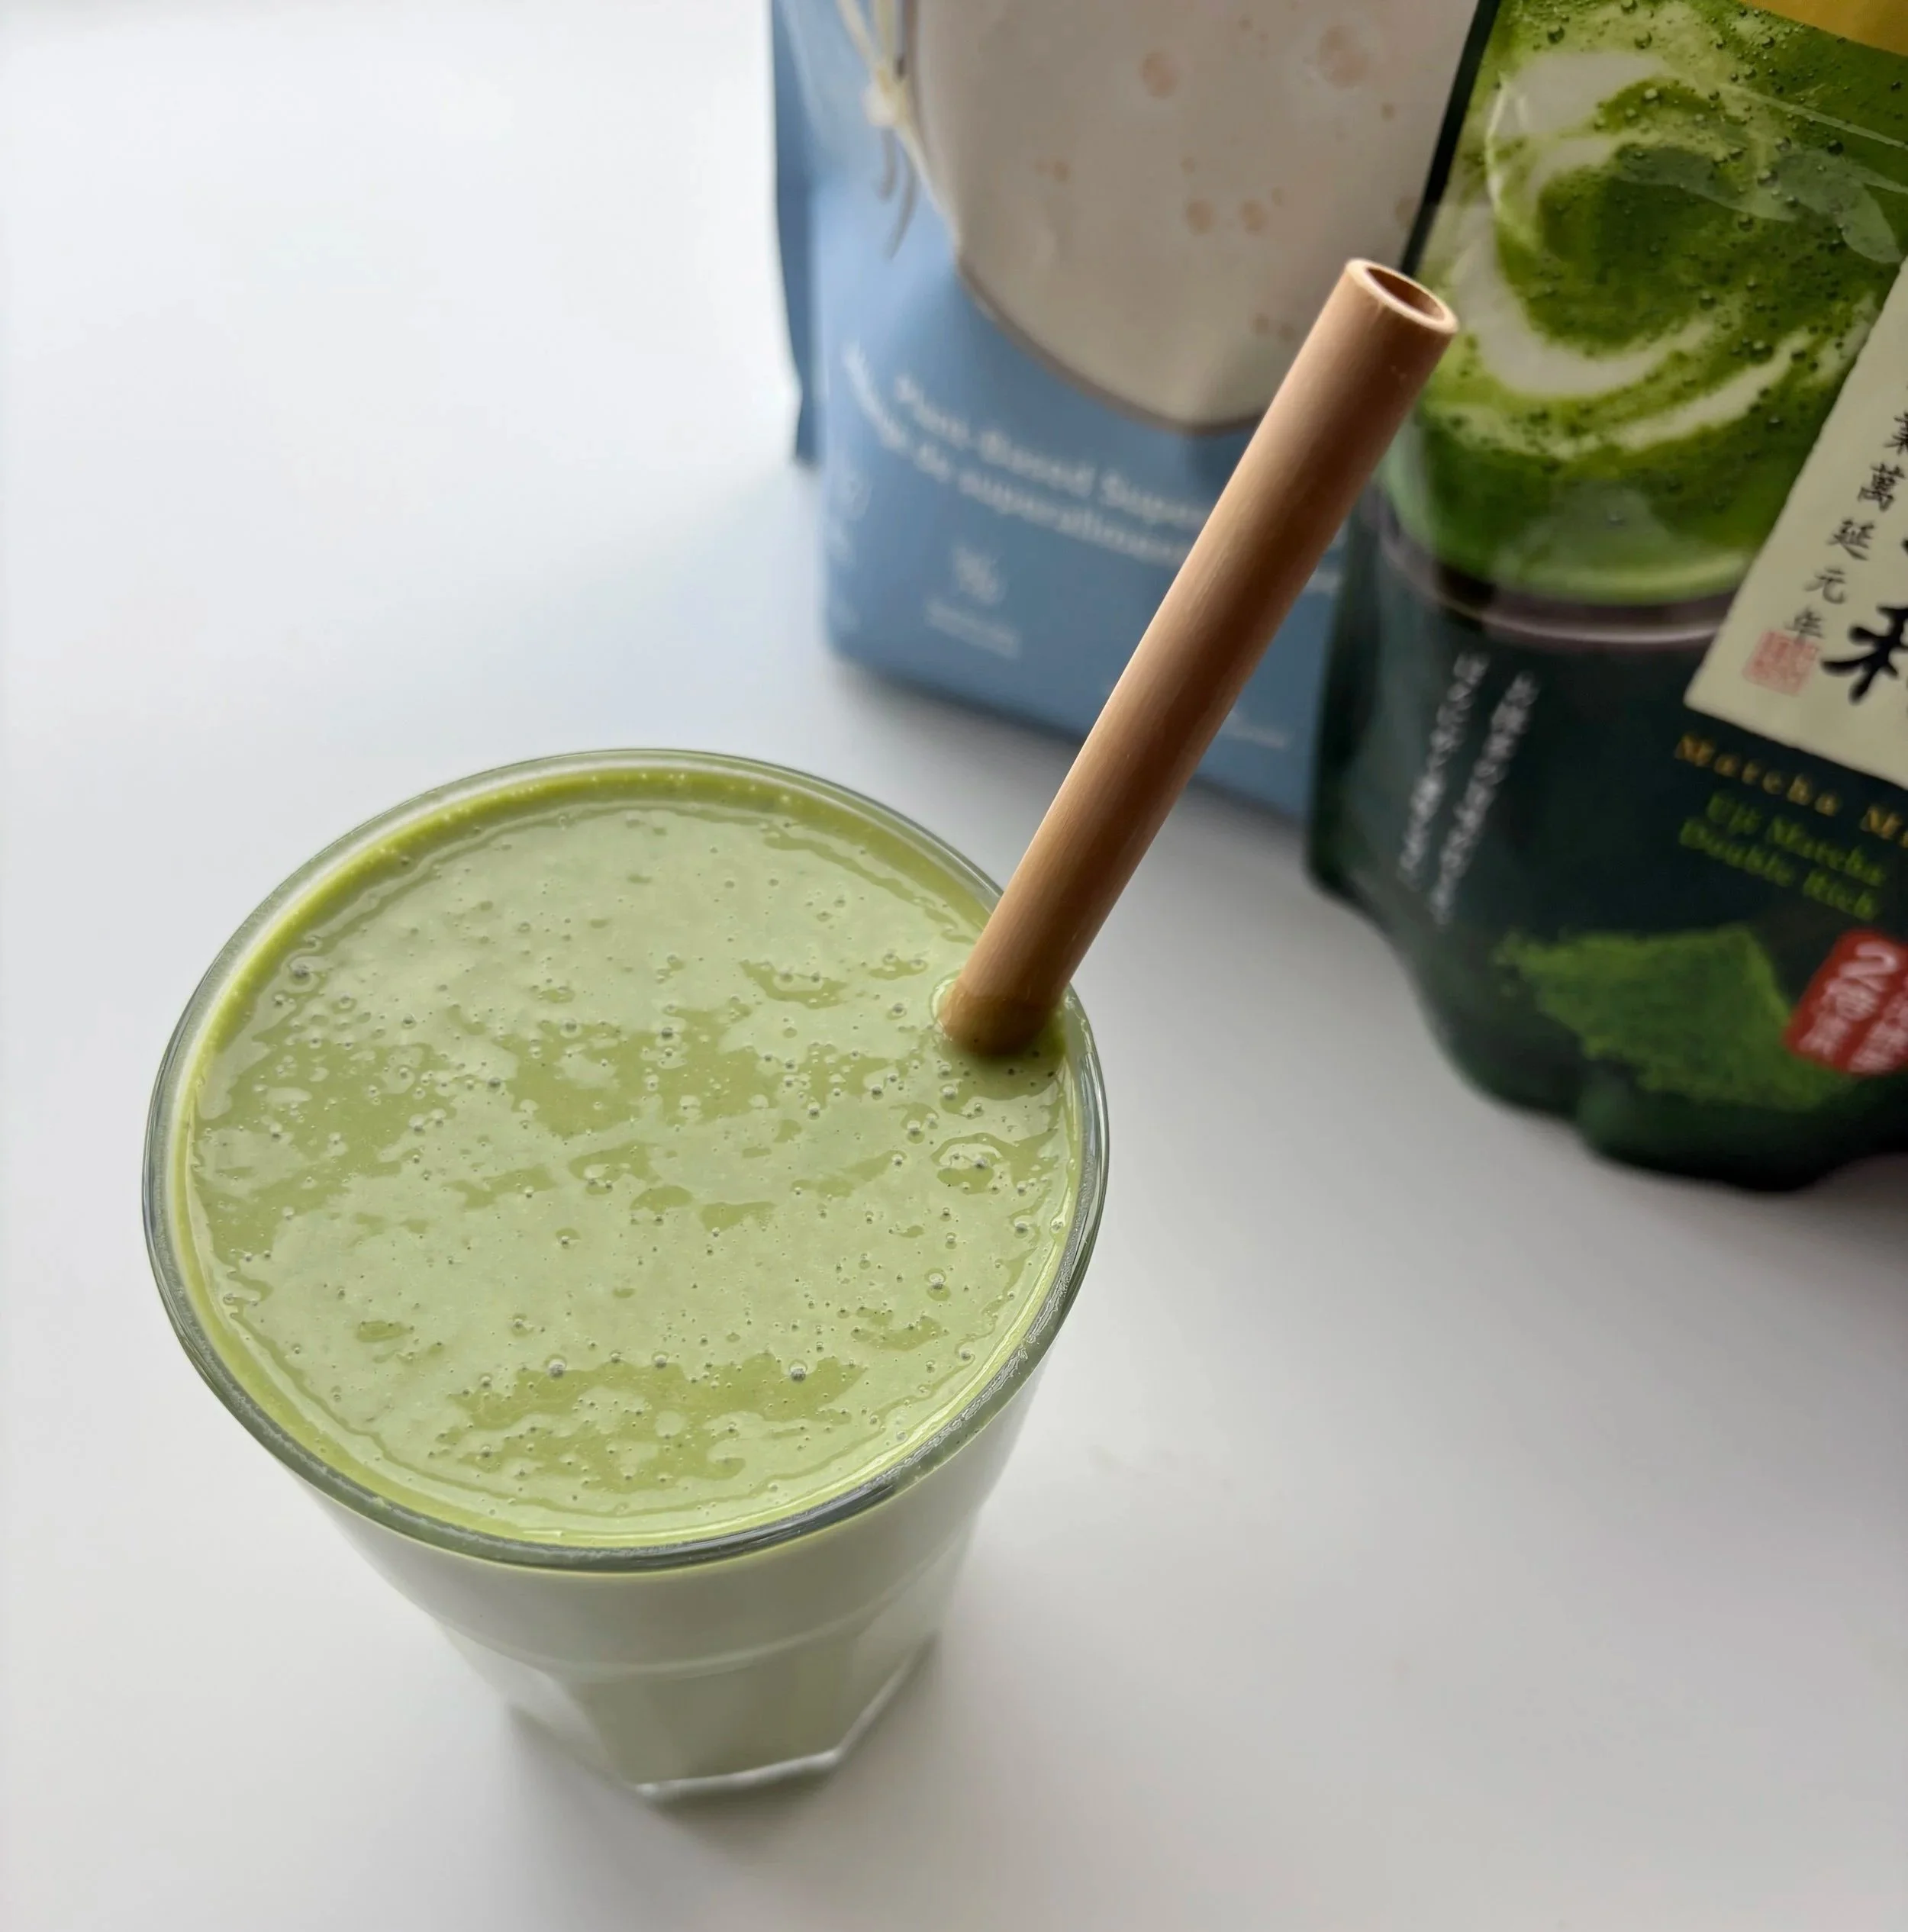
Matcha Protein Smoothie Recipe
Prep Time: 5 minutes | Serves: 1
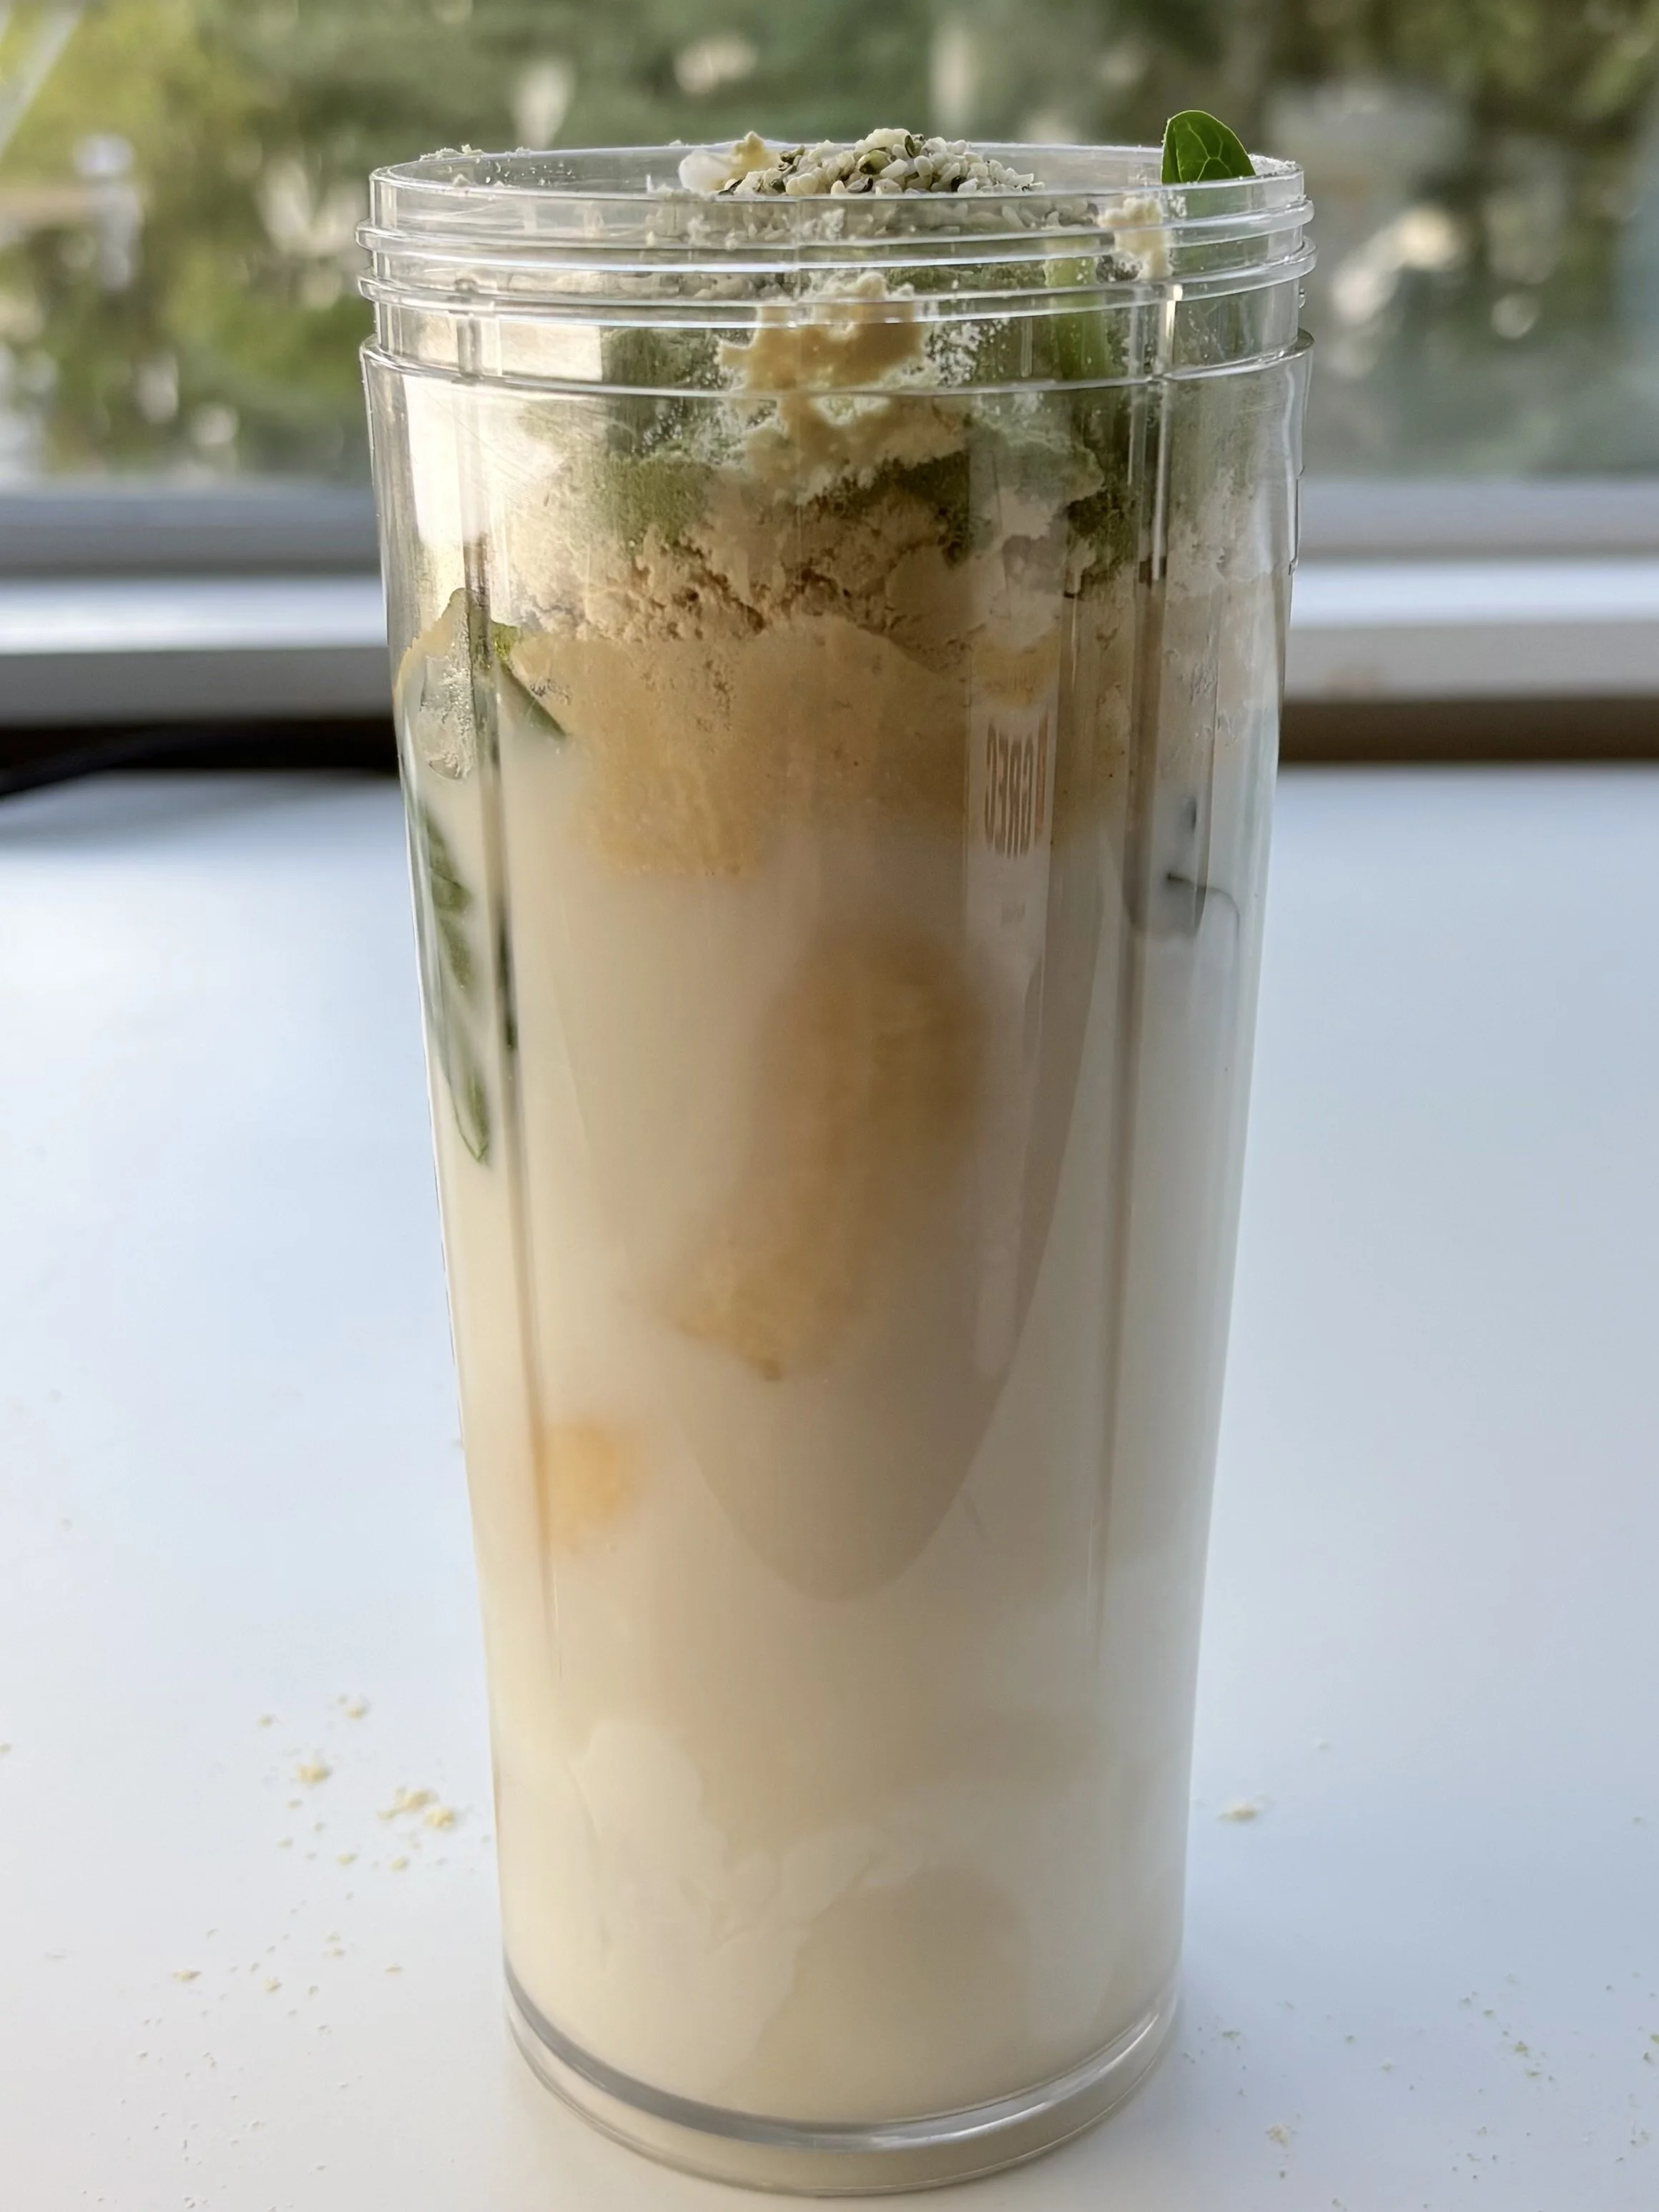
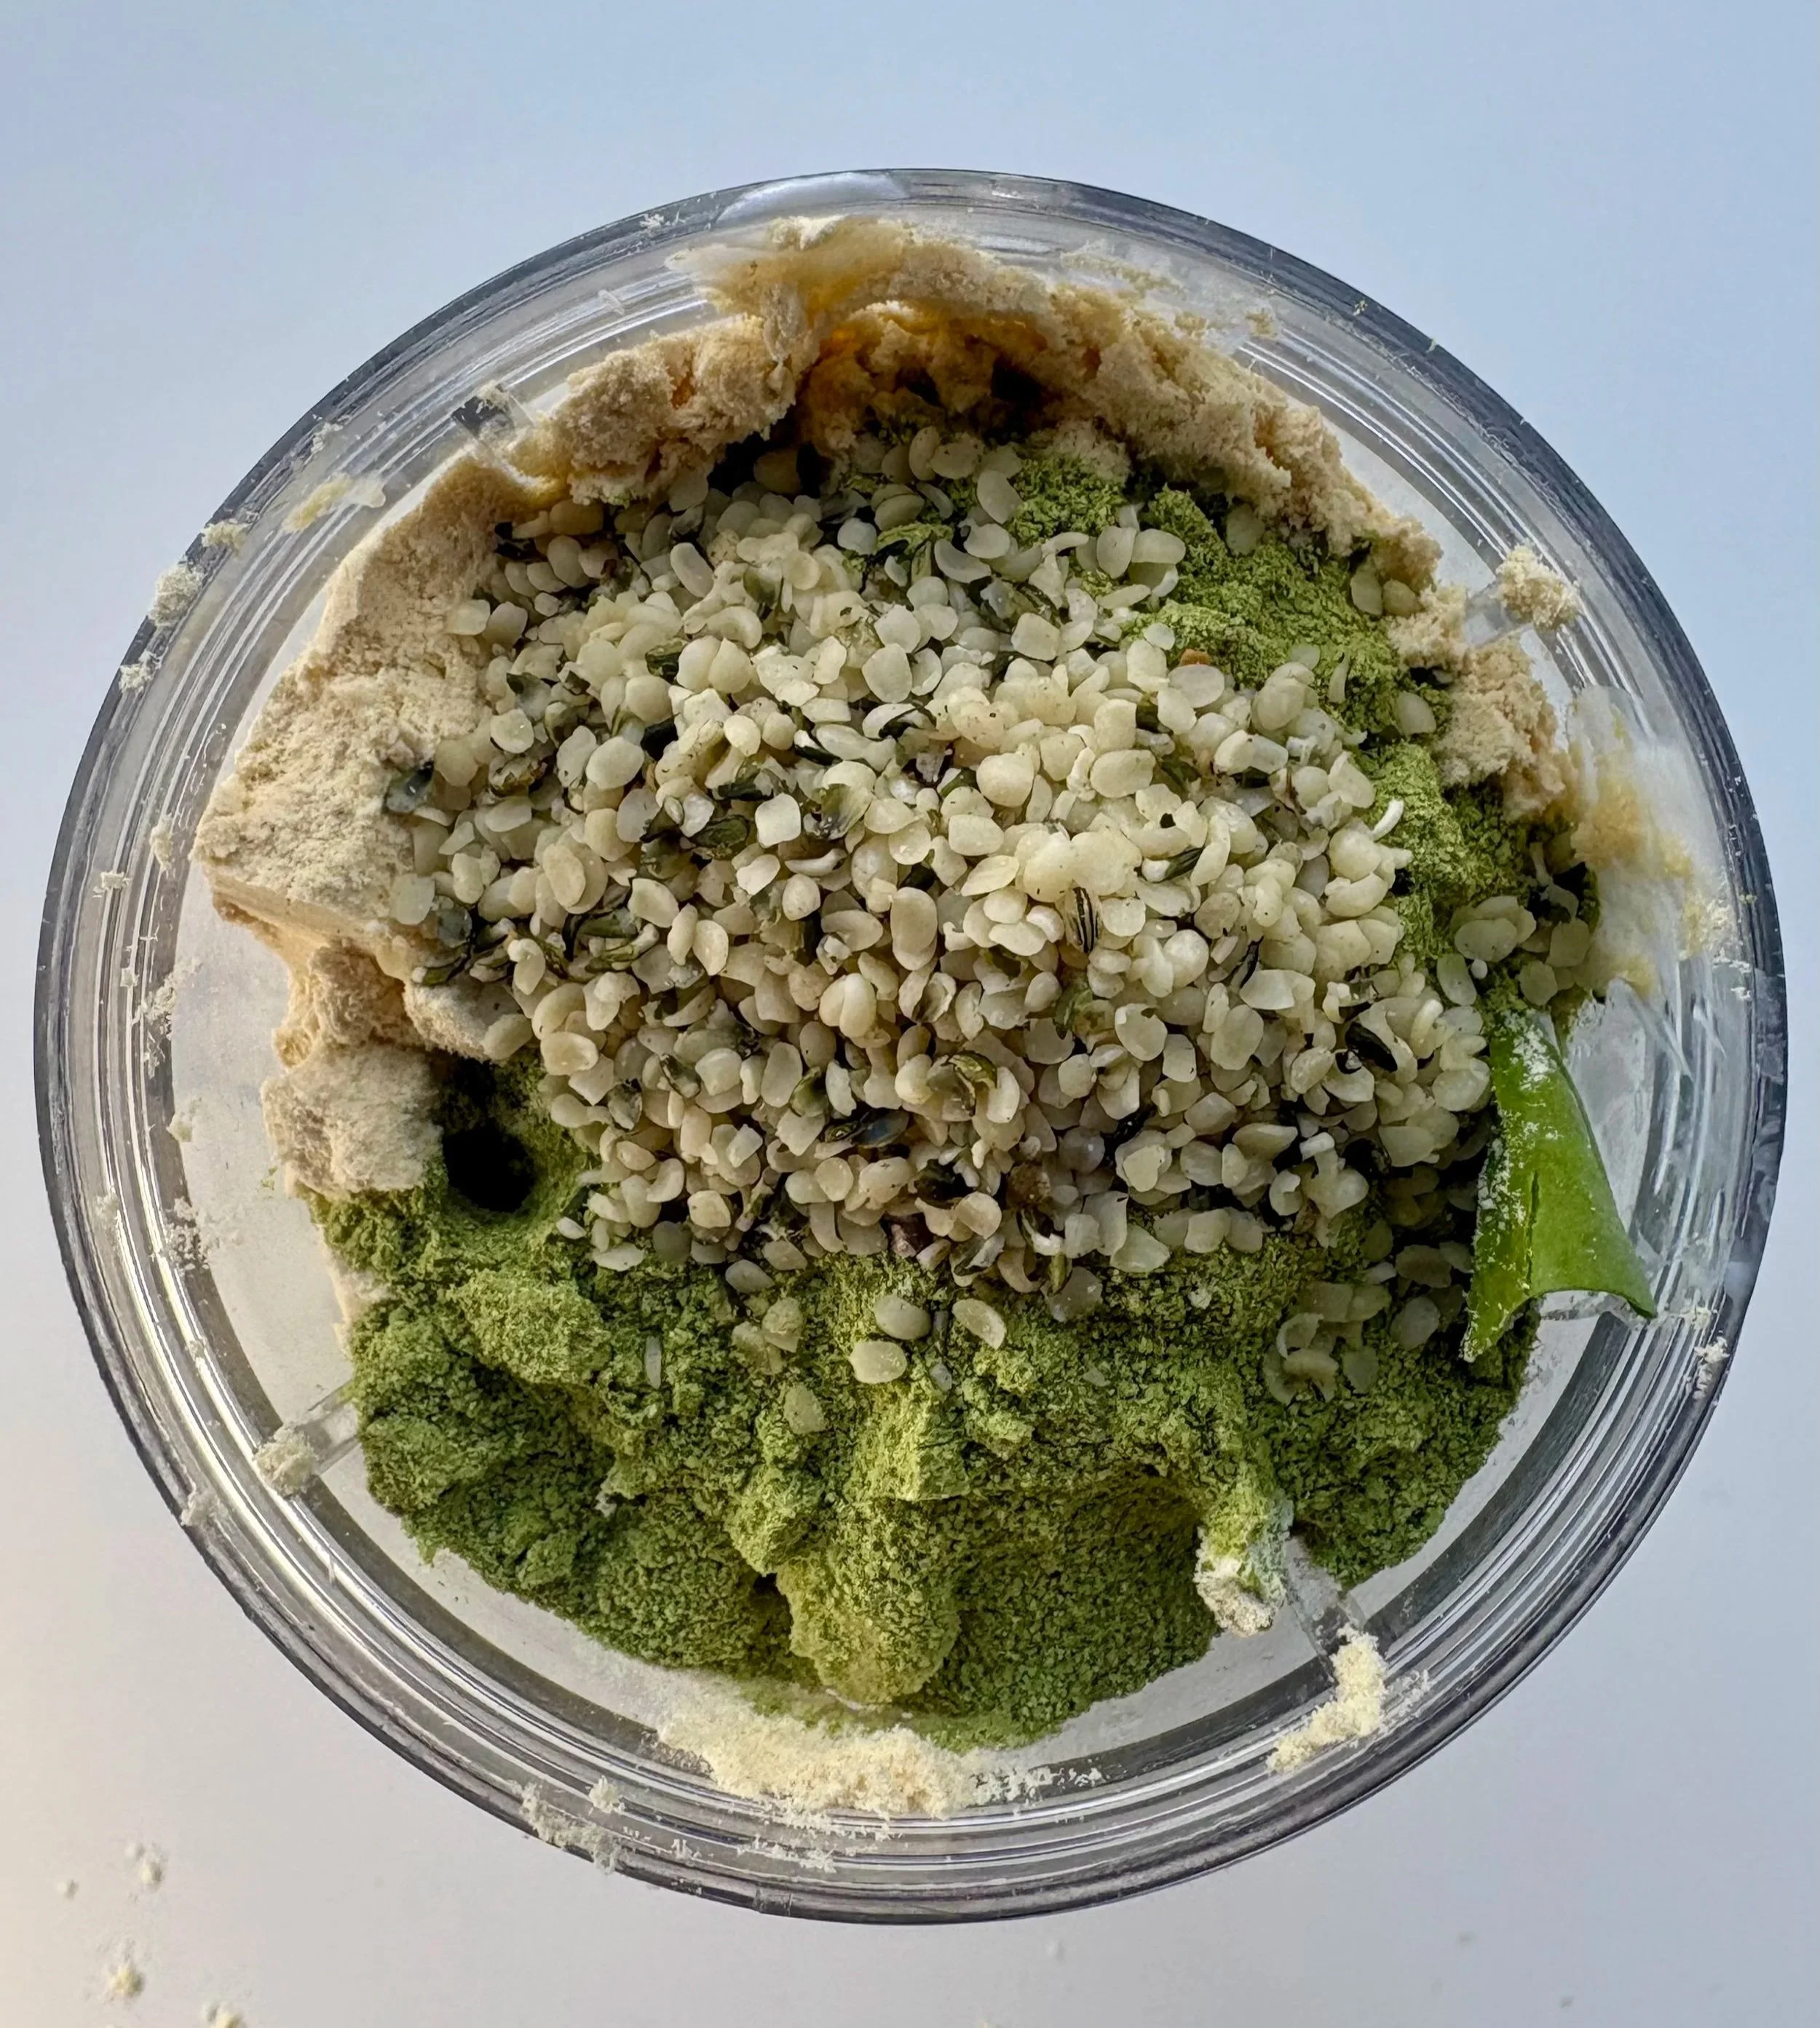
Ingredients
1 cup soy milk (or milk of choice)
¼ cup Greek yogurt
1 frozen banana
1 cup spinach
1 scoop vanilla protein powder
1 tbsp matcha powder
1 tsp hemp hearts
Optional: ice to thicken
Instructions
Add all ingredients to a blender.
Blend until smooth and creamy.
Add ice if you prefer a thicker texture.
Adjust sweetness if needed (I don’t usually add any — the banana is enough).
Serve immediately.
Why Matcha Feels Different Than Coffee
Coffee delivers caffeine quickly and intensely. Matcha delivers caffeine alongside L-theanine, which can help reduce:
Jitters
Racing thoughts
Energy crashes
If you’re curious about how L-theanine works in the brain — and why it may feel supportive for ADHD or anxious brains — you can read my full post here:
👉 L-Theanine for Brain Health: Why Matcha Feels Calmer Than Coffee
Final Thoughts
This smoothie isn’t about replacing coffee forever. It’s about having options that support your nervous system instead of overstimulating it.
Sometimes calm energy is more powerful than fast energy.

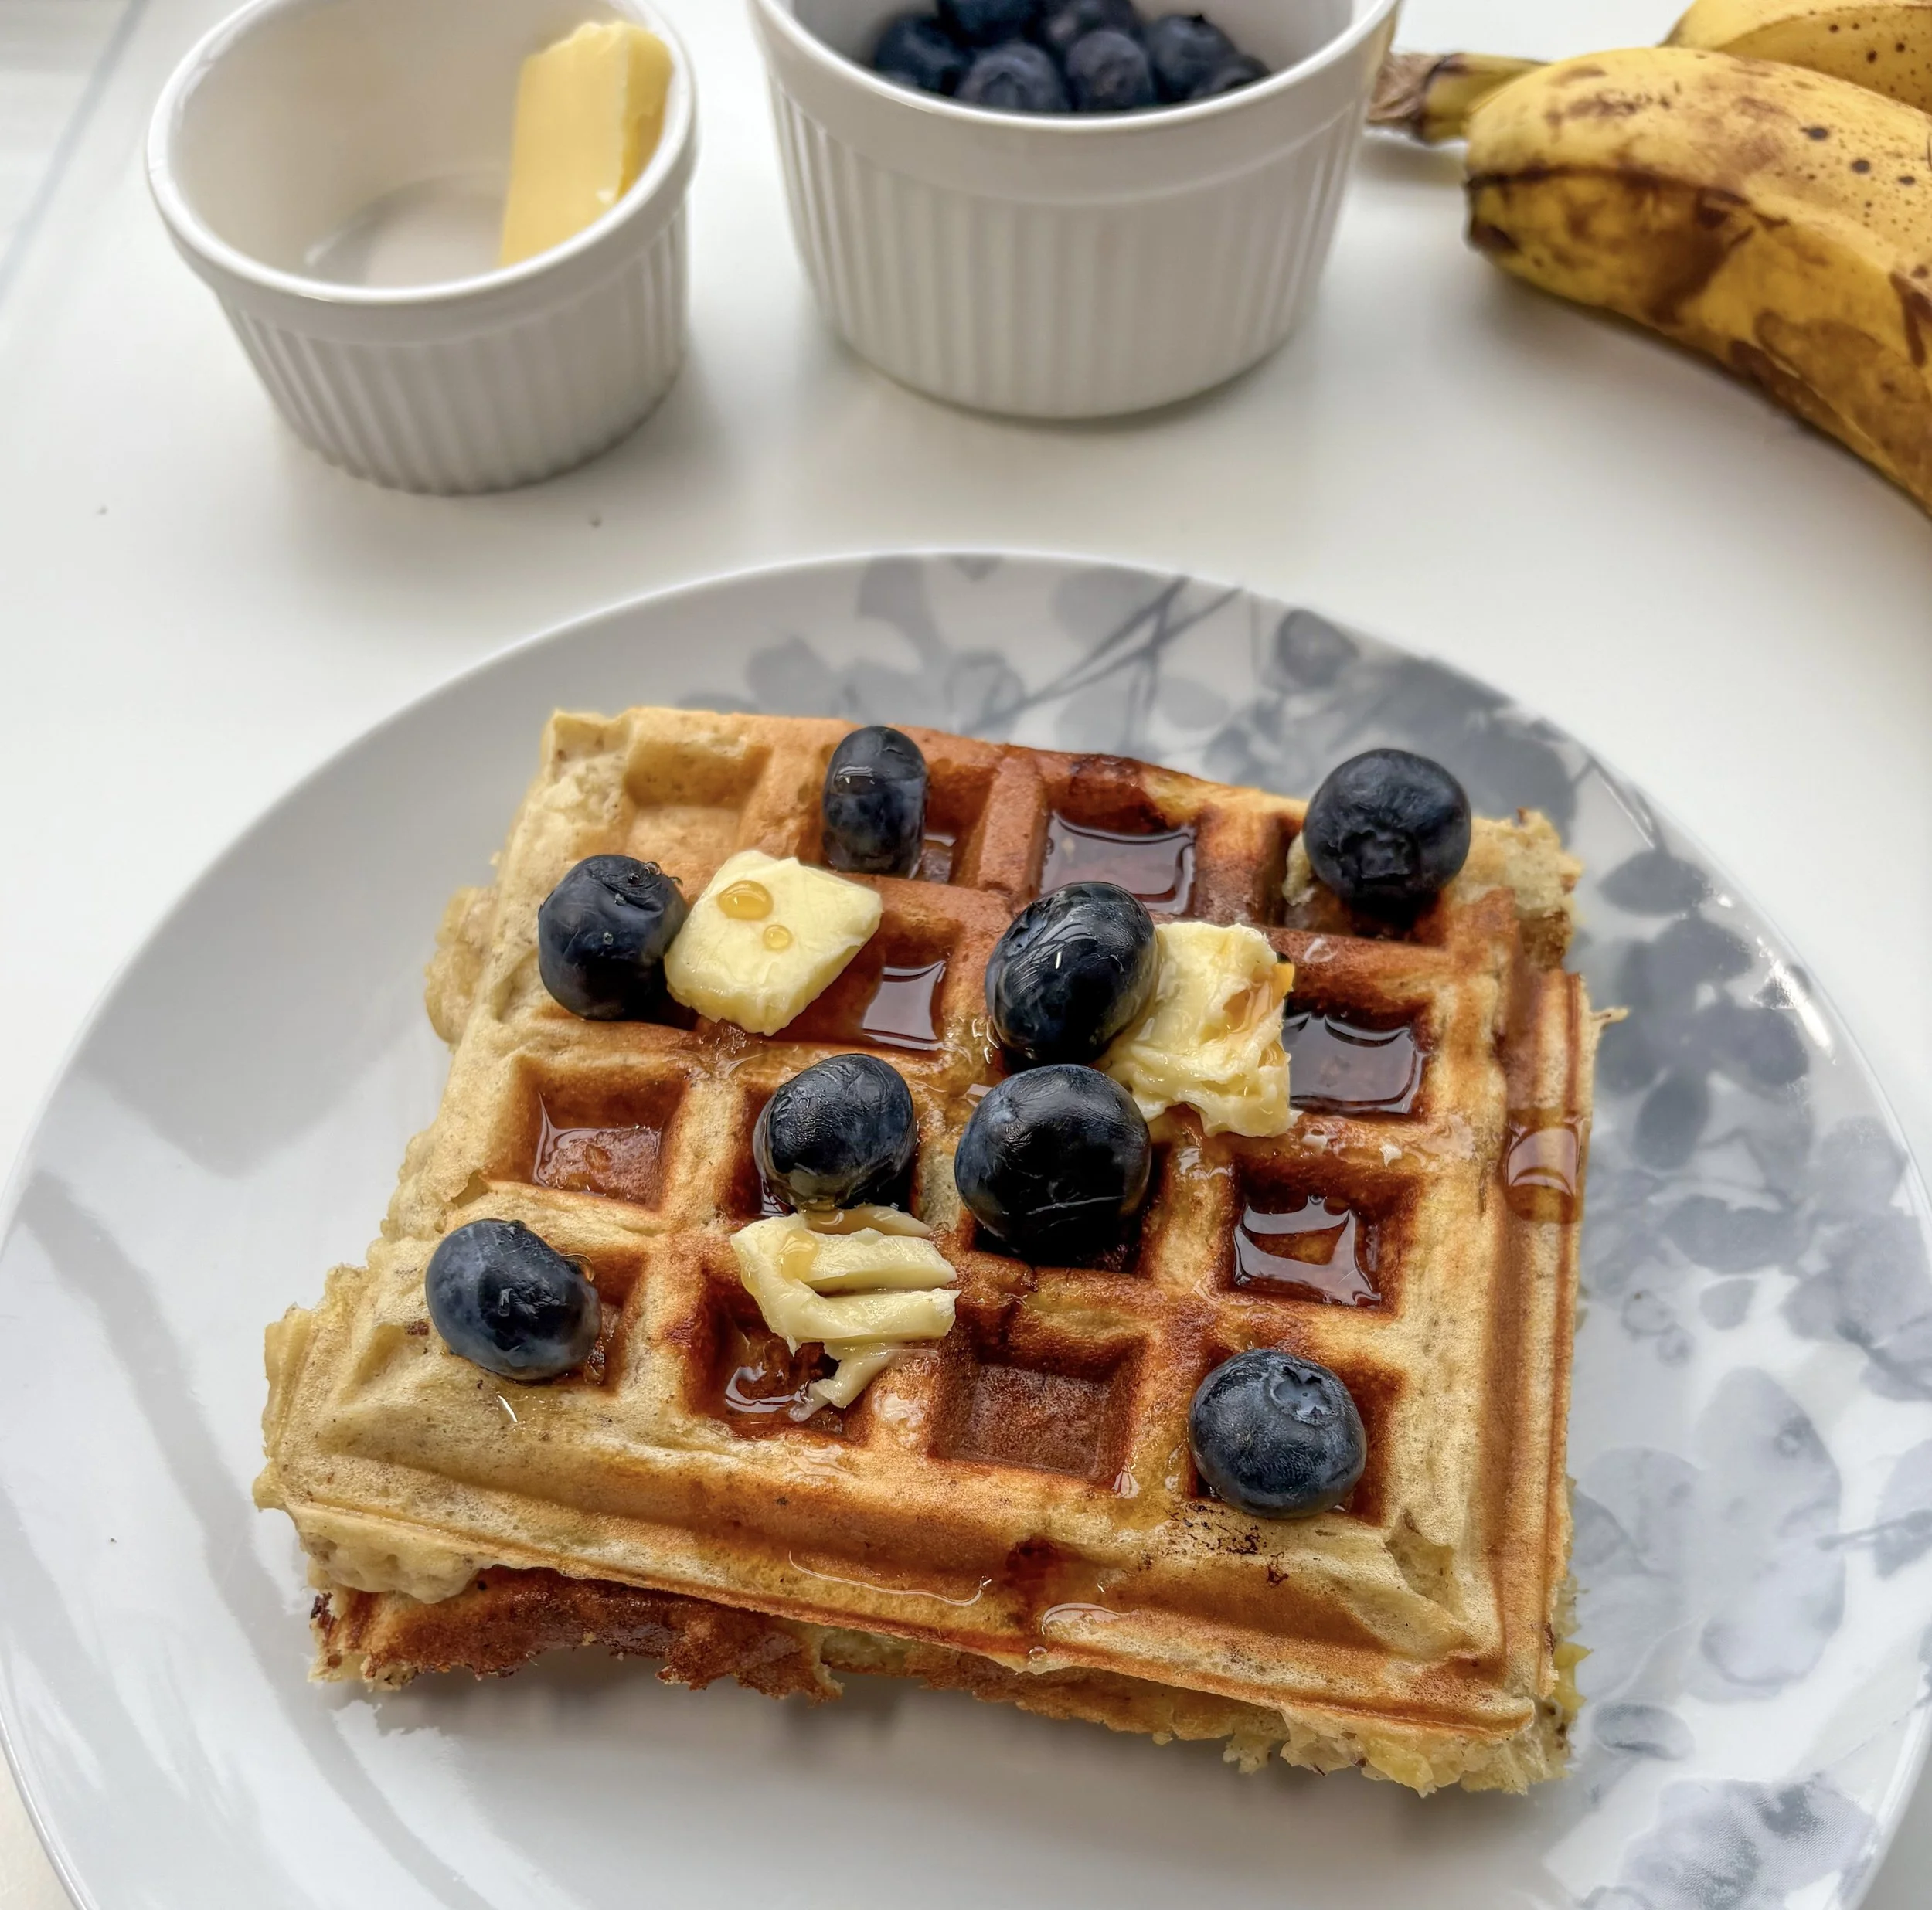
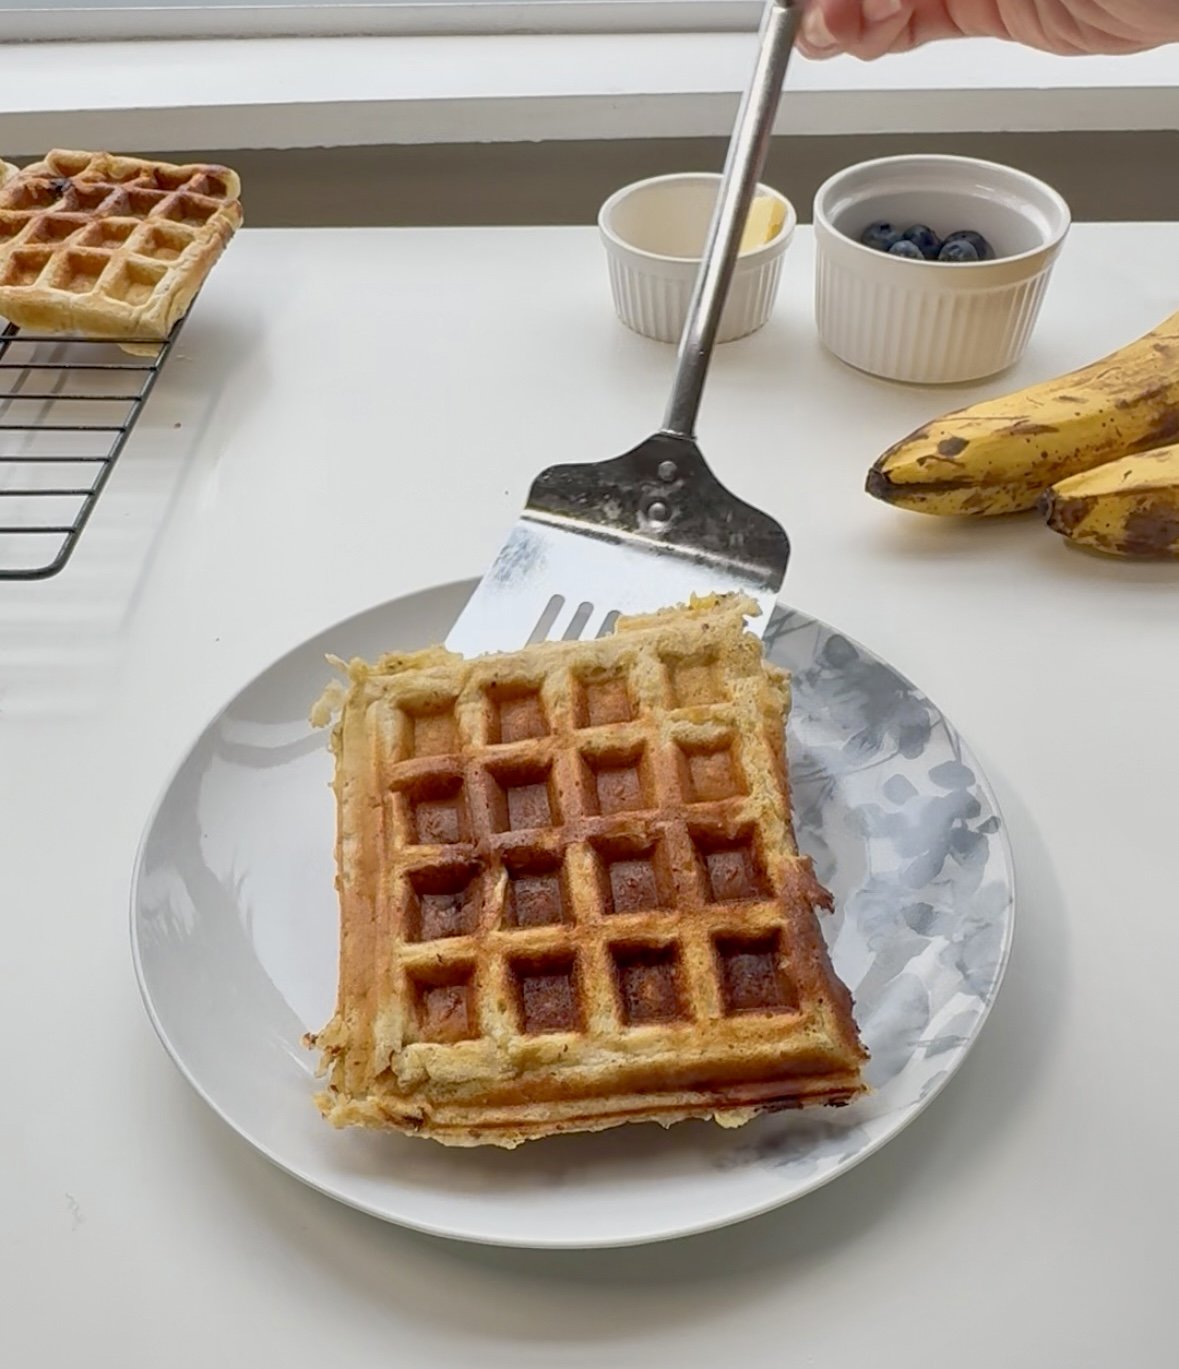
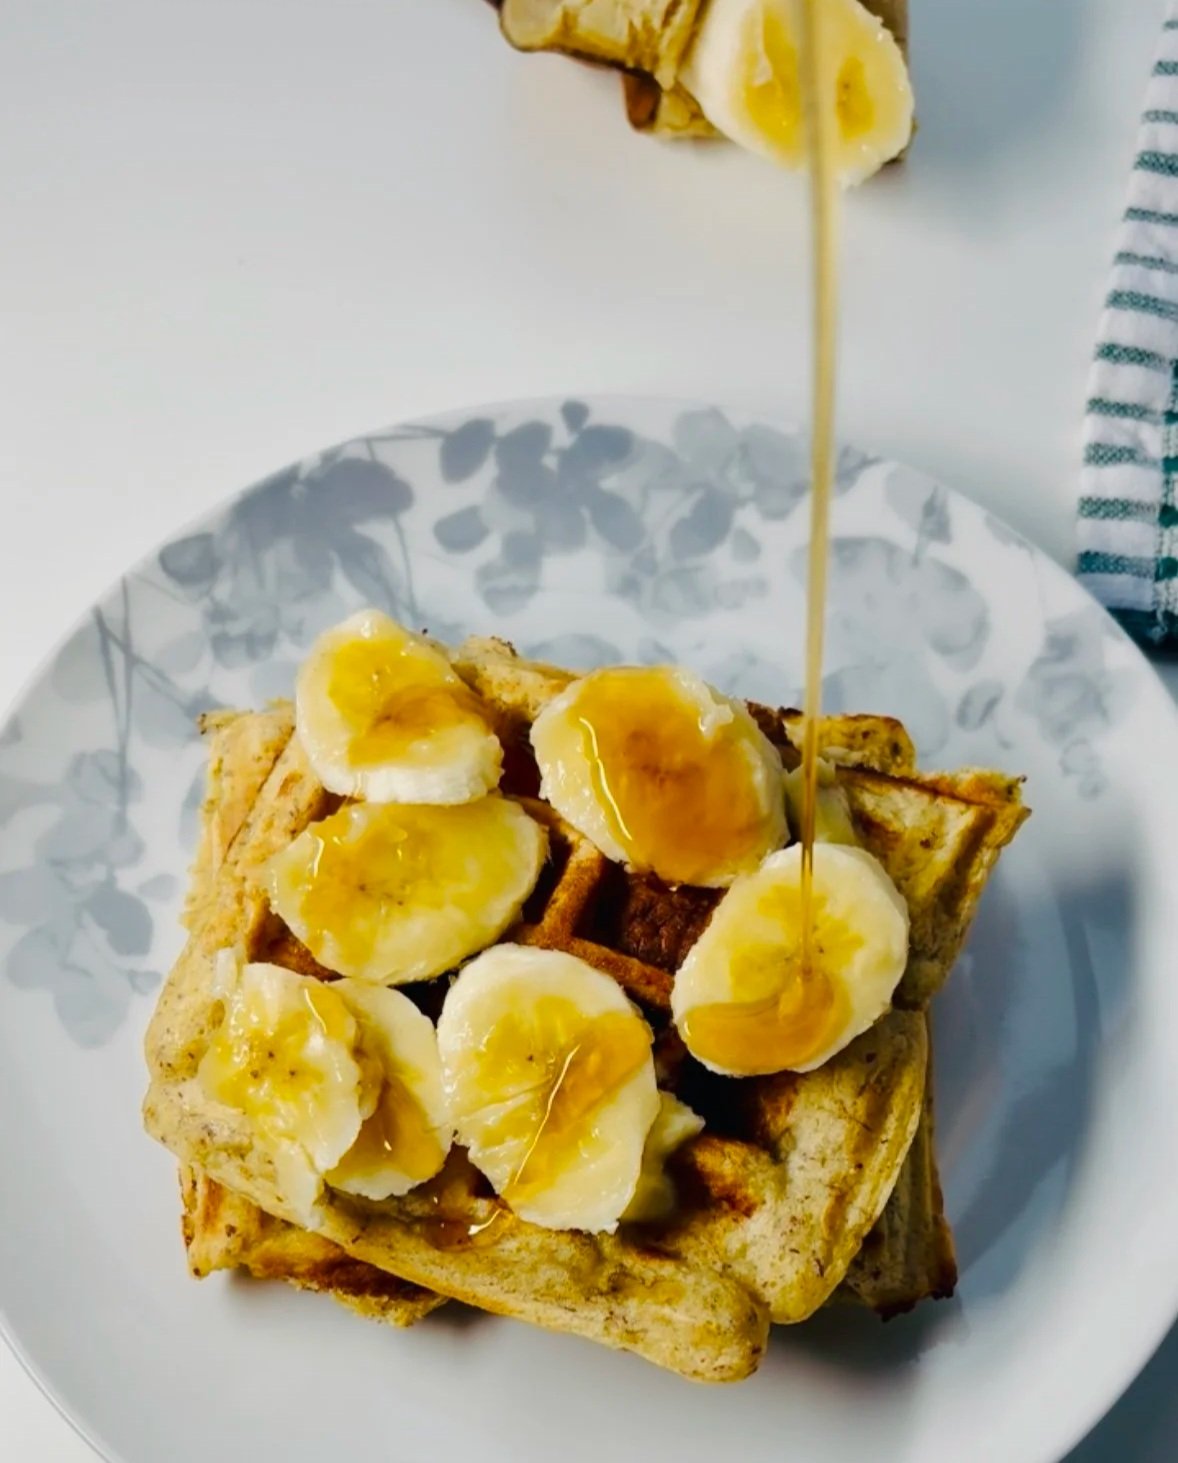
6-Ingredient Protein Waffles (Balanced & Freezer-Friendly)
These 6-ingredient protein waffles are one of my favorite go-to breakfasts when I want something warm, comforting, and genuinely filling.
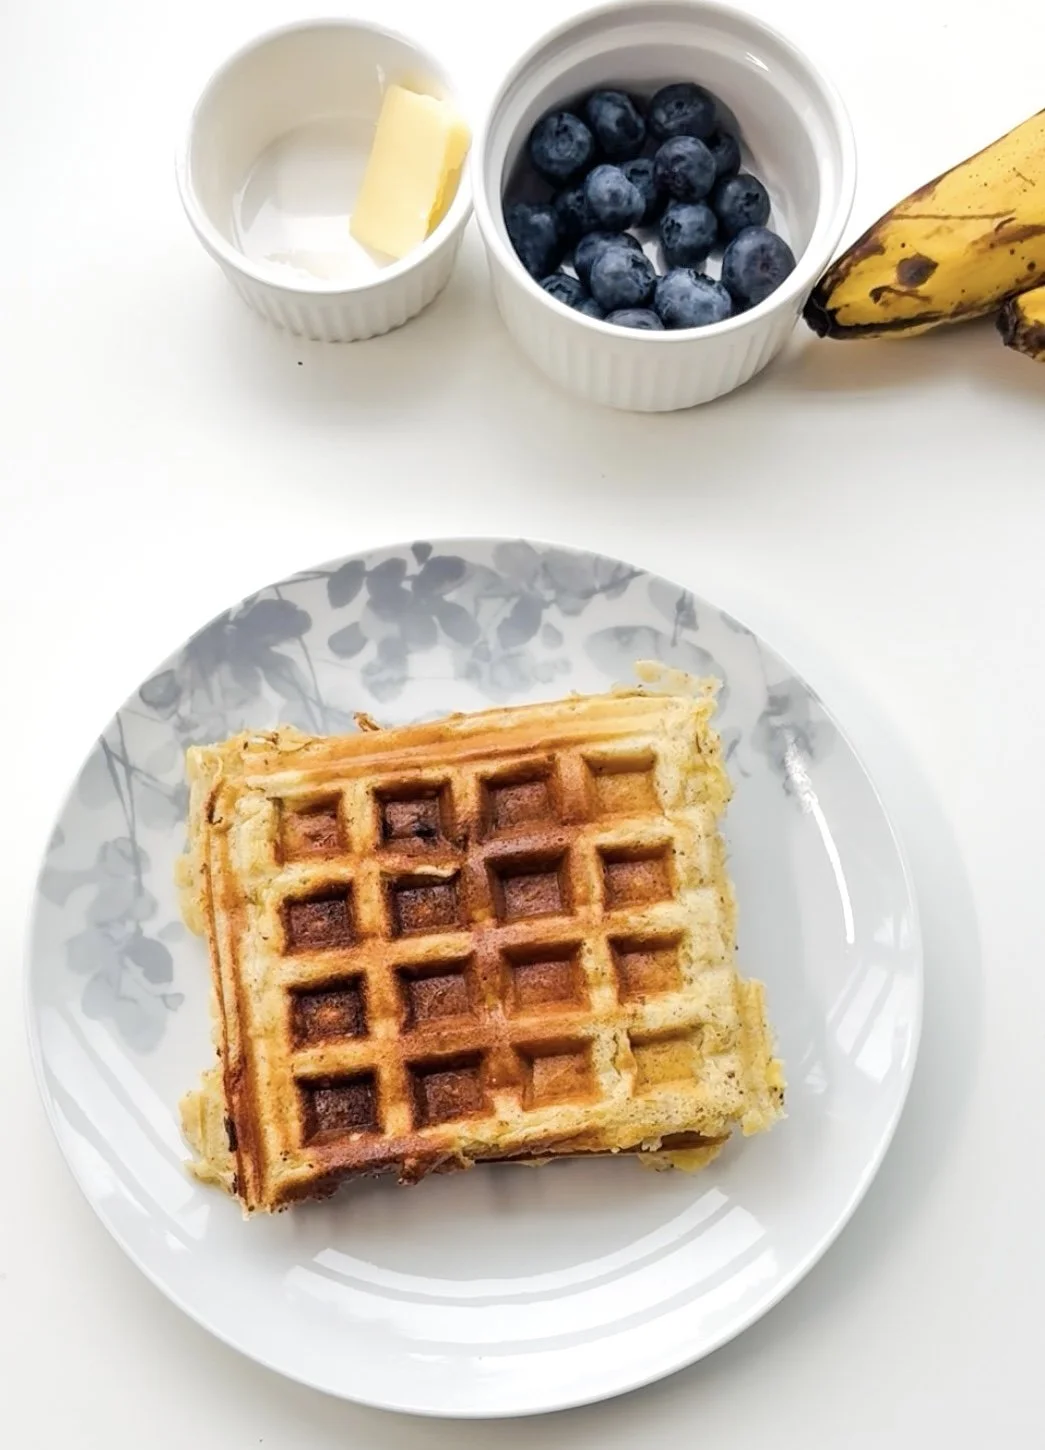
They’re naturally sweetened with banana, packed with protein, and easy to customize based on dietary needs. Whether you’re fueling busy mornings, supporting focus, or just trying to make breakfast easier, these waffles are a great staple.
As a holistic nutritionist, I always look for meals that support steady energy, blood sugar balance, and brain health — and these check all the boxes.
Why You’ll Love These Protein Waffles
High-protein & filling (no mid-morning crash)
Naturally sweetened with overripe bananas
Freezer-friendly for easy meal prep
Customizable (gluten-free, whole grain, dairy-free swaps)
Balanced with protein, carbs, and healthy fats
How to Customize
This recipe is easy to adapt based on dietary needs or digestion:
Dairy-free: Use a plain, unsweetened dairy-free yogurt and a plant-based protein powder.
Gluten-free: Use a 1:1 gluten-free flour blend and ensure your protein powder is certified gluten-free.
Vegan: Replace eggs with 2 flax eggs (2 tbsp ground flax + 5 tbsp water), use plant-based yogurt, plant milk, and vegan protein powder.
Gut-friendly: Add ground flax, choose spelt or a gentle gluten-free flour if tolerated, and pair waffles with protein-rich toppings like yogurt or nut butter instead of refined syrups.
Small swaps help make these waffles more filling, easier to digest, and supportive of steady energy and focus.

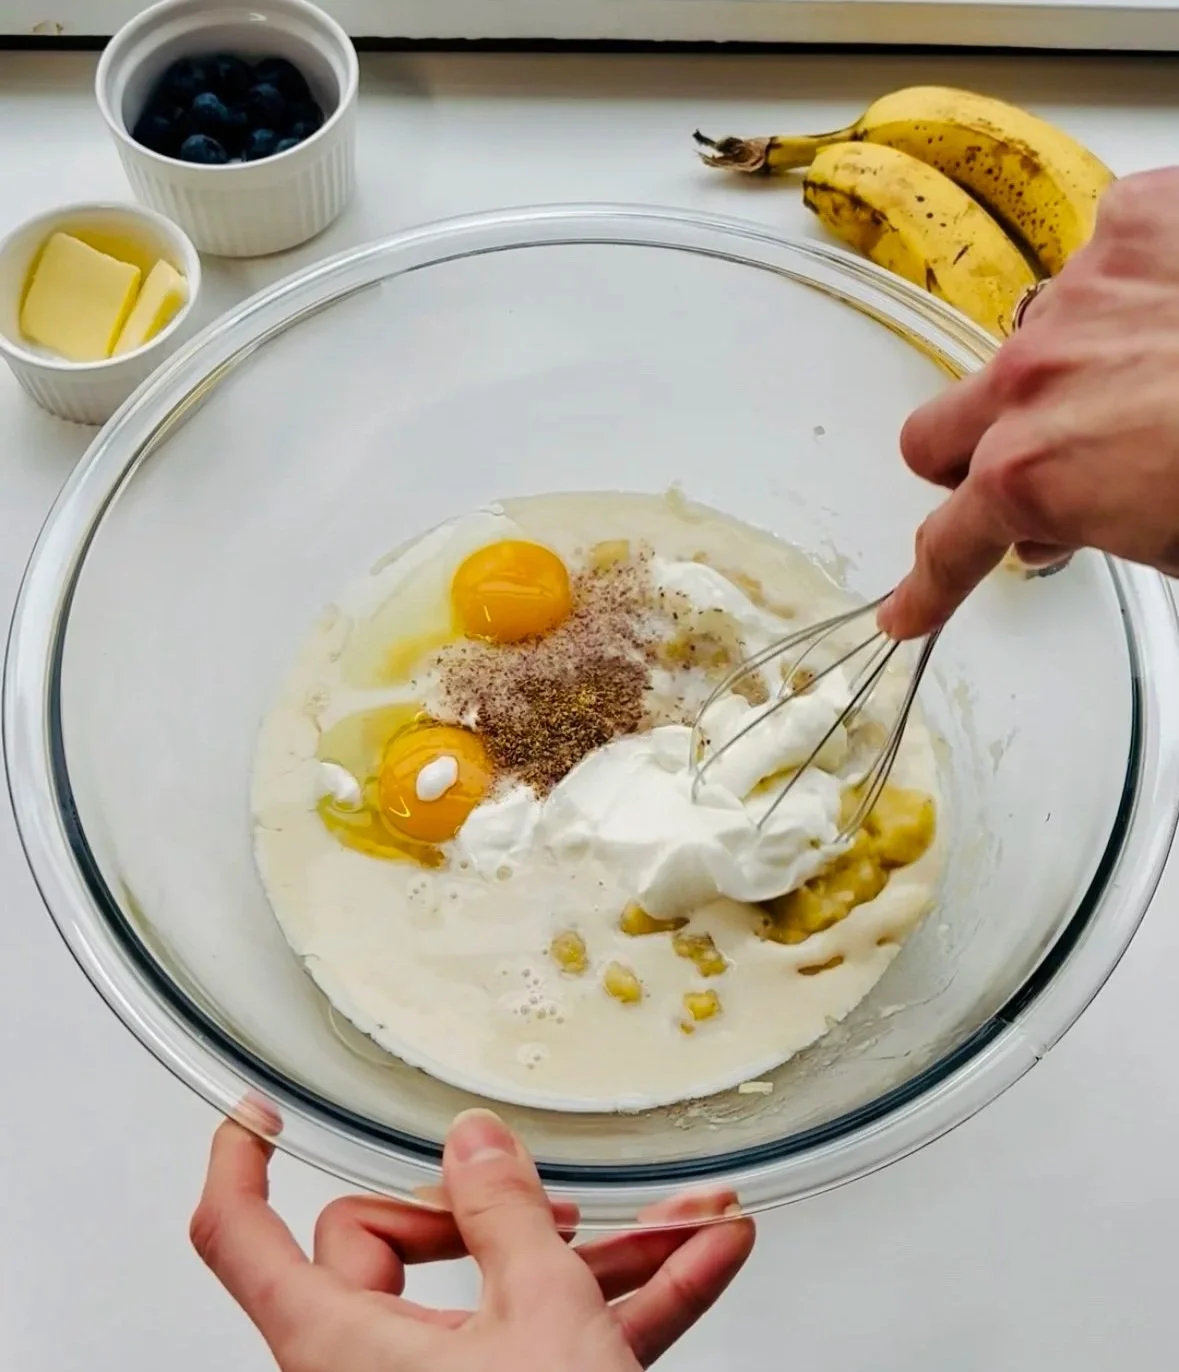
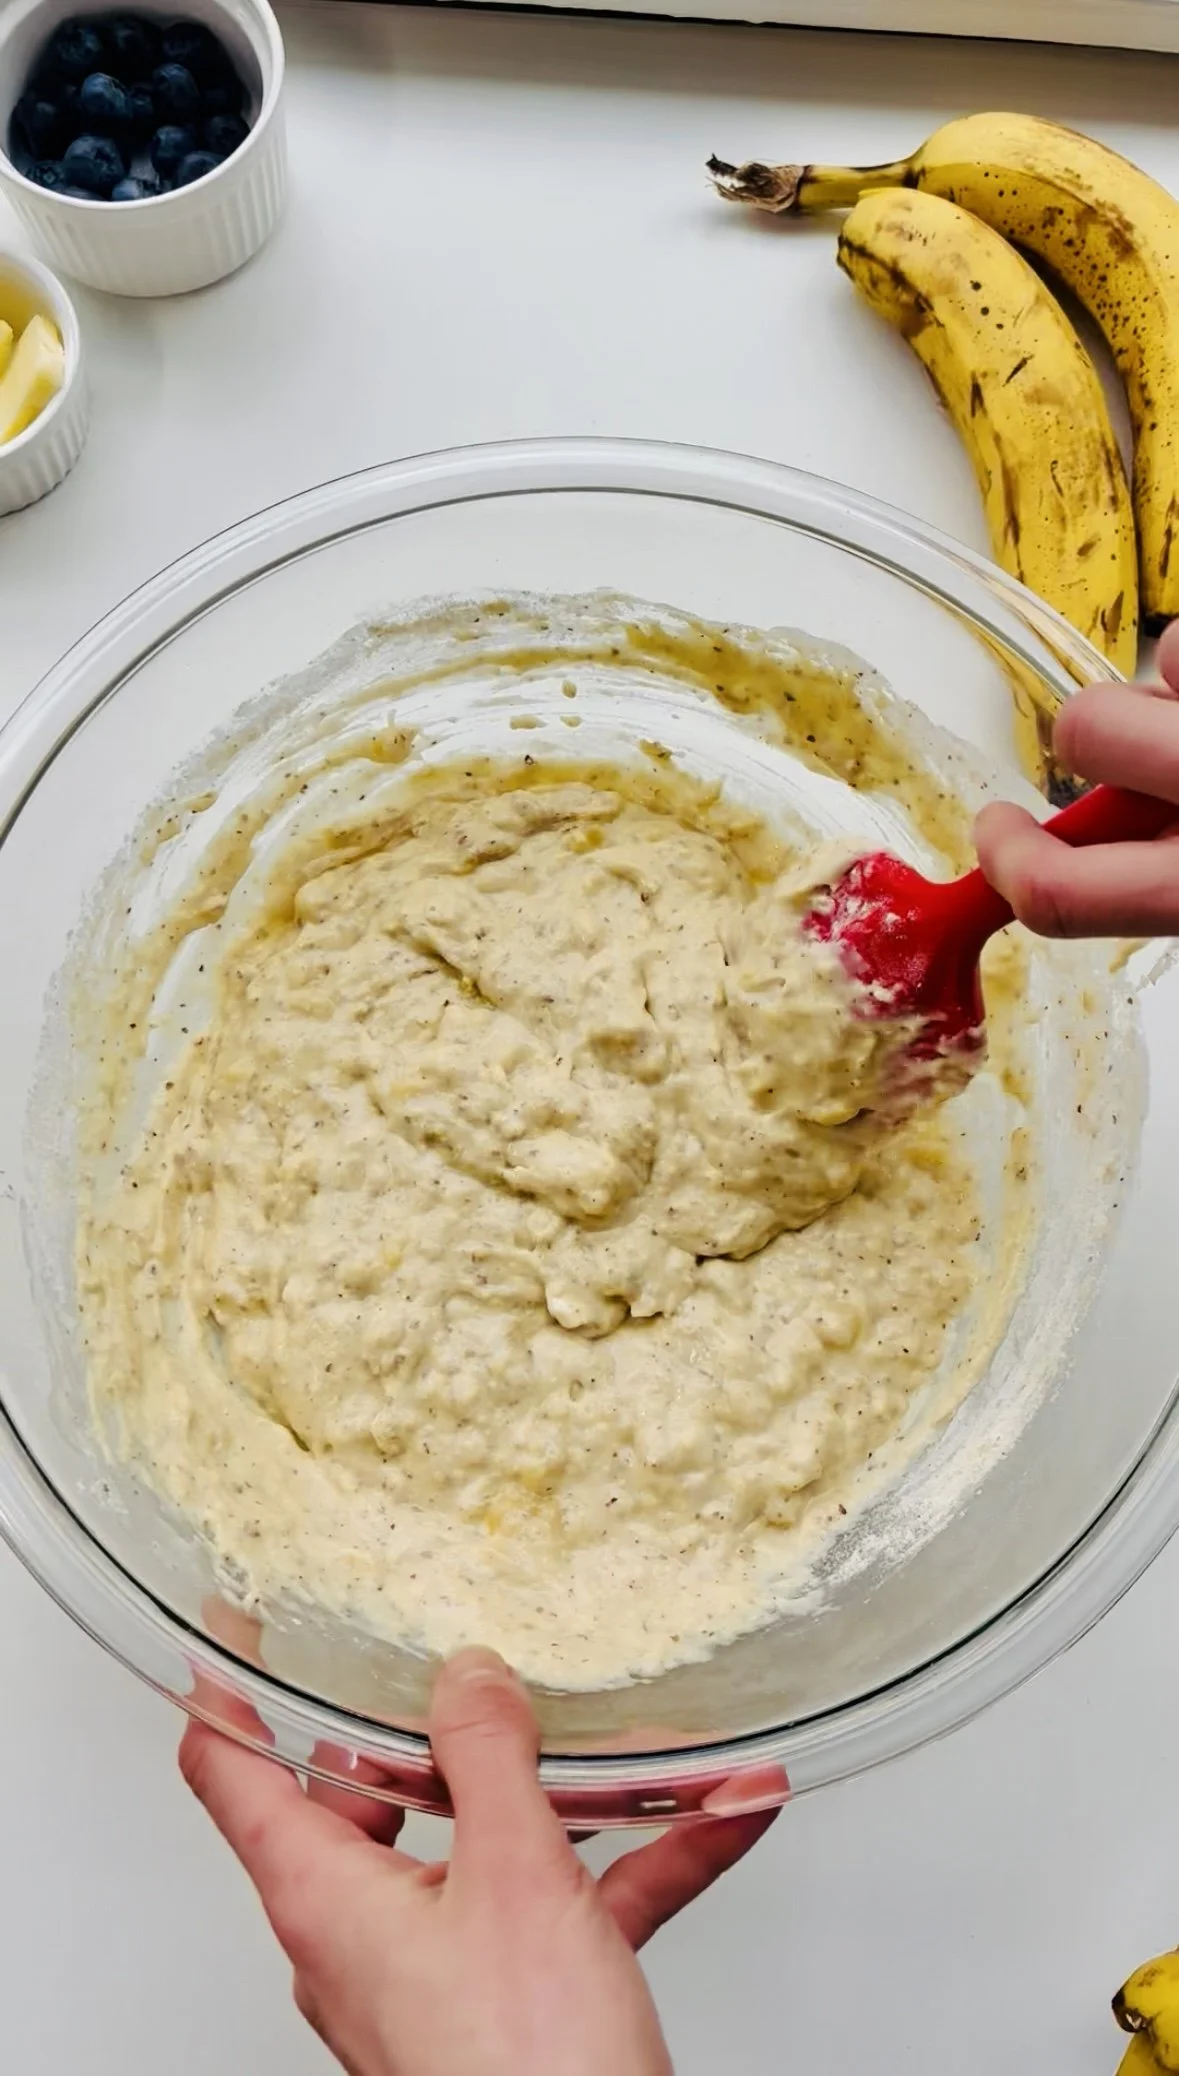
Banana Protein Waffles Recipe
Prep Time: 10 min | Cook Time: 10-15 min | Servings: ~8
Ingredients
3 overripe bananas, mashed
2 eggs
½ cup Greek yogurt
½ cup soy milk
1 tsp baking powder
1 scoop vanilla protein powder
1½ cups flour
I use a gluten-free blend
Use spelt or whole wheat flour for more nutrition
Optional Add-Ins
1 tsp ground flax
1 tsp cinnamon
1 tsp vanilla extract
Instructions
In a large bowl, mash the bananas until smooth.
Whisk in eggs, Greek yogurt, soy milk, and vanilla (if using).
Add baking powder and protein powder and mix well.
Stir in flour, flax, and cinnamon until just combined.
Preheat your waffle iron and lightly grease if needed.
Cook according to your waffle maker instructions until golden.
Serving Ideas
Greek yogurt + berries
Nut butter + sliced banana
Cottage cheese + cinnamon
Yogurt + fruit + seeds for a protein boost
Storage & Meal Prep Tips
Store waffles in the fridge for up to 4 days
Freeze in a single layer, then transfer to a freezer bag
Reheat in a toaster or oven for quick breakfasts
Nutrition Notes
Protein from eggs, Greek yogurt, and protein powder supports satiety and focus
Bananas provide natural carbs for brain fuel
Ground flax adds fiber and omega-3s for blood sugar and brain health
Whole grain or spelt flour adds extra fiber and micronutrients
This combination helps prevent the “eat breakfast → crash an hour later” cycle.
More Balanced Breakfast Recipes You’ll Love
If you like these waffles, try:
High-Protein Cucumber Greek Yogurt Dip (savory option)
All designed to support steady energy and brain health.
Final Thoughts
These 6-ingredient protein waffles prove that breakfast doesn’t need to be complicated to be nourishing. They’re simple, flexible, and supportive — especially on days when decision-making feels hard.
If you make them, let me know how you customize yours 💛
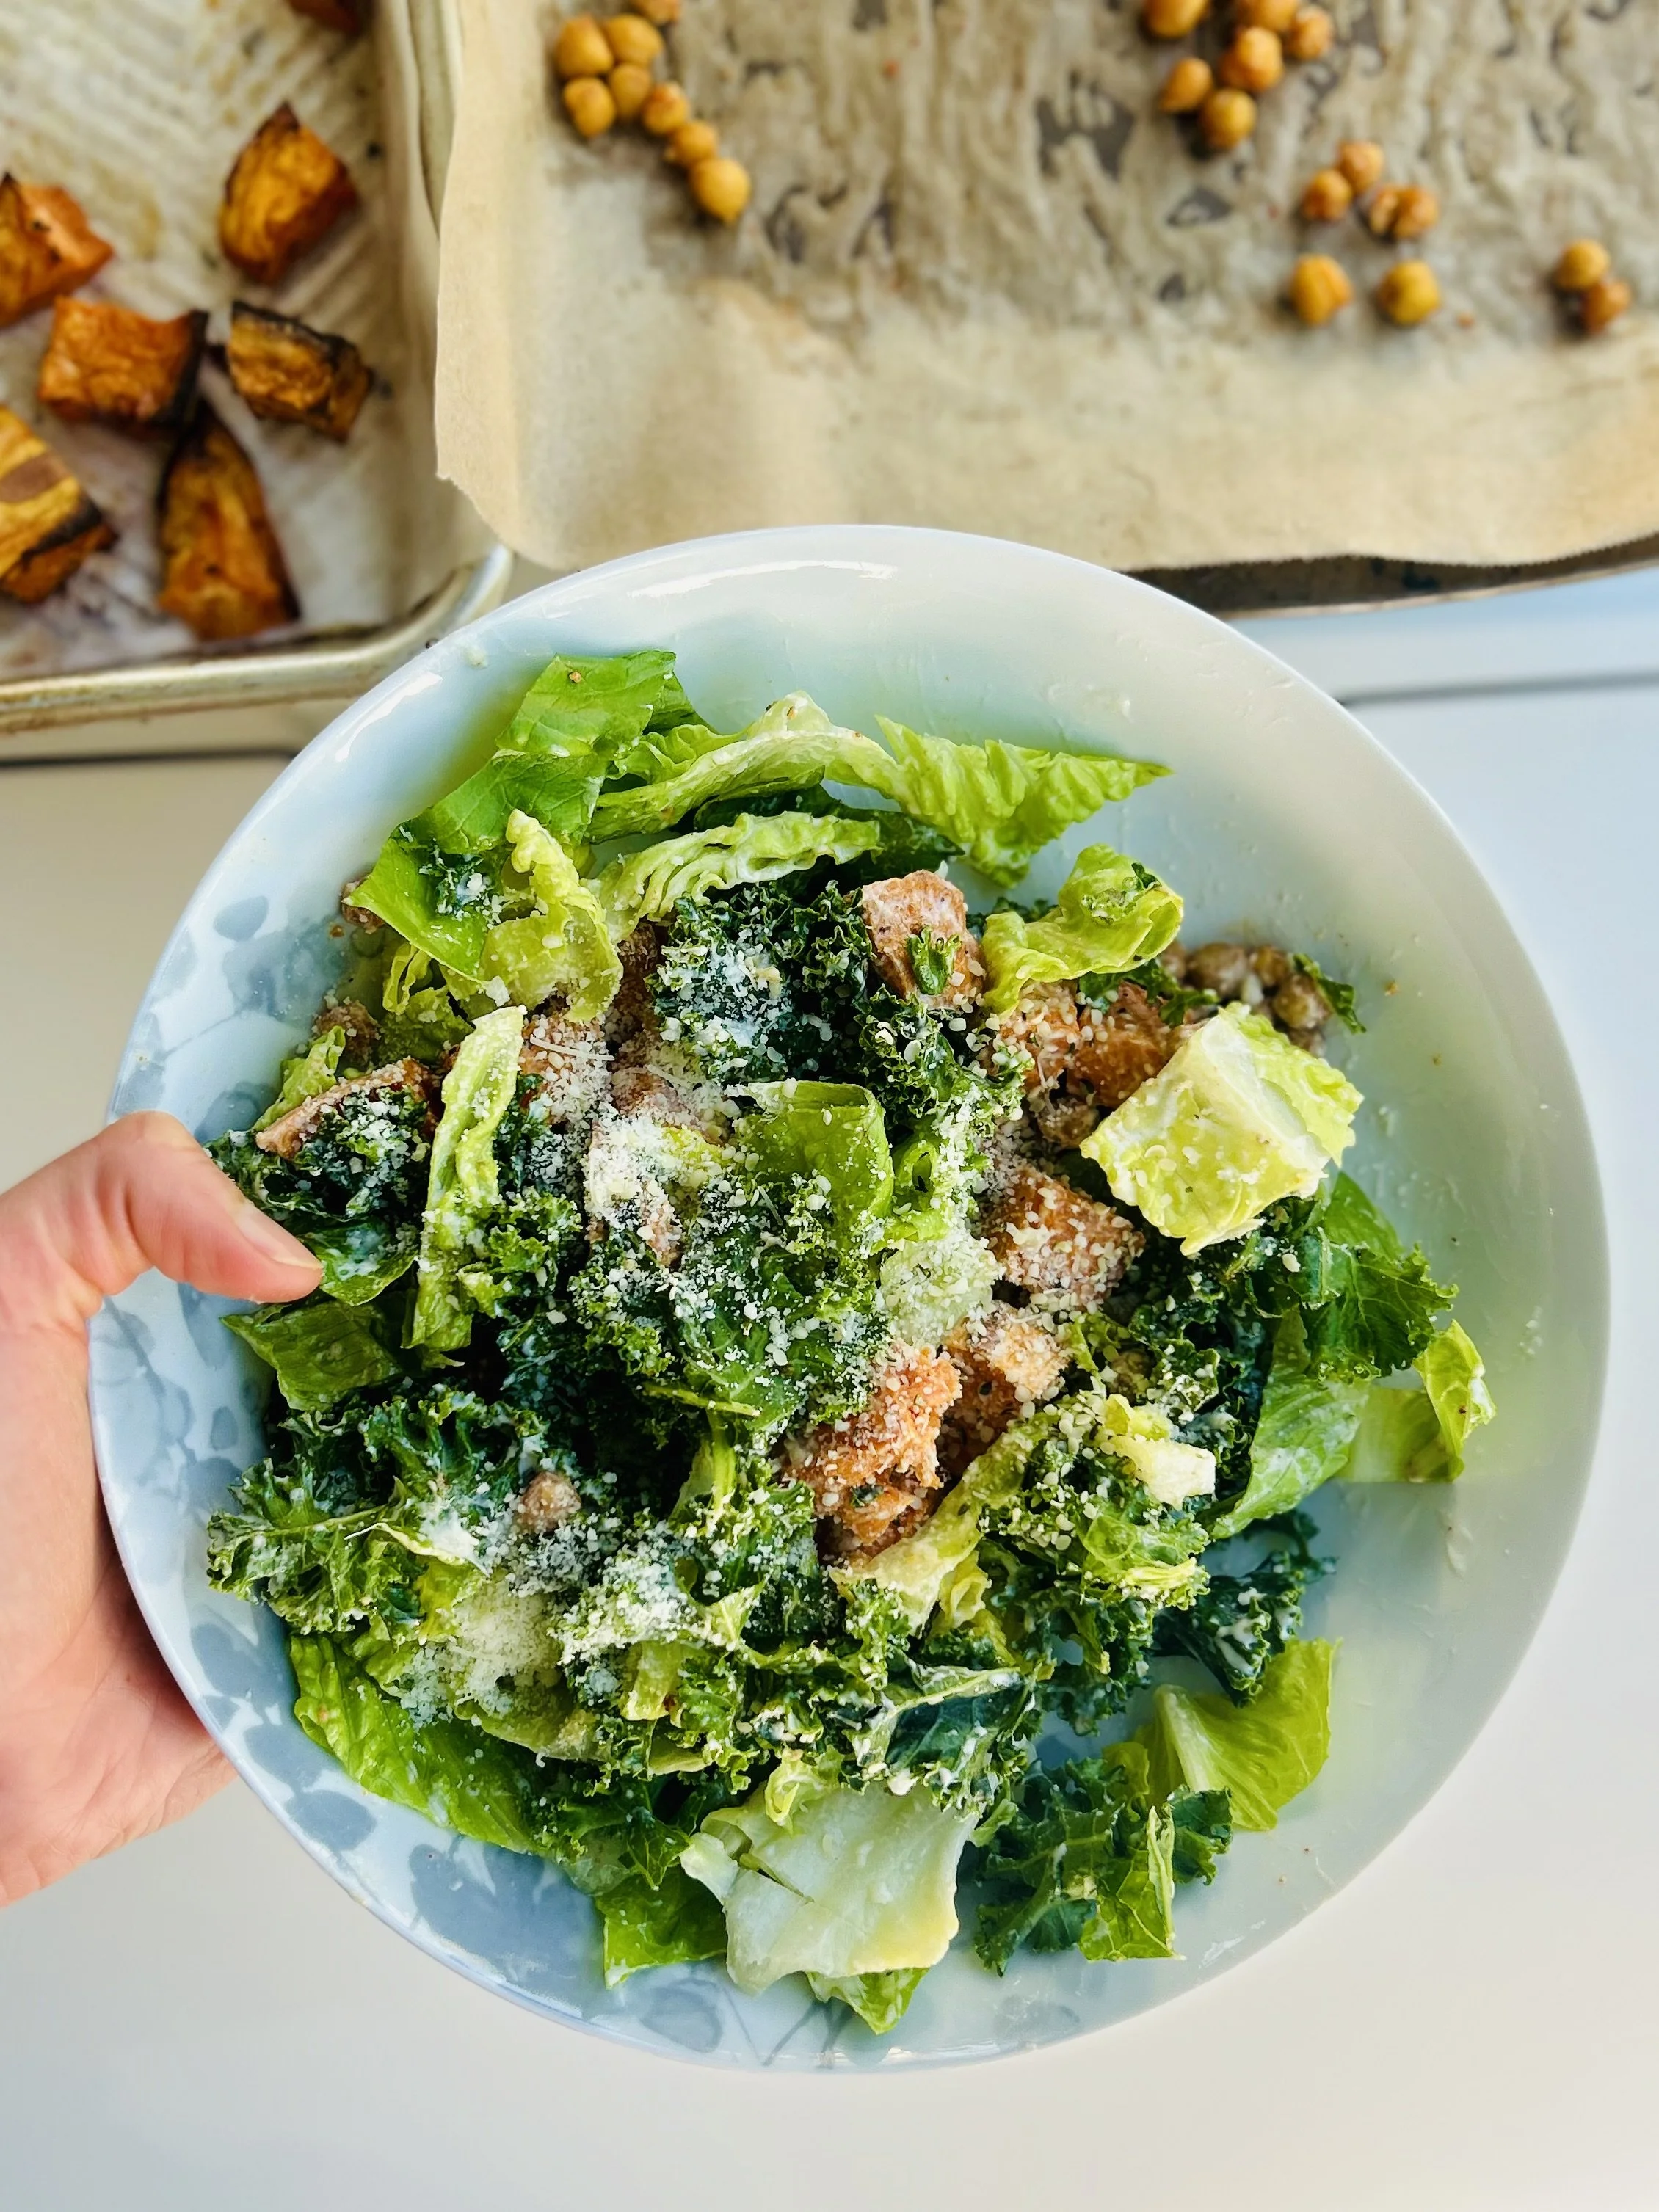
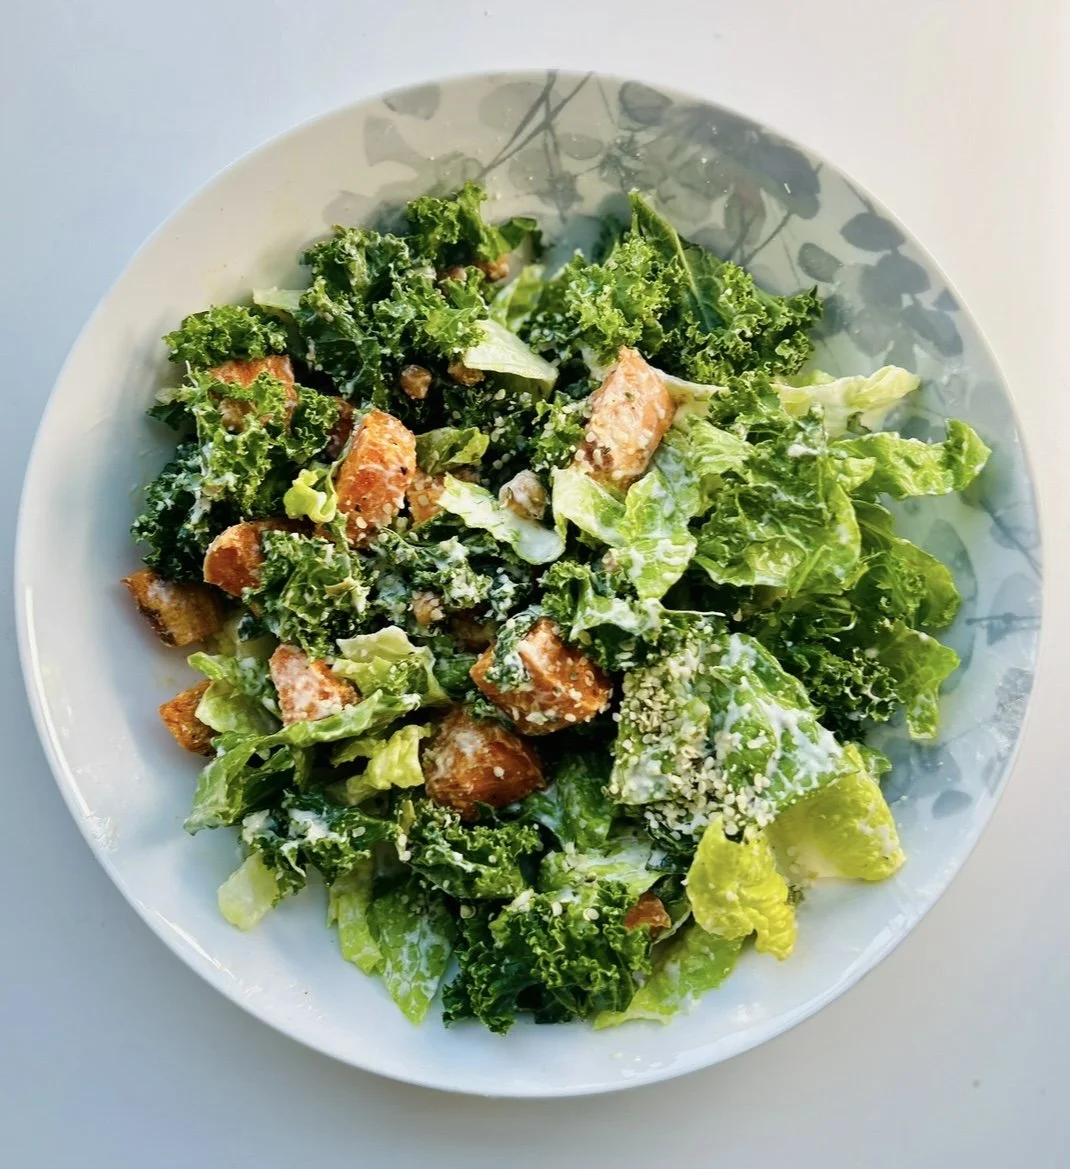
Caesar Salad with Roasted Yam and Crispy Chickpeas
This Caesar Salad with Roasted Yam and Crispy Chickpeas is a nutrient-packed twist on the classic — designed to be filling, balanced, and supportive of brain health, not a sad side salad.
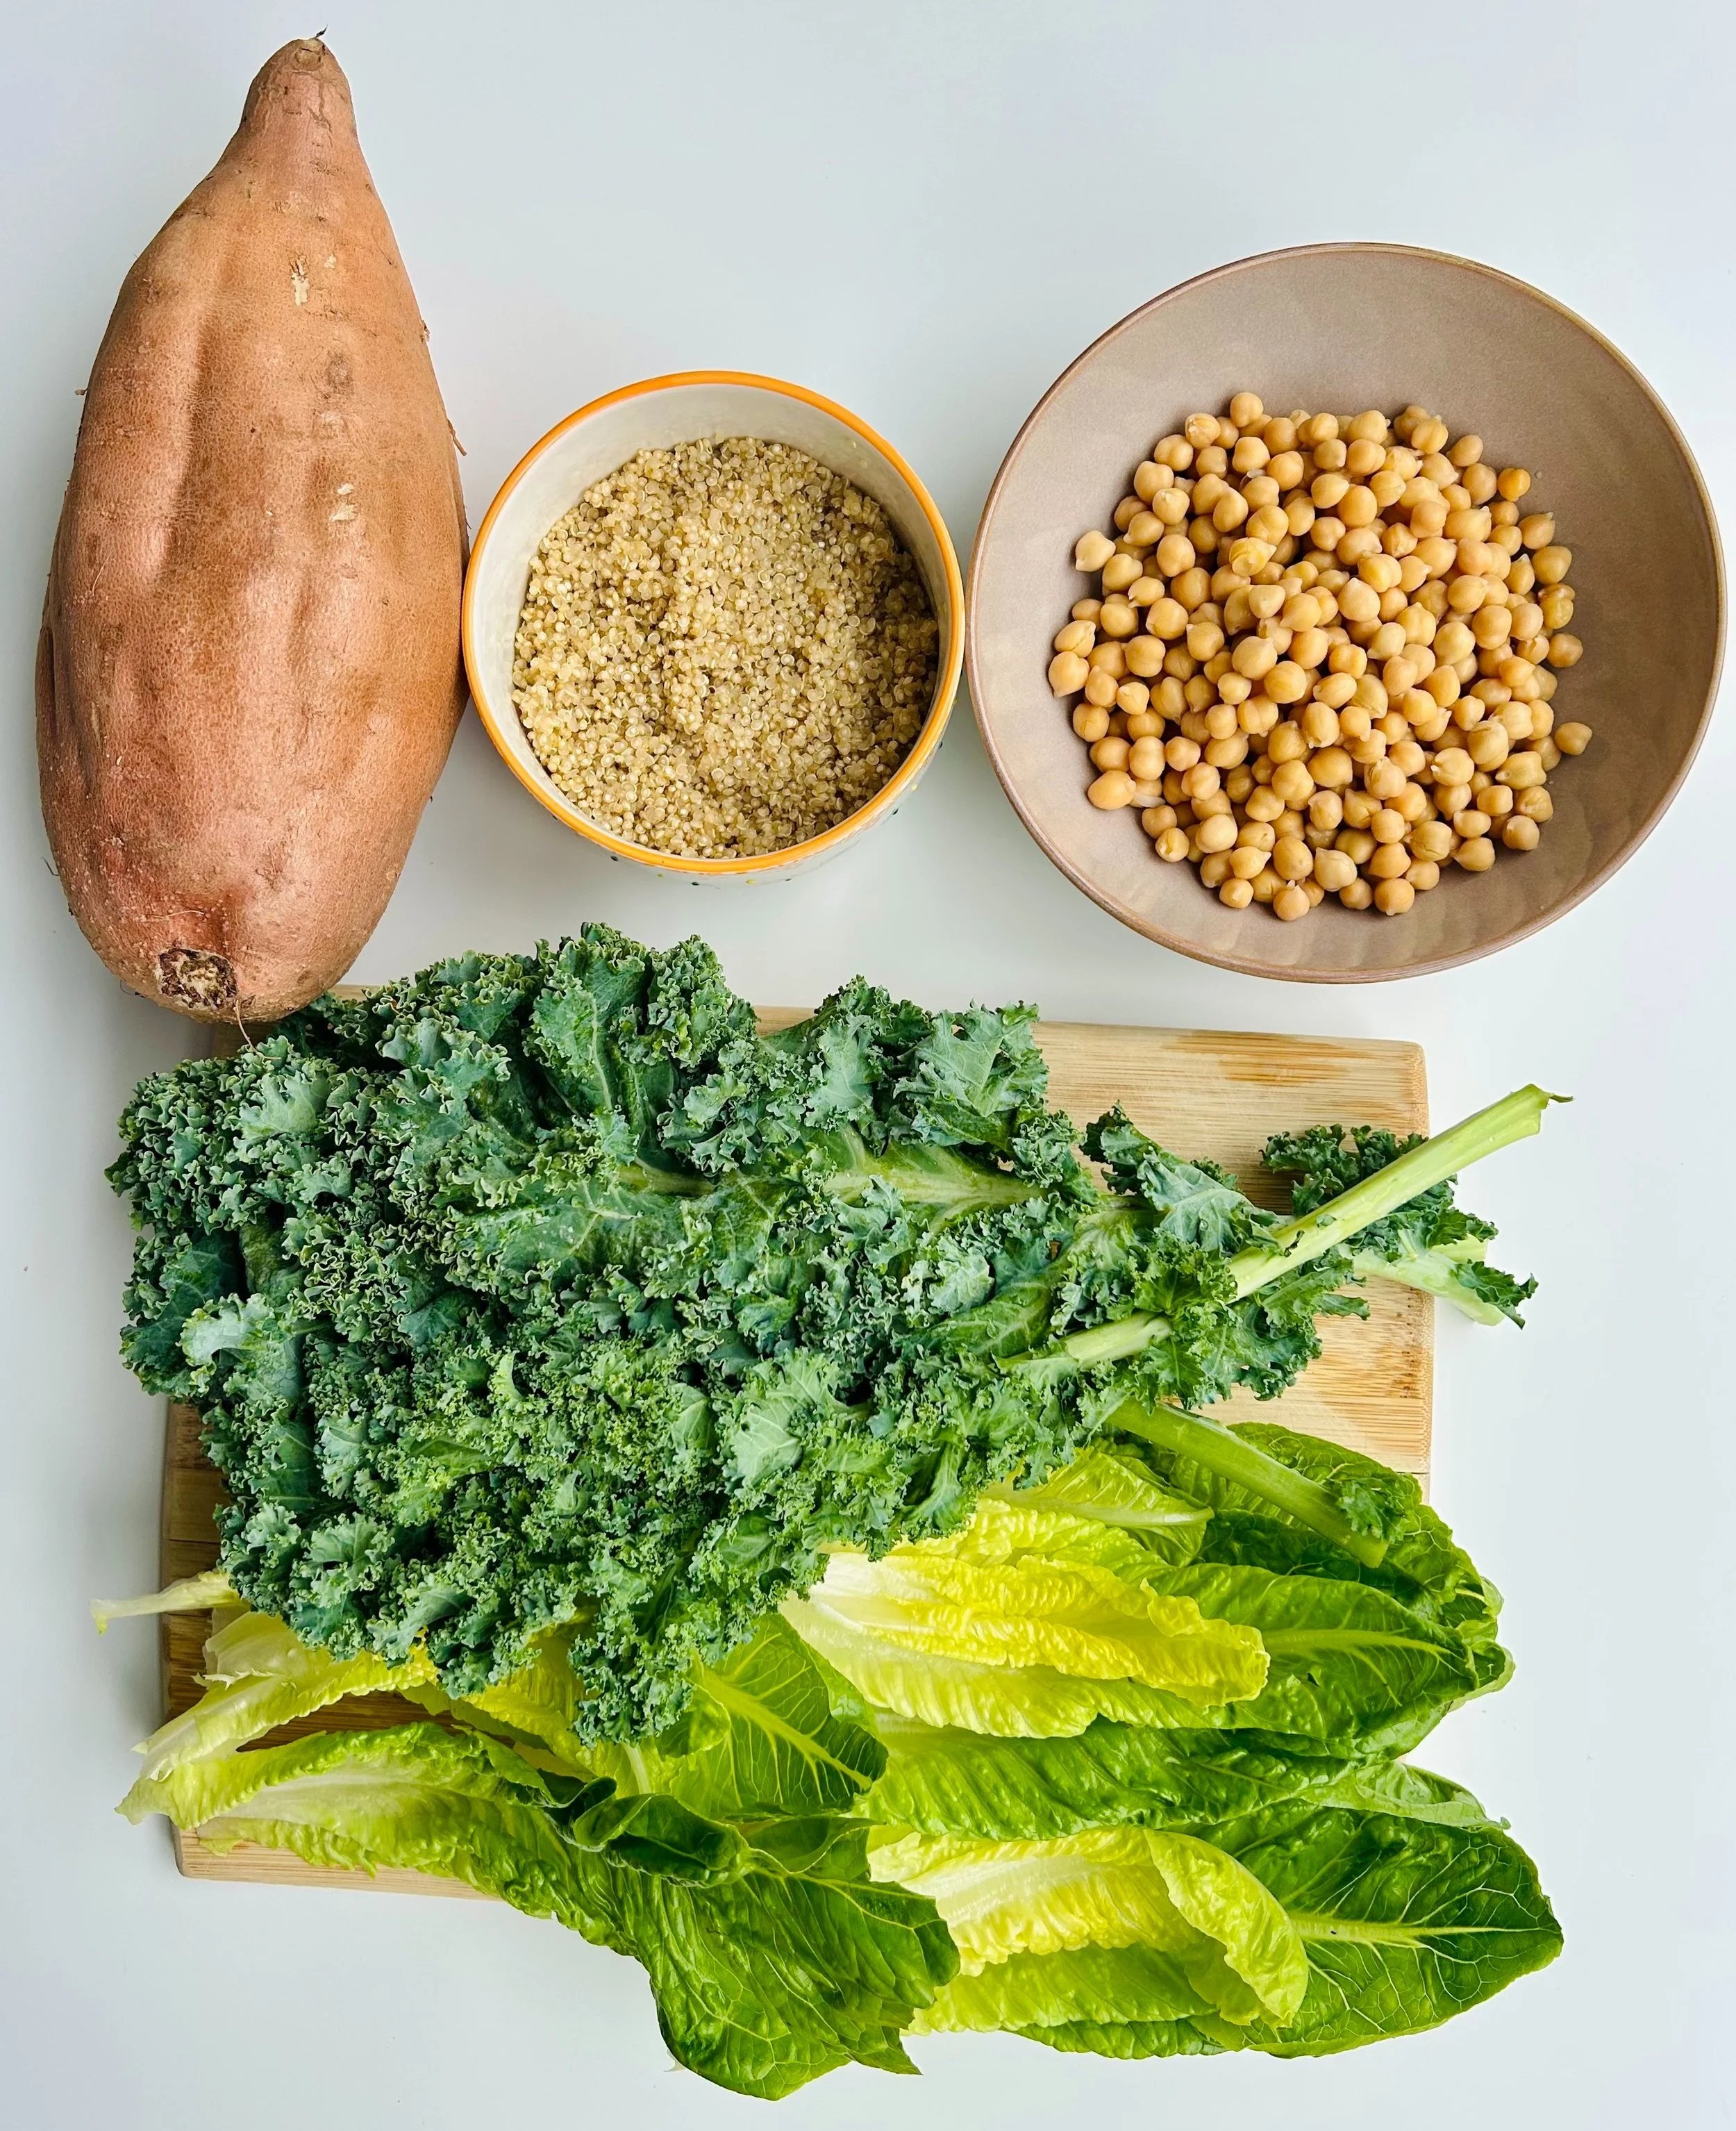
With roasted yams for complex carbs, crispy chickpeas and quinoa for plant-based protein, leafy greens for fiber, and a creamy Greek yogurt Caesar dressing, this salad works as a complete vegetarian meal or a hearty base you can customize with extra protein.
As a Vancouver-based holistic nutritionist, I focus on plant-forward meals that support steady energy, focus, and blood sugar balance — especially for busy lifestyles and brains that don’t do well with energy crashes.
Why You’ll Love This Caesar Salad
This upgraded Caesar salad checks all the boxes for a nourishing, satisfying meal:
Balanced & Filling: Includes protein, fiber, healthy fats, and complex carbs
Brain-Friendly: Supports focus and energy through steady fuel (not spikes)
Meal Prep–Friendly: Components store well for quick lunches
Customizable: Easy to make vegetarian, vegan, or higher-protein
Gluten-Free: Naturally gluten-free with simple ingredients
Caesar Salad with Roasted Yam and Crispy Chickpeas Recipe
Prep Time: 15 minutes | Cook Time: 25 minutes | Serving: 4
Ingredients
Salad
1 head romaine lettuce, chopped
1 bunch kale, de-stemmed and chopped
4 cups cubed yams (about 1 large or 4 small, cut into 1-inch cubes)
1 cup uncooked quinoa, cooked (yields ~3 cups)
1 can (15 oz) chickpeas, drained and rinsed
Coating for Yams and Chickpeas
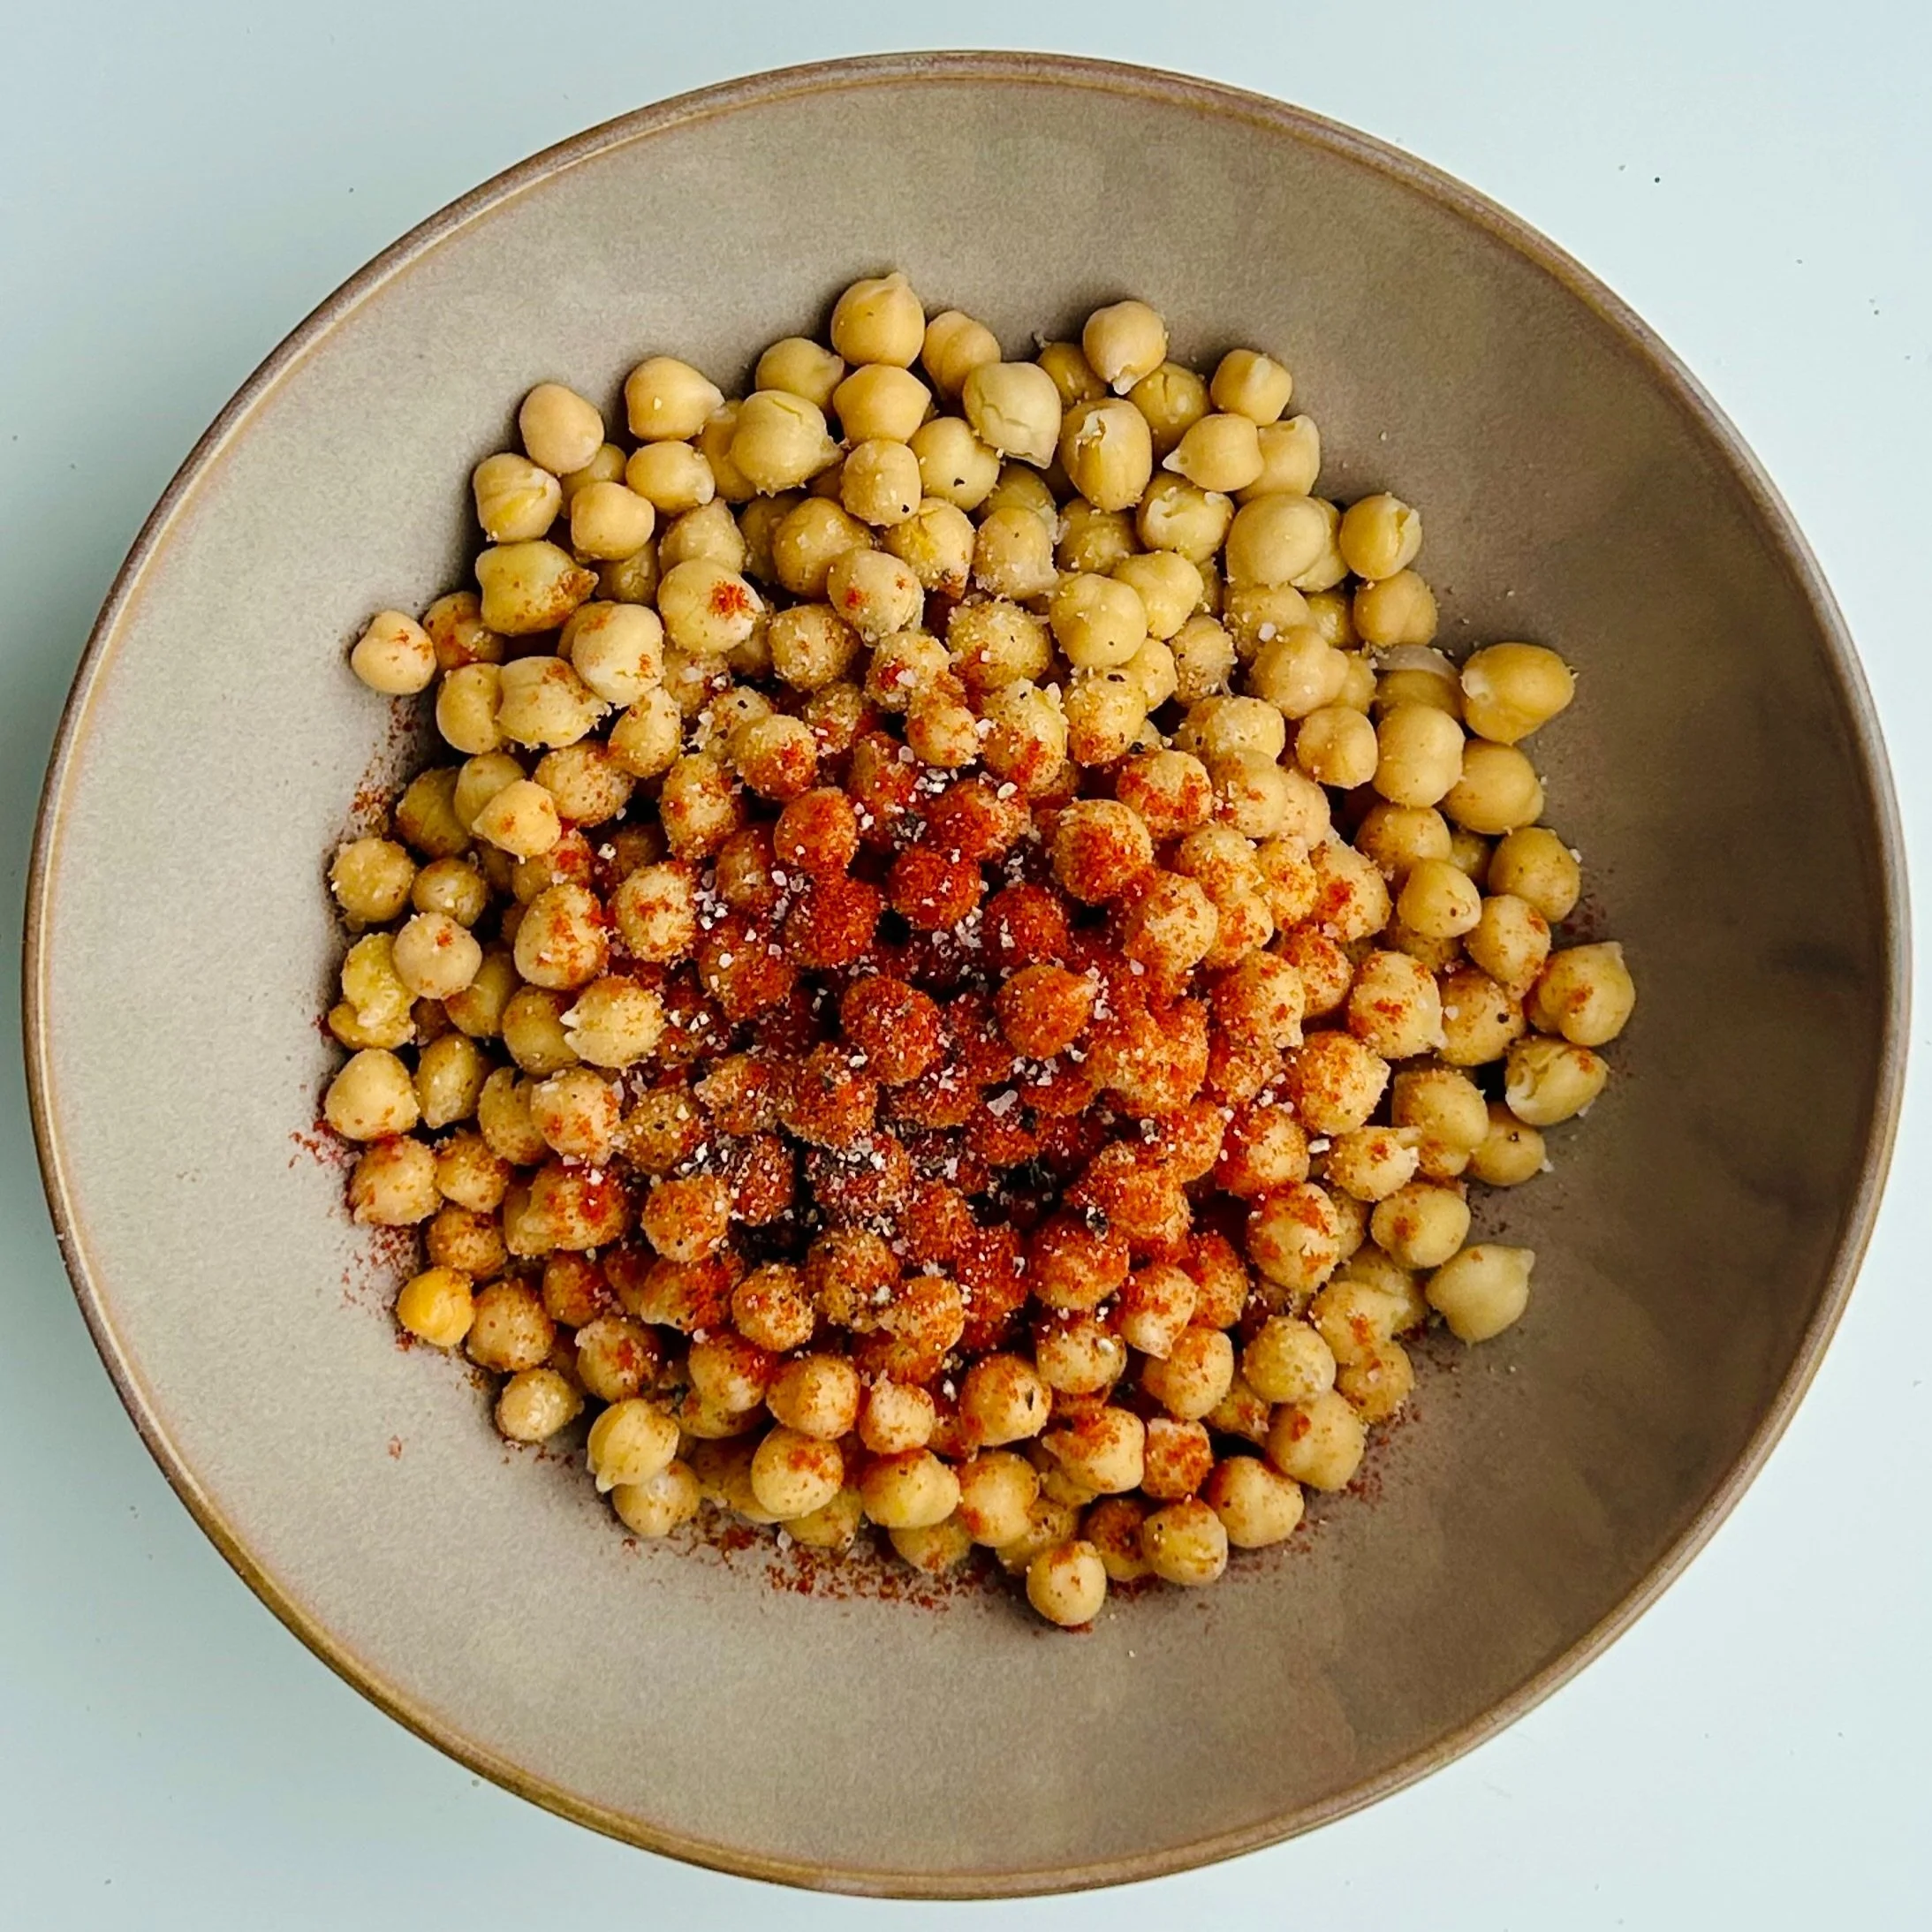
3 tsp garlic powder
2 tsp onion powder
2 tsp paprika
1 tsp salt
1 tsp pepper
Avocado oil, for tossing
Greek Yogurt Caesar Dressing
1 cup full-fat plain Greek yogurt
Juice and zest of 1 large lemon
1 tbsp capers, finely chopped
3 cloves garlic, minced (or to taste)
¼ cup olive oil
Salt and pepper, to taste
Optional: 1 tsp nutritional yeast or 1 tbsp grated parmesan cheese for umami
Optional Toppings
Hemp hearts, for a protein boost
Boiled egg, sliced or chopped
Instructions
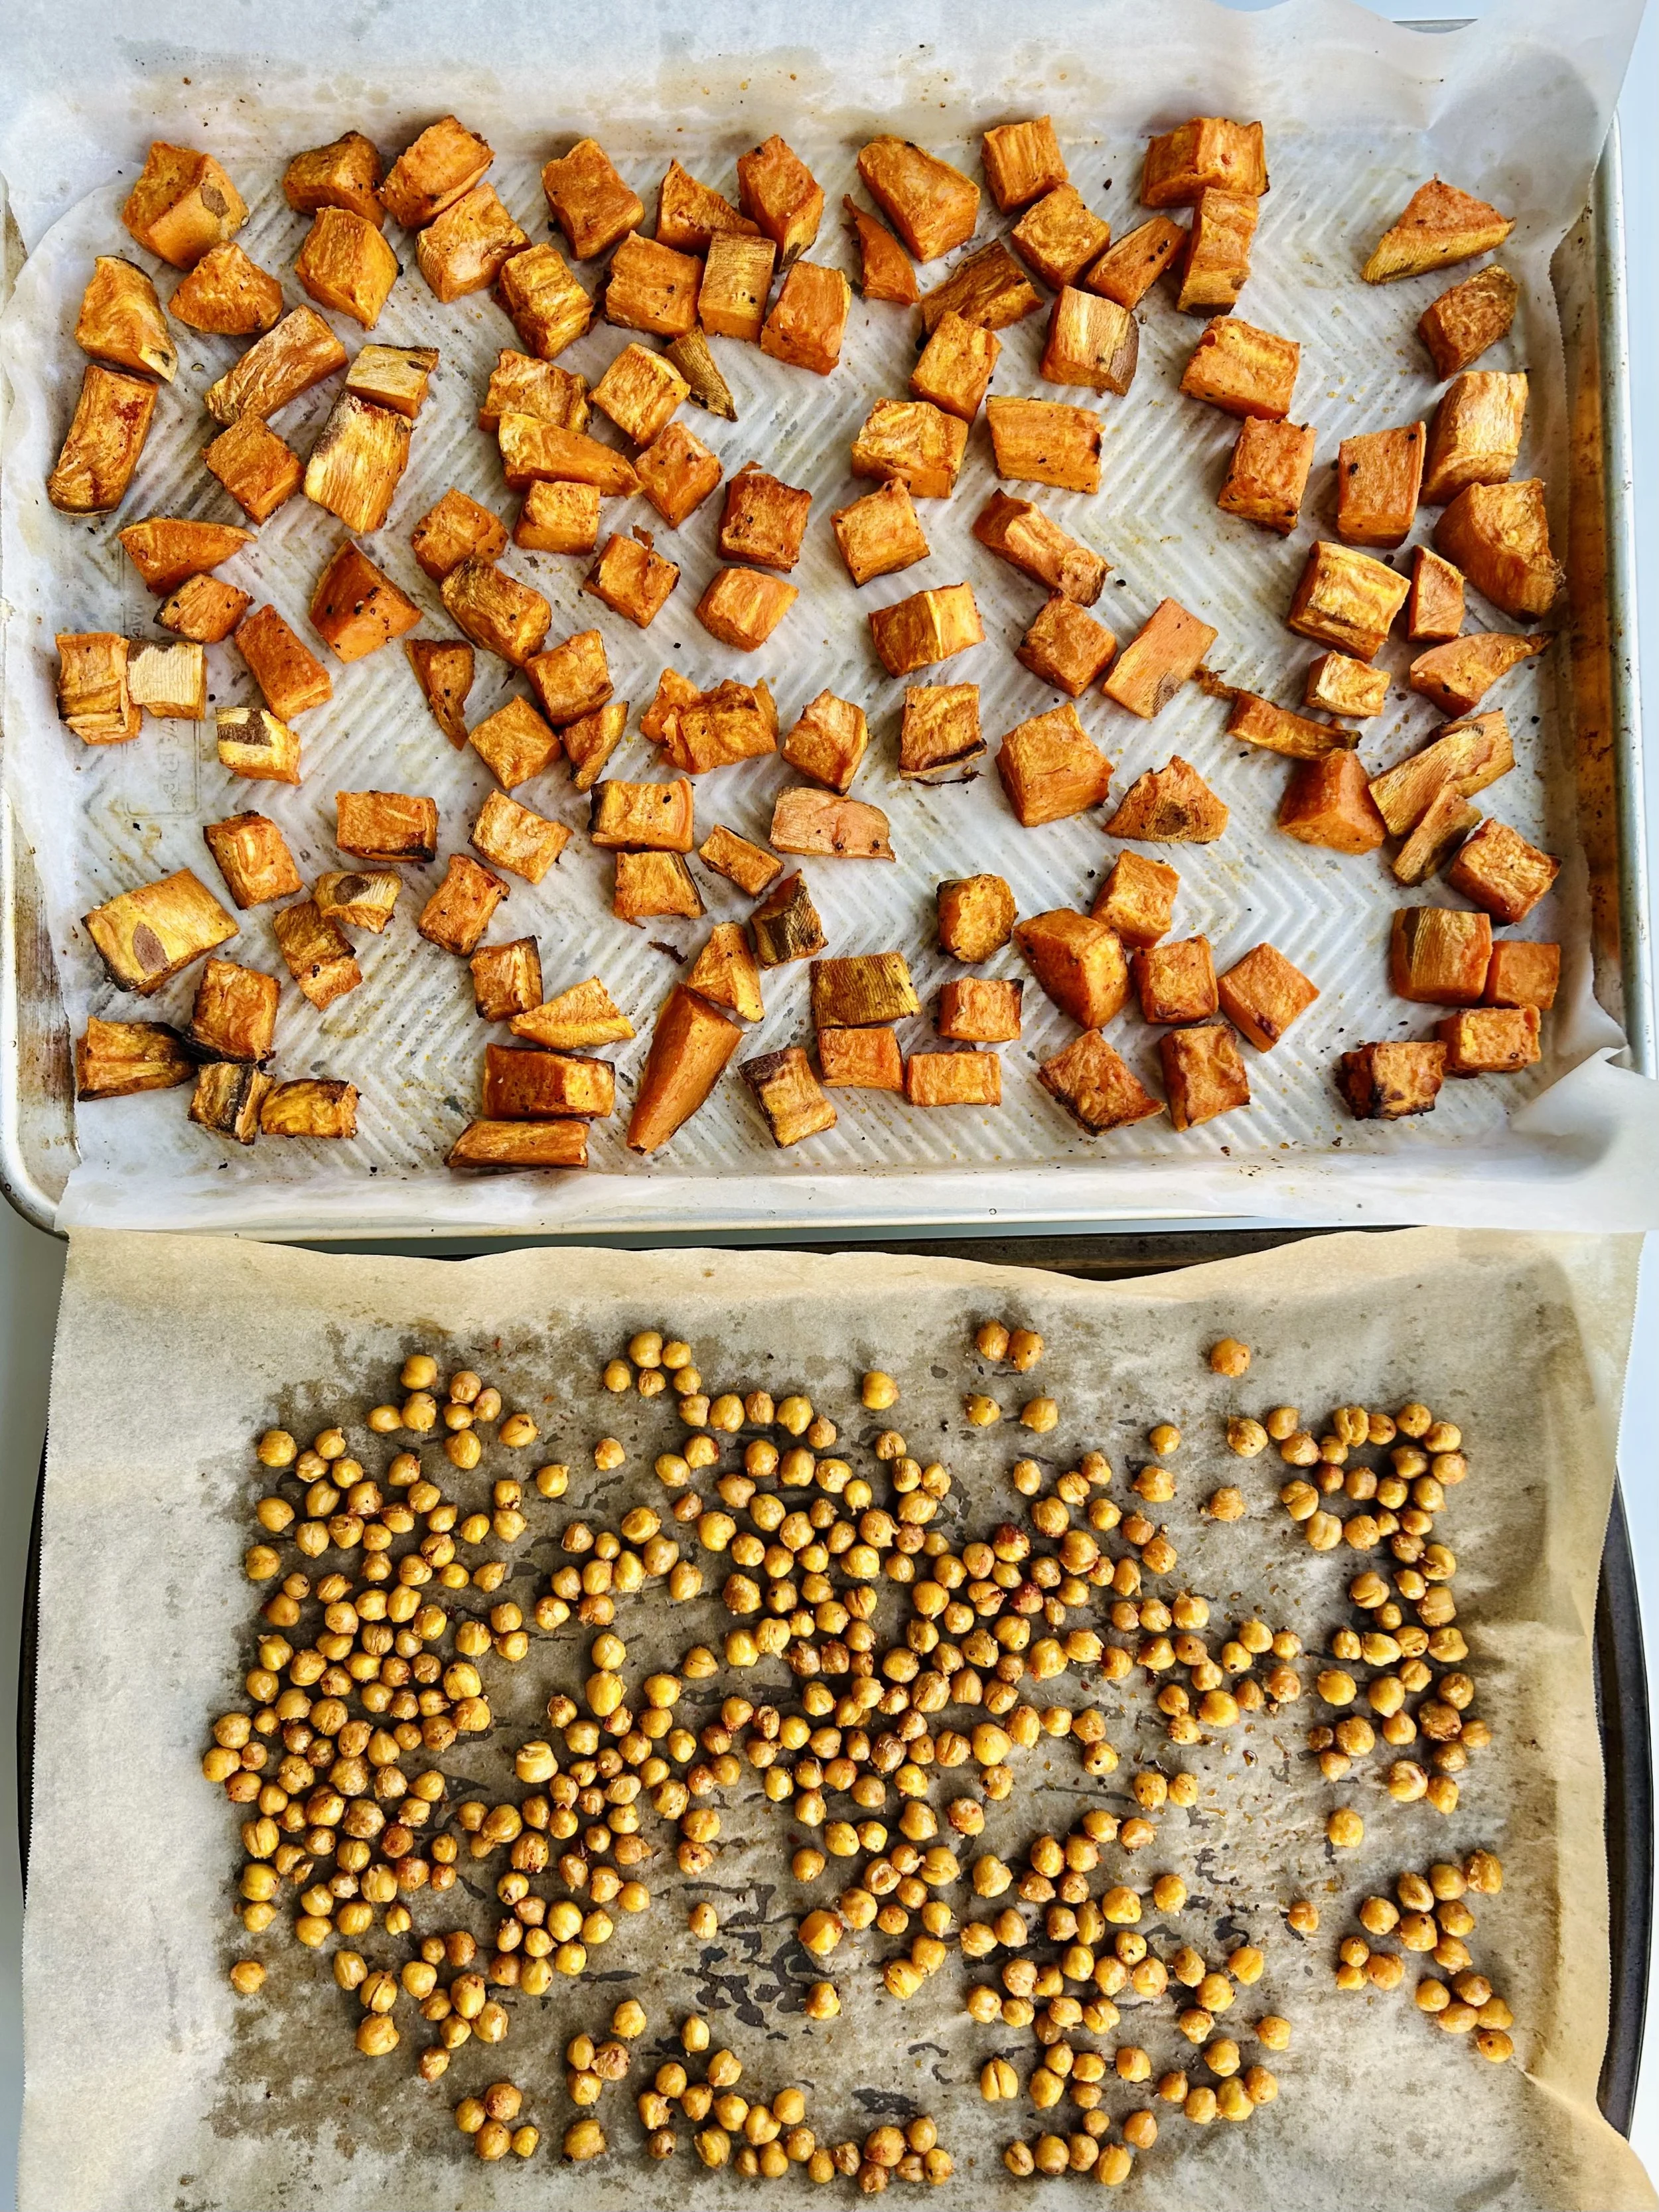
Step 1: Roast the Yams & Chickpeas
Preheat oven to 375°F (190°C) and line a baking sheet with parchment paper.
Toss yam cubes with avocado oil, half the garlic powder, onion powder, paprika, salt, and pepper. Spread evenly on one half of the baking sheet.
Pat chickpeas dry with a paper towel, then toss with avocado oil and the remaining spices. Spread on the other half of the baking sheet.
Roast for 25 minutes, flipping halfway, until yams are soft and chickpeas are crispy.
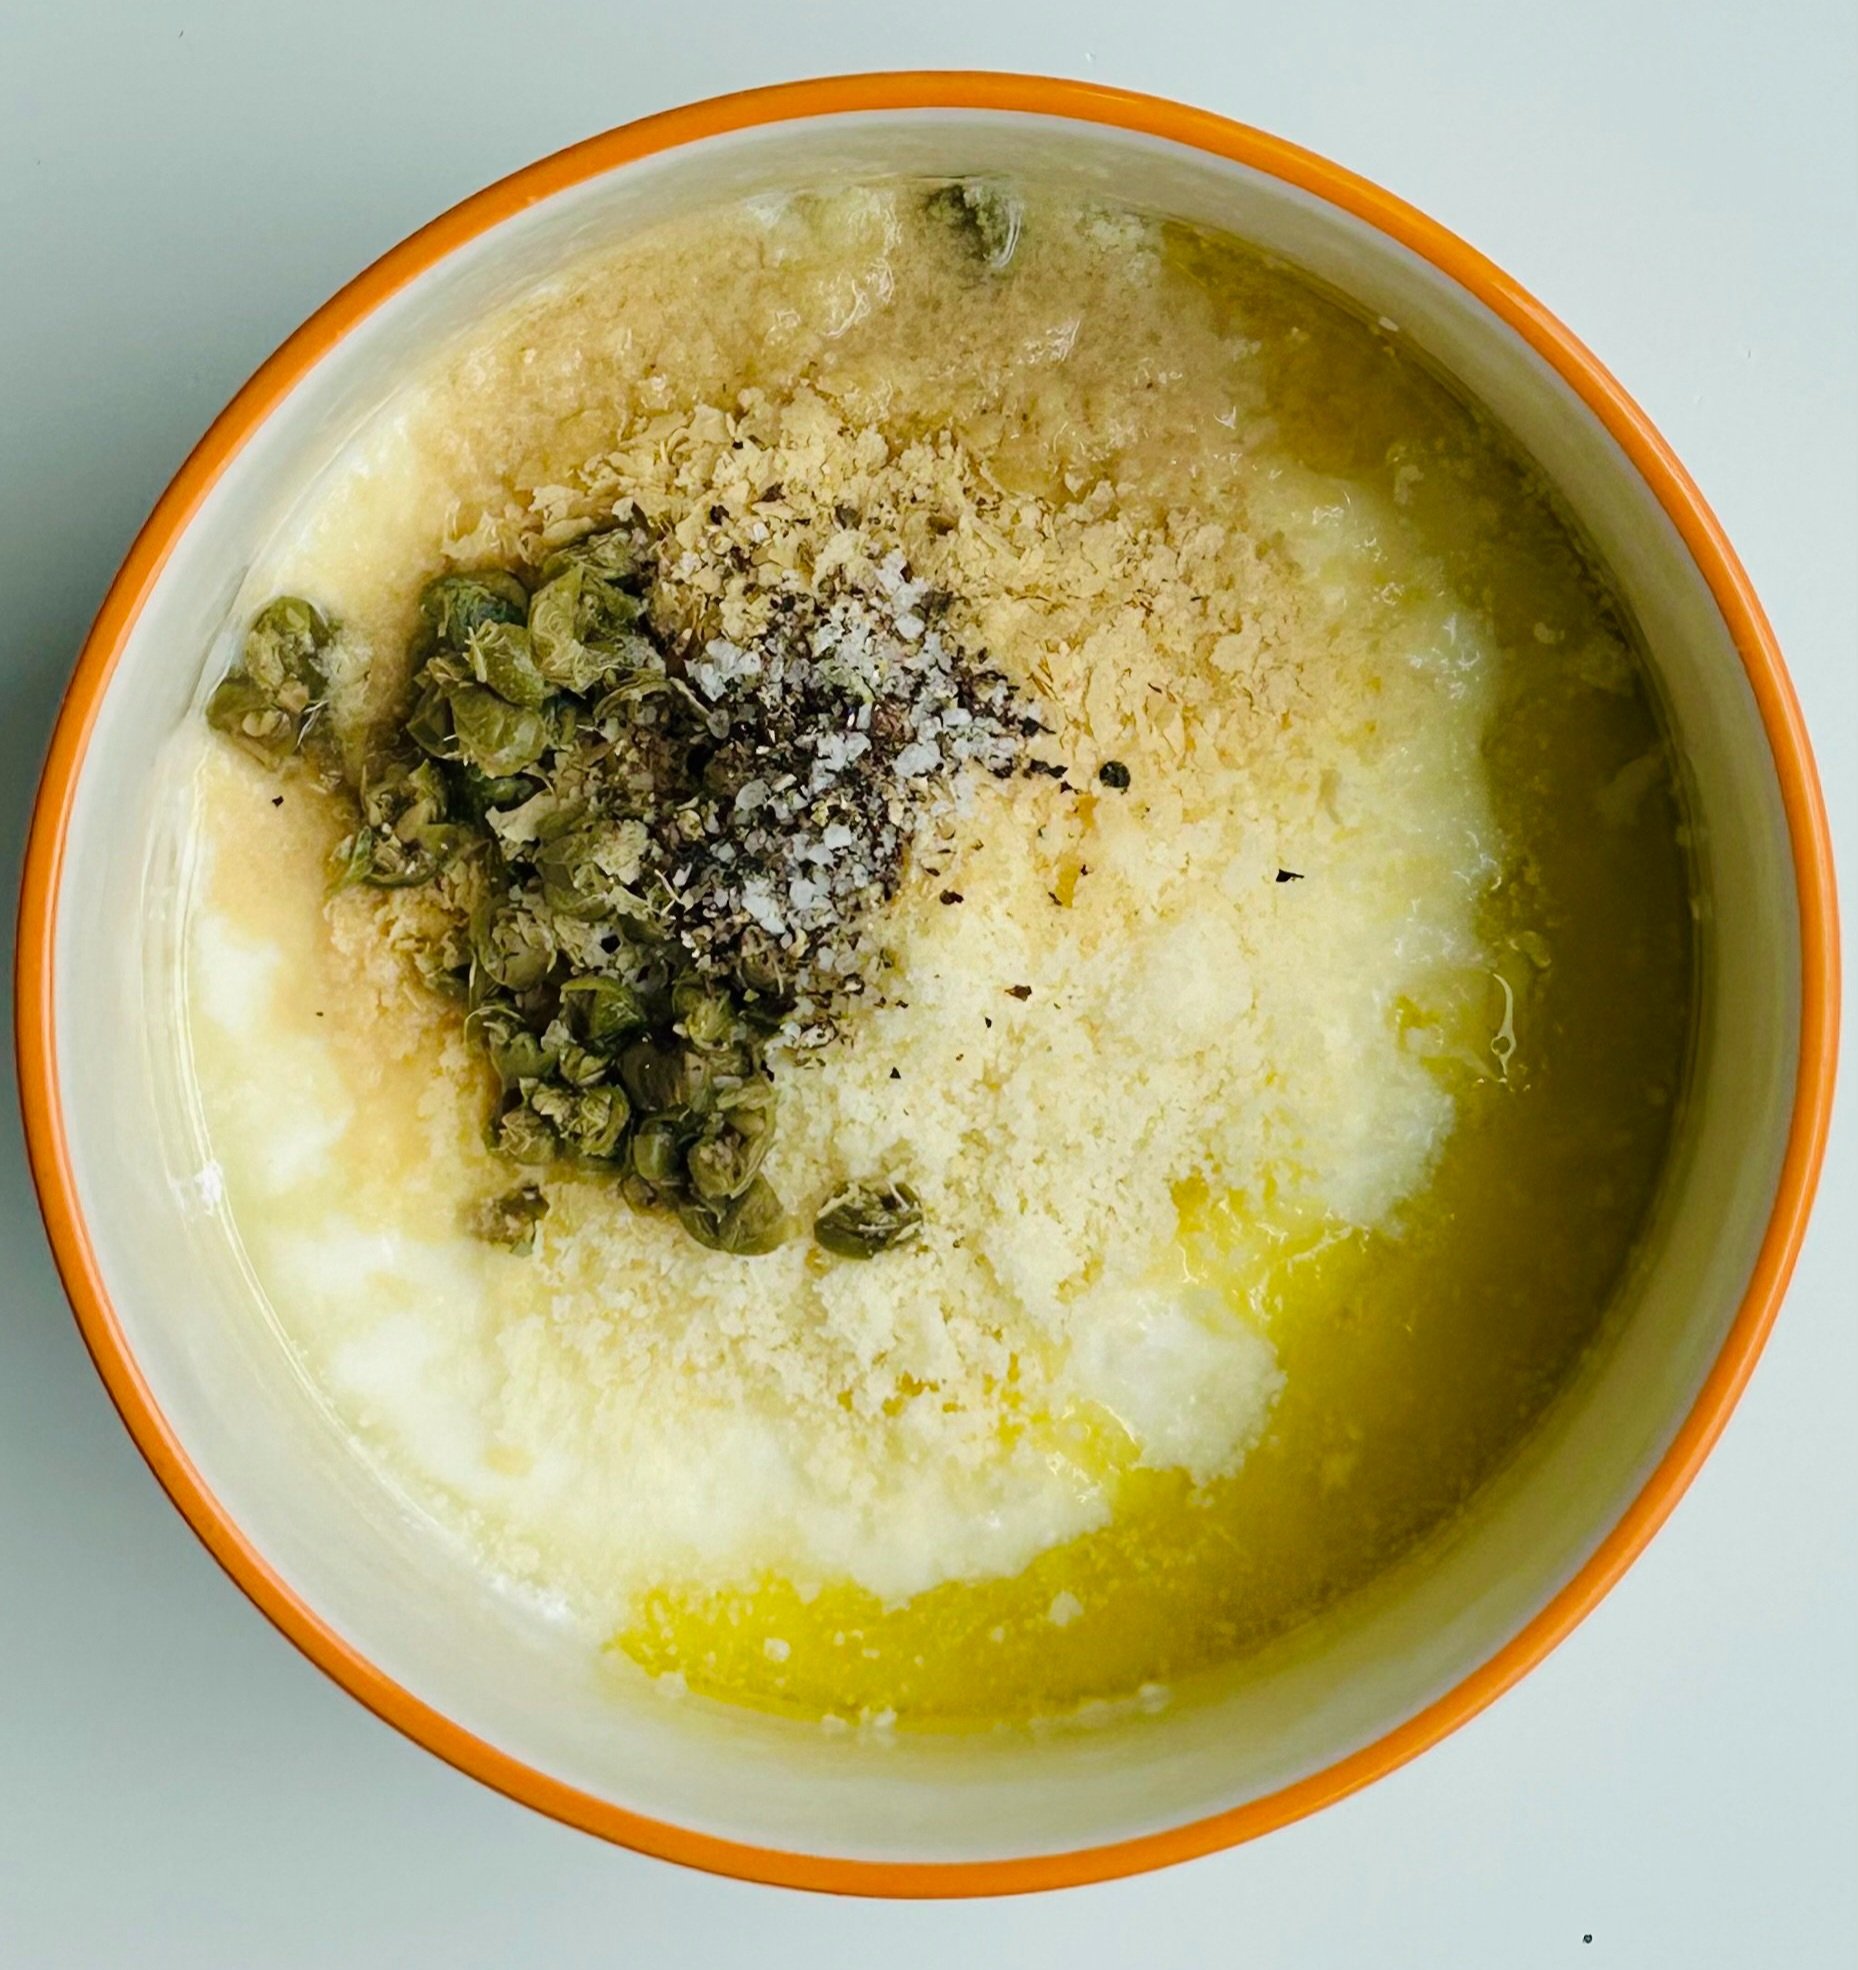
Step 2: Prepare the Dressing
In a small bowl, whisk together Greek yogurt, lemon juice and zest, chopped capers, minced garlic, olive oil, salt, and pepper.
If using, mix in nutritional yeast or parmesan for extra flavor. Adjust consistency with a splash of water if needed.
Step 3: Assemble the Salad
Massage the chopped kale with a drizzle of lemon juice and olive oil for 1–2 minutes until tender. Set aside.
In a large bowl, combine chopped romaine and massaged kale.
Toss with the Caesar dressing to coat evenly.
Top with cooked quinoa, roasted yams, and crispy chickpeas. Optional: Sprinkle with hemp hearts or add sliced boiled egg for a protein boost.
Serve immediately for the crispiest texture!
How to Add More Protein (Make It a Full Meal)
This salad is already balanced, but if you want even more protein, try adding:
Plant-Based Protein Add-Ons
Baked or air-fried tofu
Tempeh, cubed and roasted with the yams
Extra chickpeas or white beans
Animal Protein Add-Ons
Sliced boiled or jammy eggs
Grilled chicken breast
Grilled or roasted salmon (pairs especially well with the lemony dressing)
These additions turn this into a high-protein lunch or dinner bowl that supports satiety and focus.
Nutritional Highlights (Per Serving, Approximate)
Calories: ~420 kcal
Protein: ~16 g (before added proteins)
Carbohydrates: ~55 g
Fat: ~16 g
Fiber: ~10 g
Why This Supports Brain Health
Protein (chickpeas, quinoa, yogurt) supports neurotransmitter function
Fiber (greens, yams) helps stabilize blood sugar
Healthy fats (olive oil, avocado oil, hemp hearts) support cognitive health
Micronutrients from greens and yams provide antioxidants and vitamin A
Meal Prep Tips
Store roasted yams, chickpeas, quinoa, and dressing separately for up to 3–4 days
Massage kale ahead of time — it holds up better than romaine
Re-crisp chickpeas in the oven for 5–7 minutes if needed
More Balanced Recipes You’ll Love
If you enjoyed this salad, try these other Growing Minds Nutrition recipes:
Nourishing Roasted Veggie Buddha Bowl with Tahini-Dijon Dressing
Simple Greek Yogurt Breakfast Bowl (Protein-Packed & Brain-Boosting) – an easy way to build a balanced breakfast with protein, fiber, and healthy fats
High-Protein Cucumber Greek Yogurt Dip – a refreshing, protein-rich dip that pairs well with wraps, bowls, or veggies
All of these recipes follow the same principle: supporting brain health and steady energy through balanced nutrition.
Final Thoughts
This Caesar Salad with Roasted Yam and Crispy Chickpeas proves that salads can be satisfying, nourishing, and brain-friendly. Whether you keep it vegetarian or add your favorite protein, it’s a flexible, flavorful way to fuel your day.
If you try it, let me know how you customize it — I love seeing how you make these recipes your own 💛

No-Bake Protein Bars for Steady Energy
These no-bake protein bars are one of my favorite snacks to keep on hand when I want steady energy, better focus, and fewer blood sugar dips — without relying on ultra-processed bars.
They’re soft, customizable, and made with simple pantry ingredients. Perfect for busy days, low-capacity days, or anytime you want a snack that actually keeps you full.
Why These Protein Bars Work
A lot of store-bought protein bars are either:
very low in carbs (leading to quick crashes), or
high in sugar without enough protein or fat
These bars are different because they combine:
Protein → supports neurotransmitters like dopamine
Healthy fats → slows digestion and increases satiety
Complex carbs (oats) → provide steady, long-lasting energy
That balance helps support blood sugar stability, which plays a big role in focus, mood, and energy — especially for people who are prone to crashes.
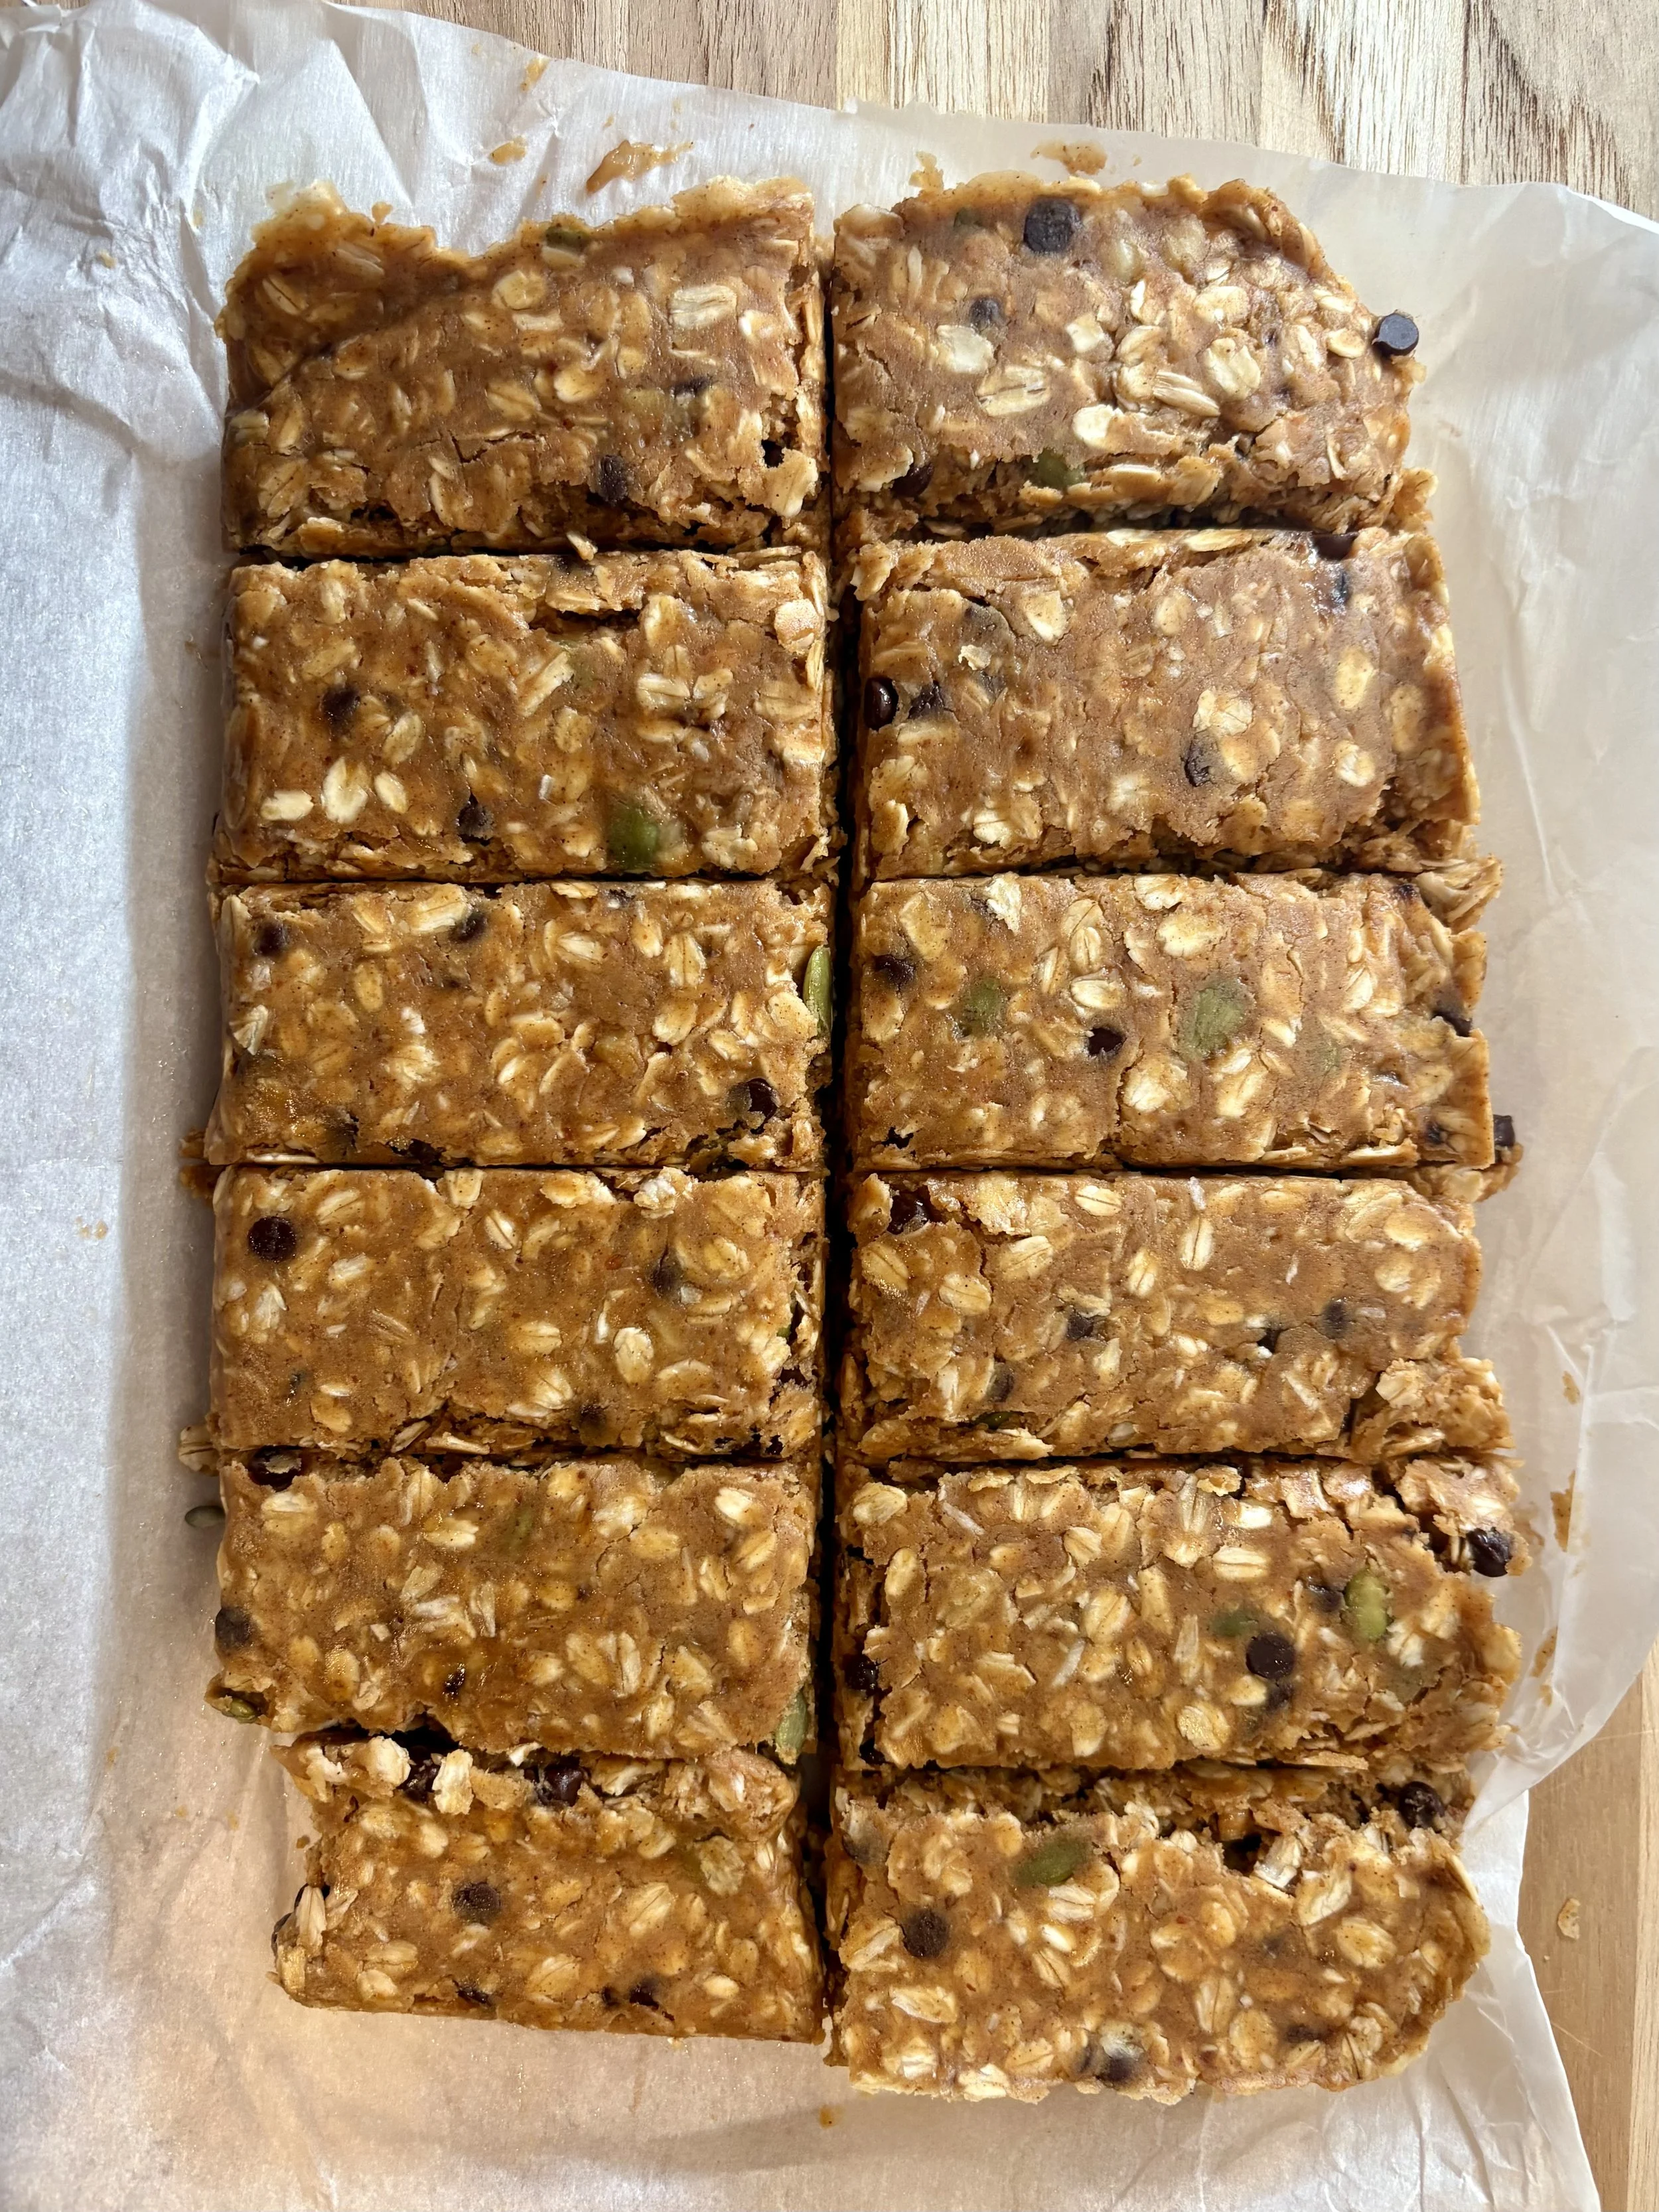
No-Bake Protein Bars Recipe
Servings: 12 bars
Prep Time: 10 min | Chill Time: 30 min | Total Time: 40 min
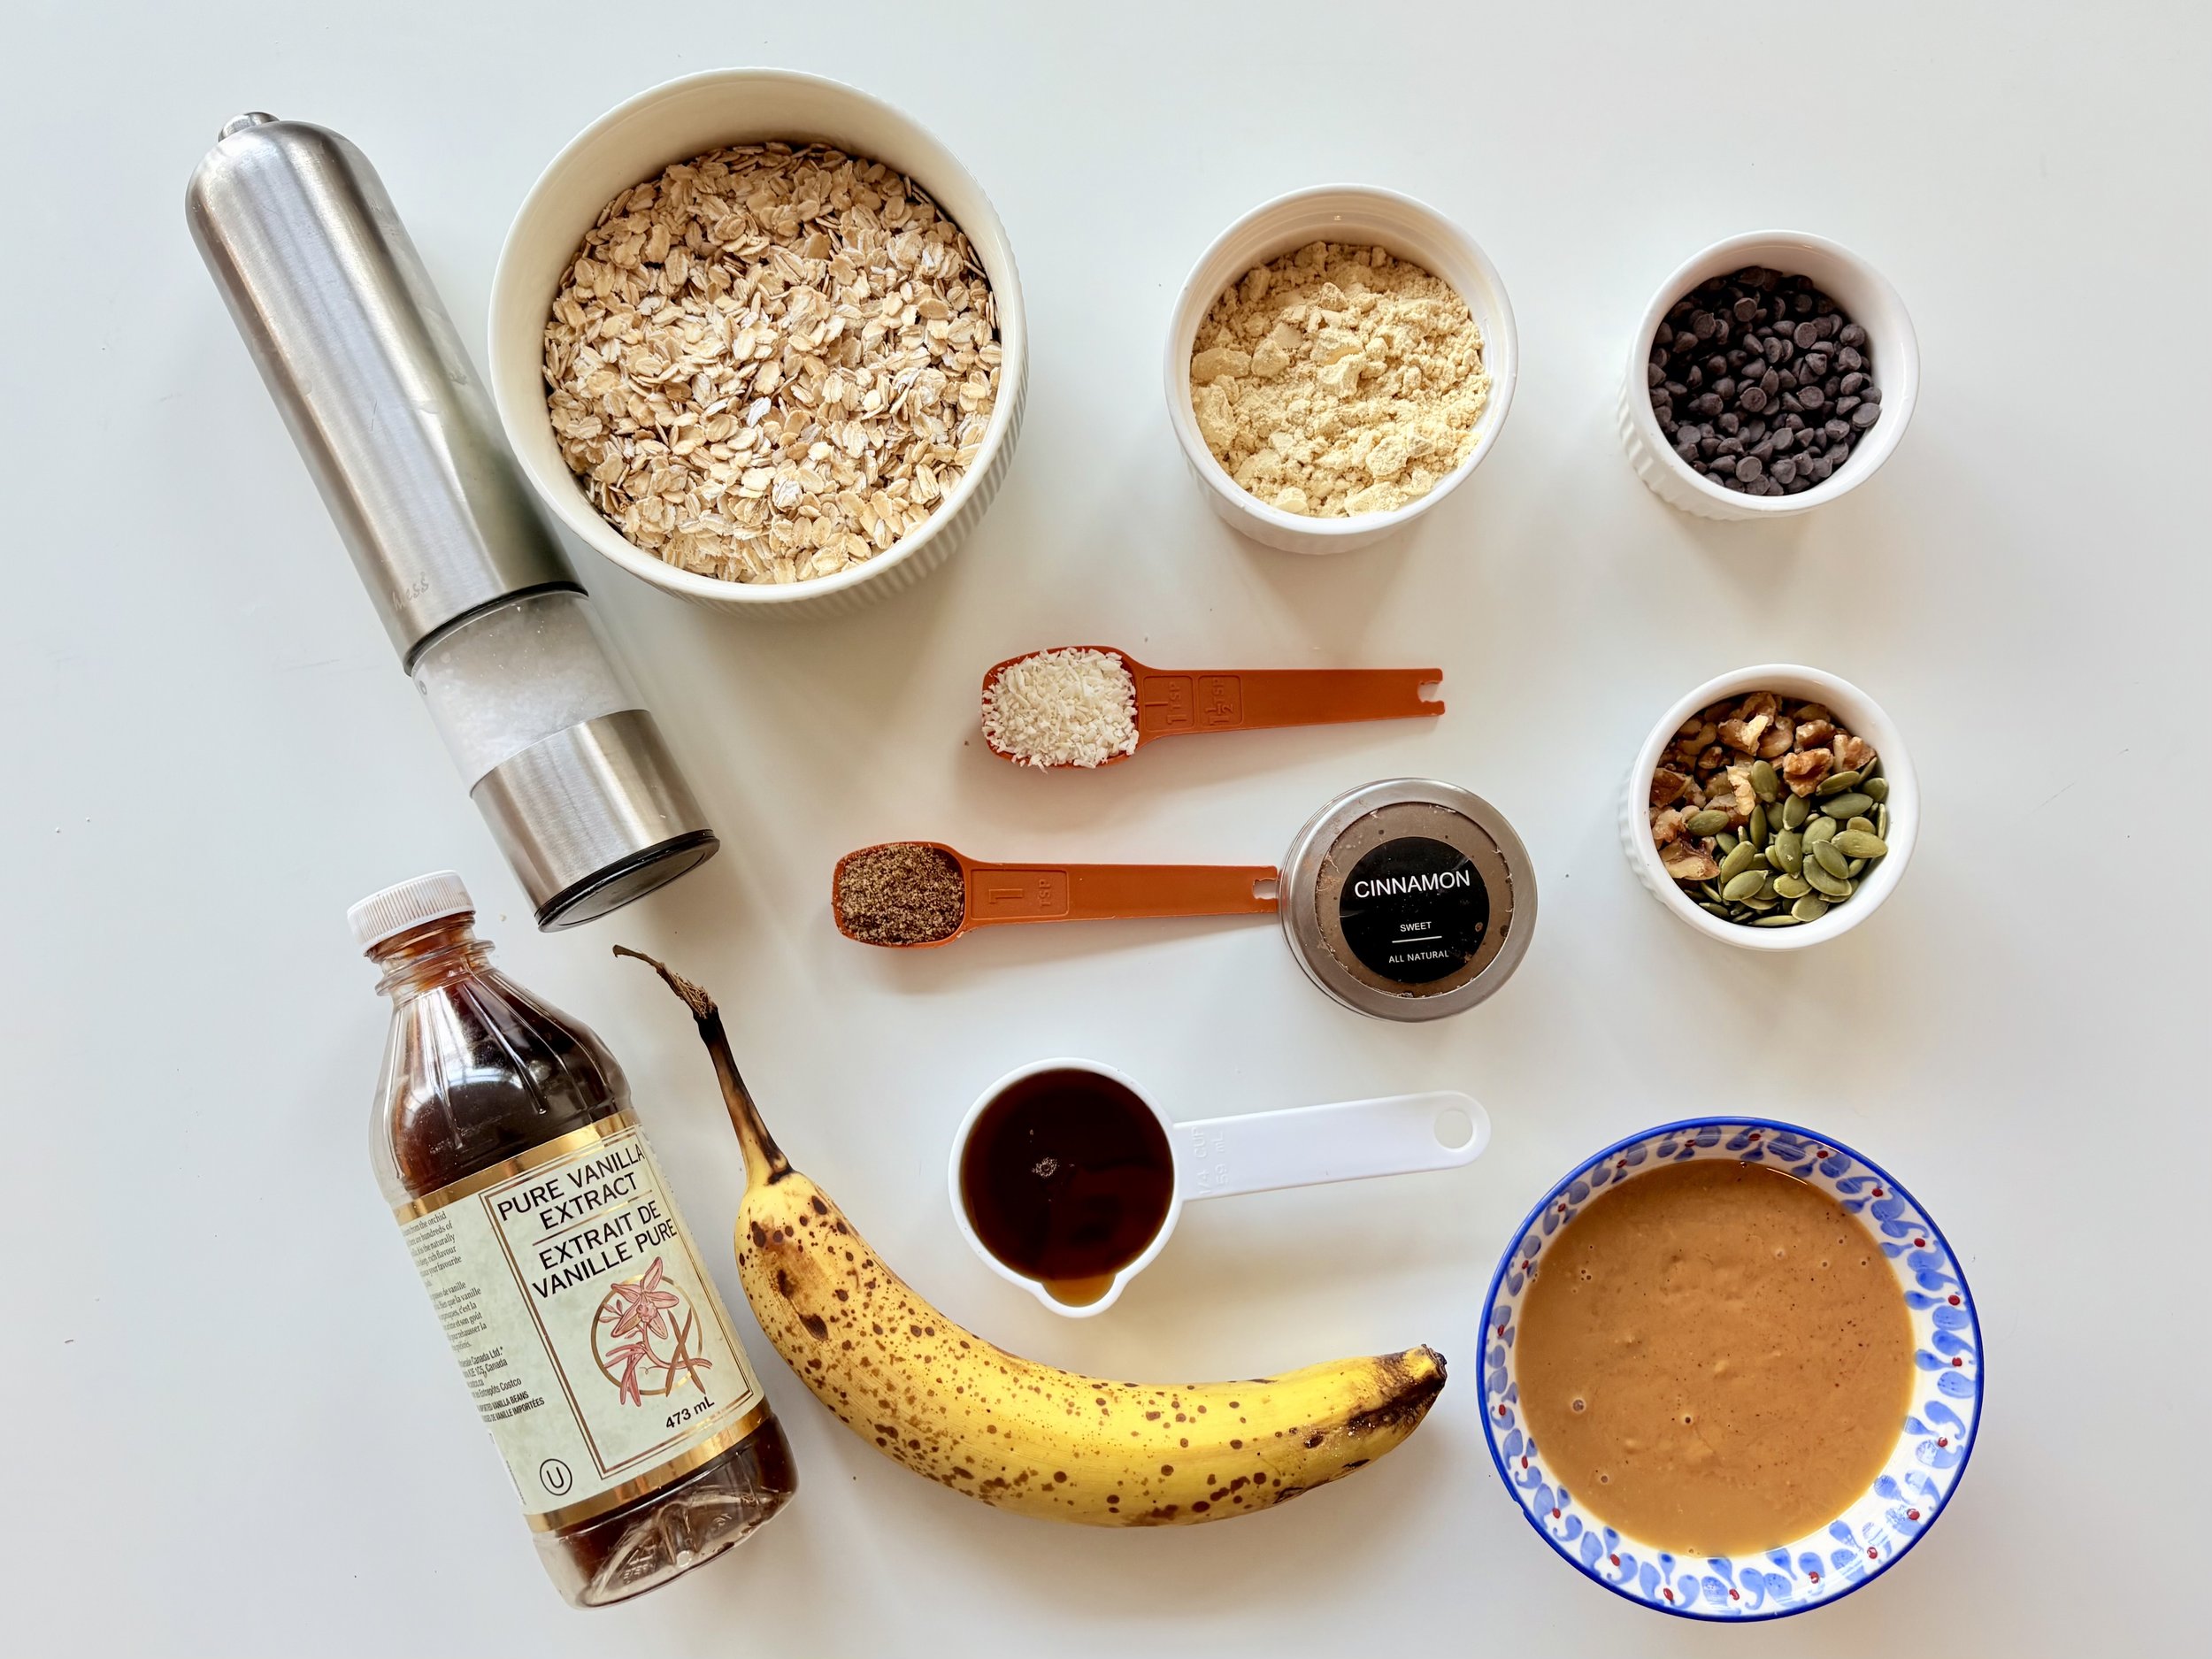
Ingredients
Wet ingredients
1 banana, mashed
1 cup peanut butter (or any nut butter / tahini combo)
¼ cup maple syrup or honey
1 tsp pure vanilla extract
Dry ingredients
1 tsp ground flax
1 tsp cinnamon
¼ cup protein powder
(I use a mix of pea protein and vanilla vegan protein powder)2.5 cups rolled oats
1 cup mix-ins
(dark chocolate chips, chopped walnuts, pumpkin seeds, coconut flakes)½ tsp salt
Instructions
In a large bowl, add the wet ingredients: mashed banana, peanut butter, maple syrup or honey, and vanilla. Mix until smooth and well combined.
Add the ground flax and protein powder. Stir until fully incorporated.
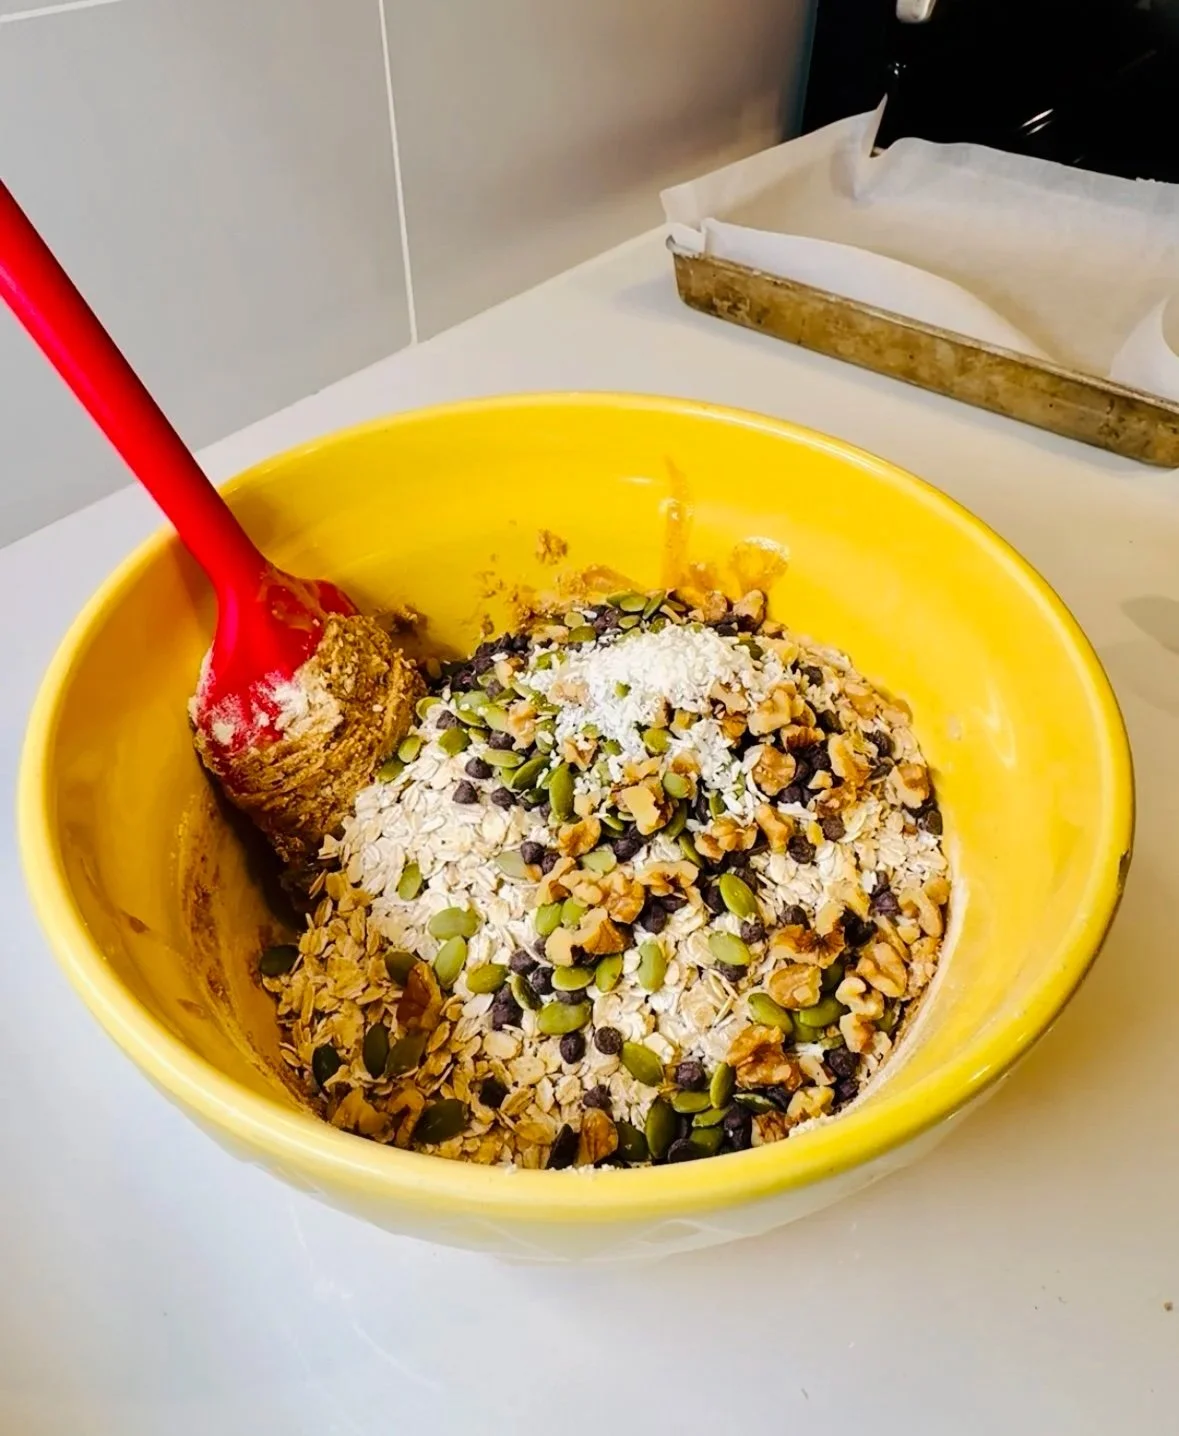
Add the rolled oats, mix-ins, cinnamon, and salt. Mix well until everything is evenly distributed.
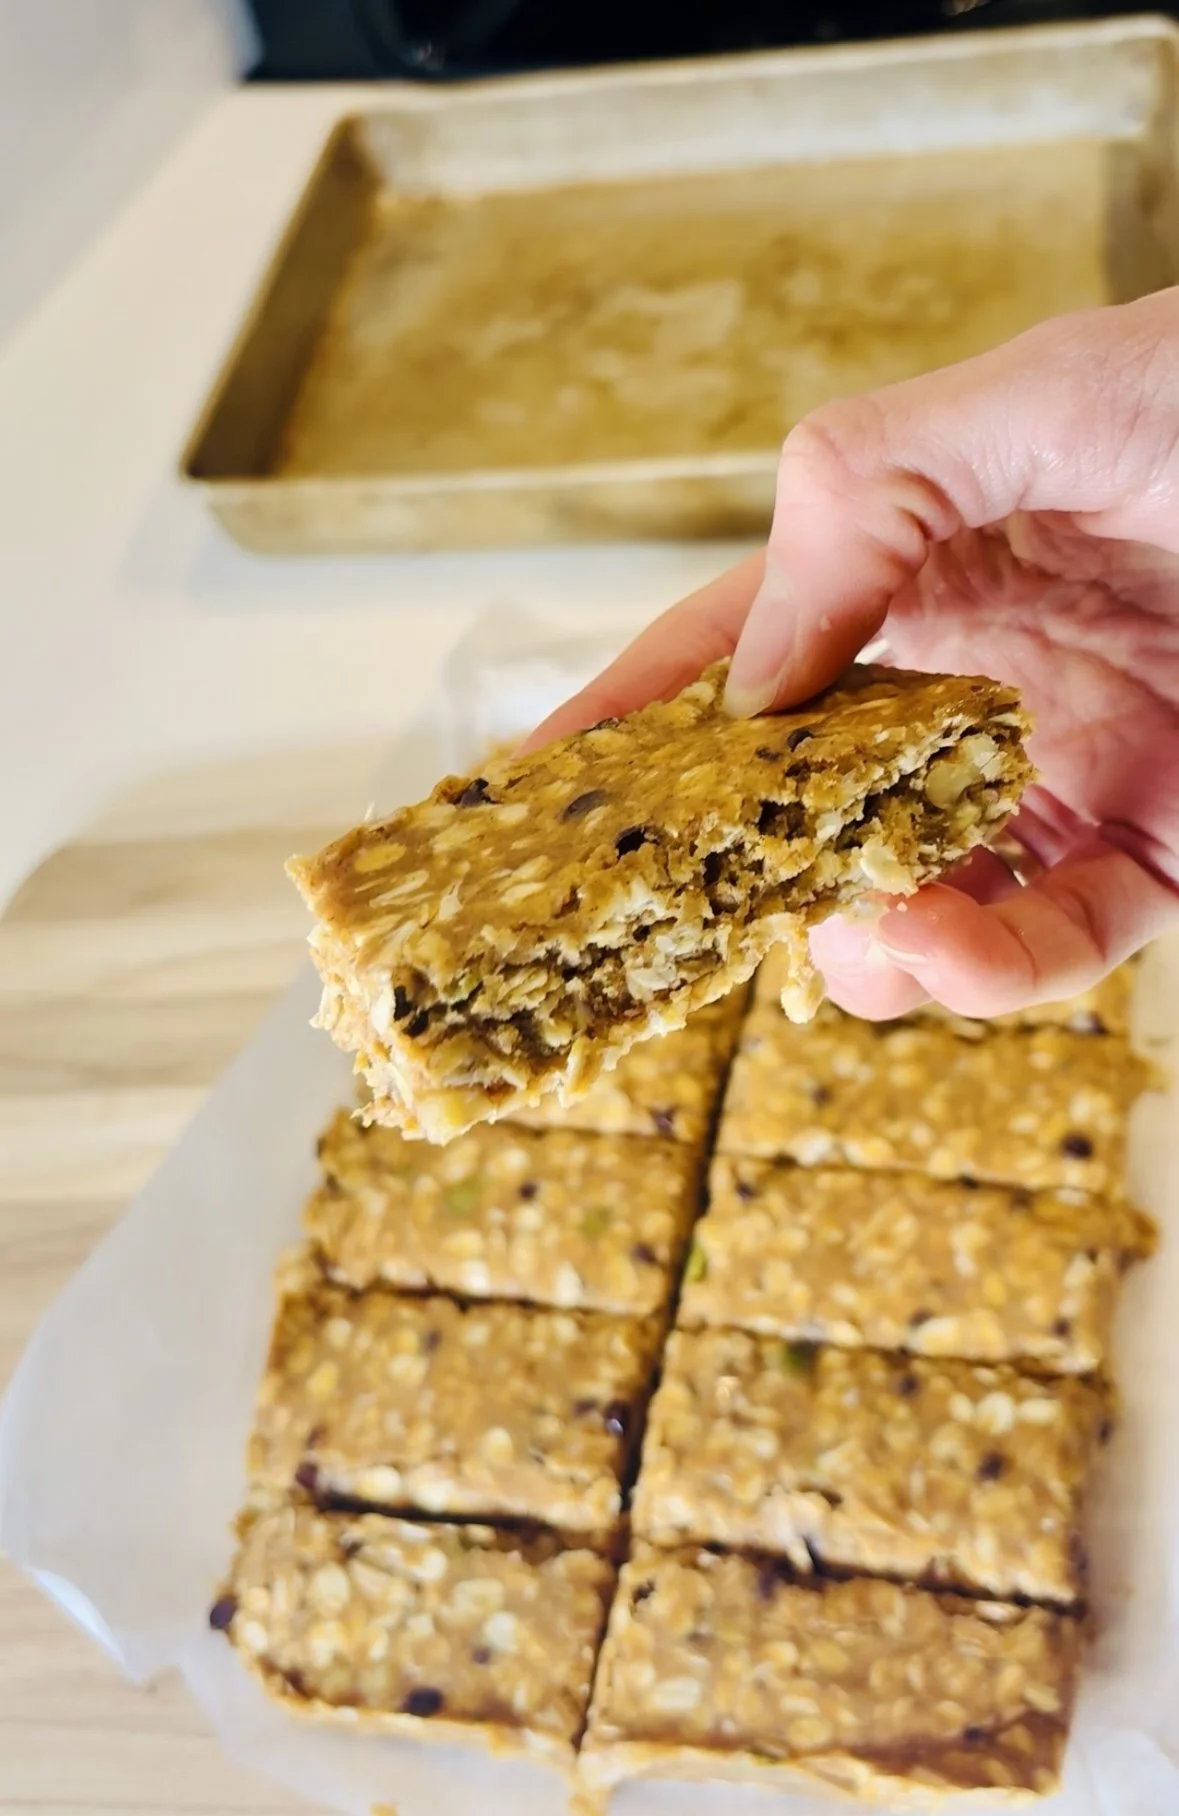
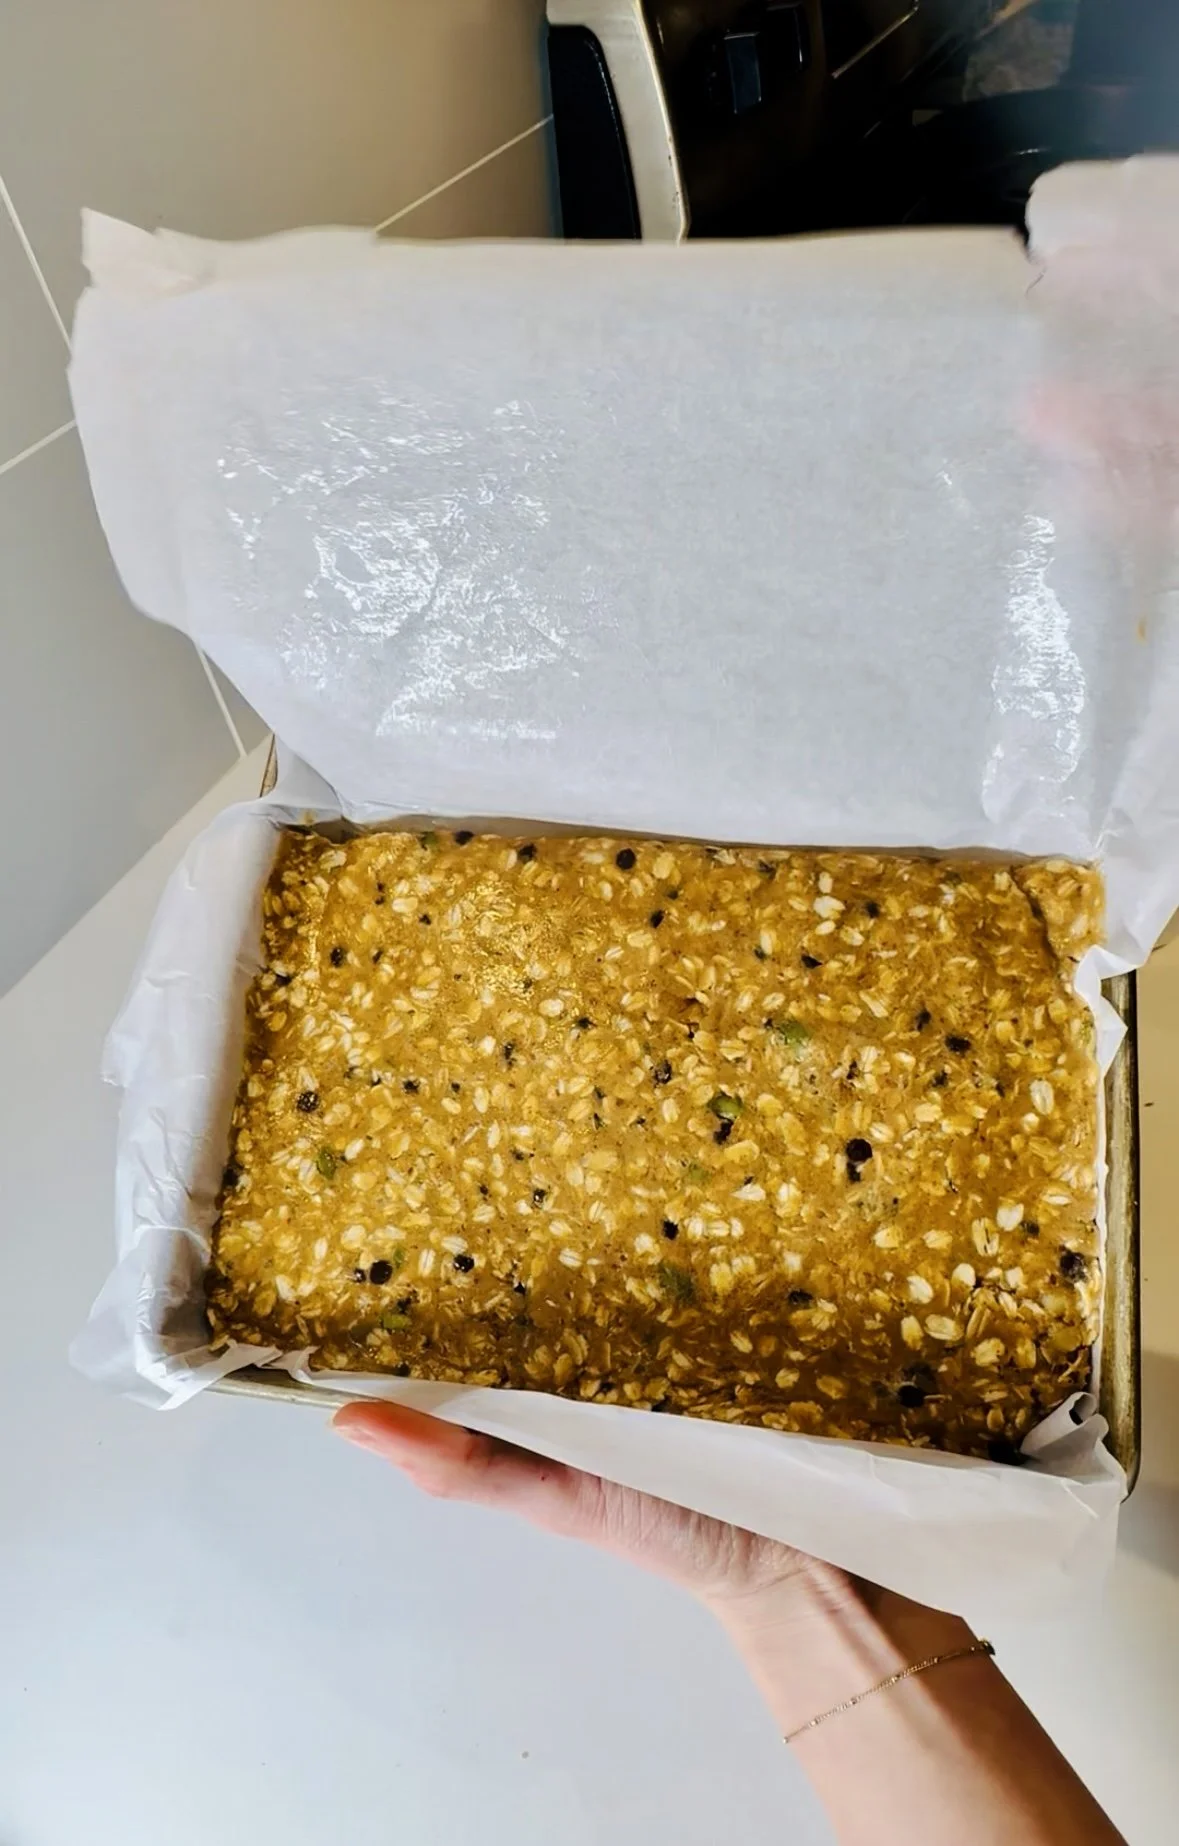
Line a loaf pan with parchment paper. Spoon the mixture into the pan.
Place another piece of parchment on top and press down firmly using your hands or a measuring cup with a flat bottom to flatten evenly.
Refrigerate for at least 30 minutes before slicing into bars.
Storage
Store bars in an airtight container in the fridge
Keeps well for up to 1 week
Tips & Variations
Use one large piece of parchment so you can fold half over the top to press the bars flat
Other great mix-ins:
dried cranberries or raisins
any nuts or seeds
cacao nibs
You can swap peanut butter for almond butter, sunflower seed butter, or a nut butter–tahini mix
When to Eat These
These bars work well:
as a mid-morning or afternoon snack
before or after movement
when you need fuel but don’t want a full meal
They’re especially helpful if you tend to forget to eat until your energy crashes.
More Recipes
If you like these protein bars, you might also enjoy:
Pumpkin Energy Balls — soft, snackable, and perfect for quick energy
Banana Nut Granola — great for pairing with fruit & yogurt or milk for a balanced breakfast or snack
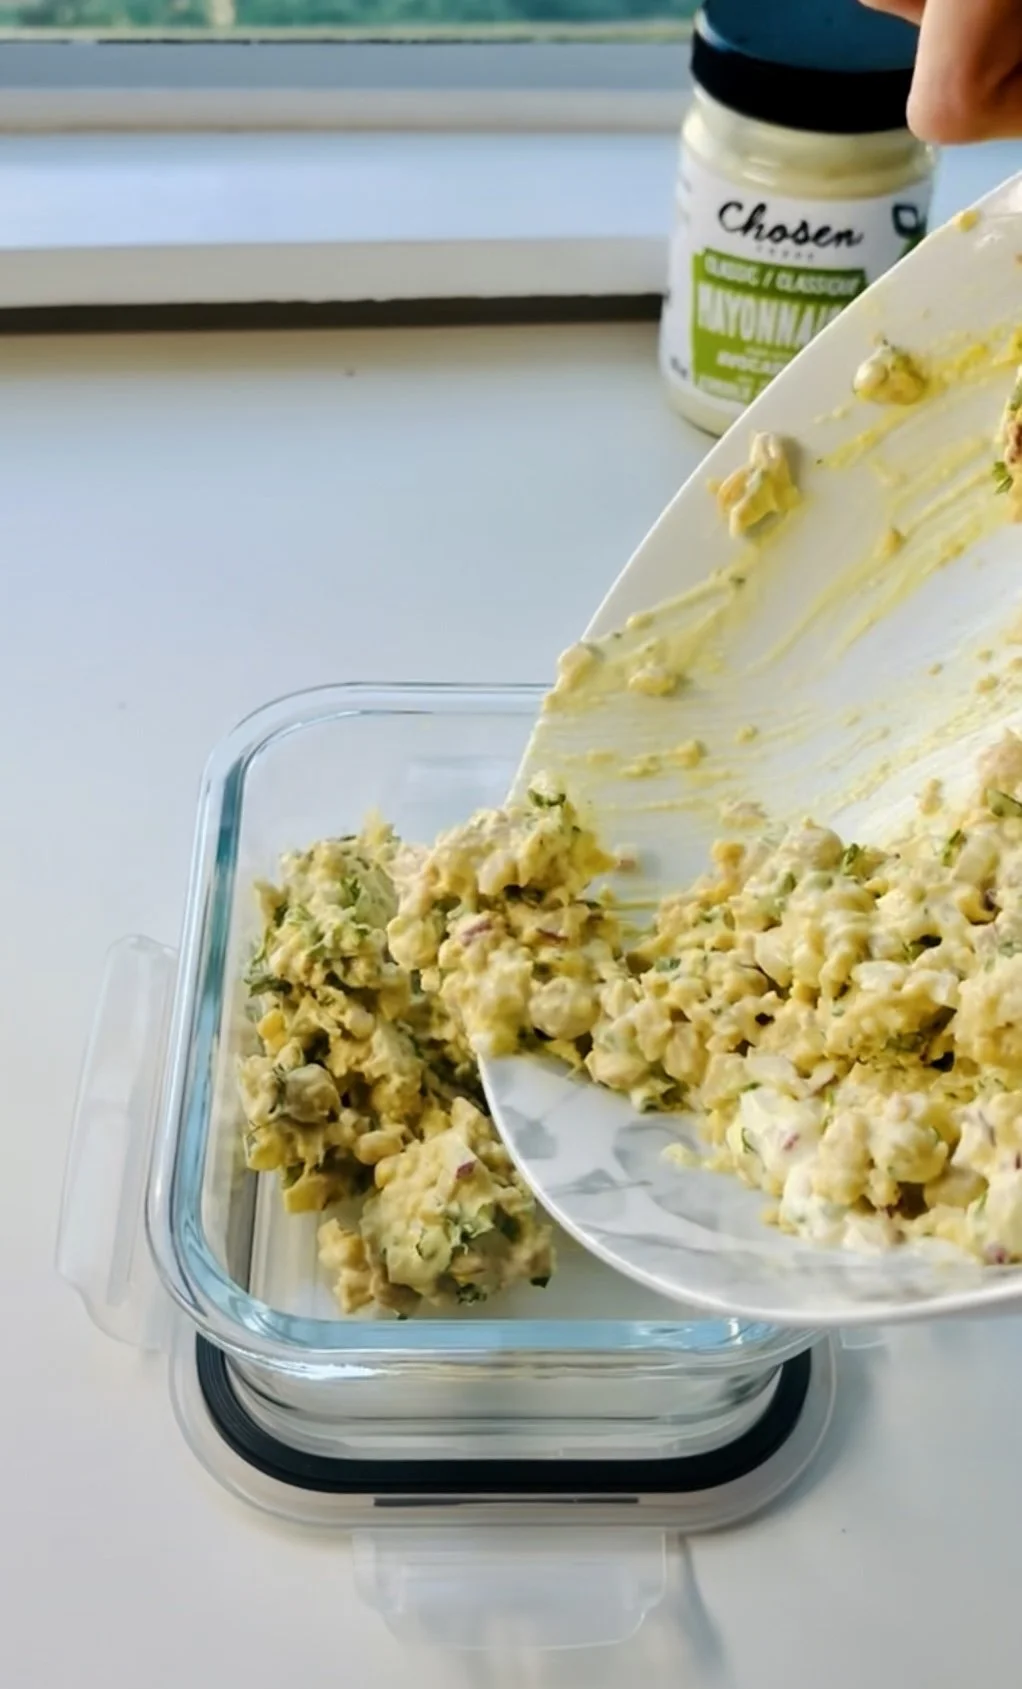
Easy Chickpea Salad Sandwich Filling
If you’re looking for a simple, protein-rich vegetarian lunch that actually keeps you full and focused, this chickpea salad sandwich filling is one of my go-to recipes.
It’s quick to make, easy to prep ahead, and incredibly versatile — perfect for busy workdays, low-energy days, or when decision fatigue hits hard.
Why Chickpeas Are Great for Brain & Gut Health
Chickpeas are rich in:
Plant-based protein → supports neurotransmitters like dopamine
Fiber → helps stabilize blood sugar and support gut health
Complex carbohydrates → steady, long-lasting energy
Balanced meals like this can make a noticeable difference in focus, mood, and afternoon energy — especially for people with ADHD.

Chickpea Salad Sandwich Filling Recipe
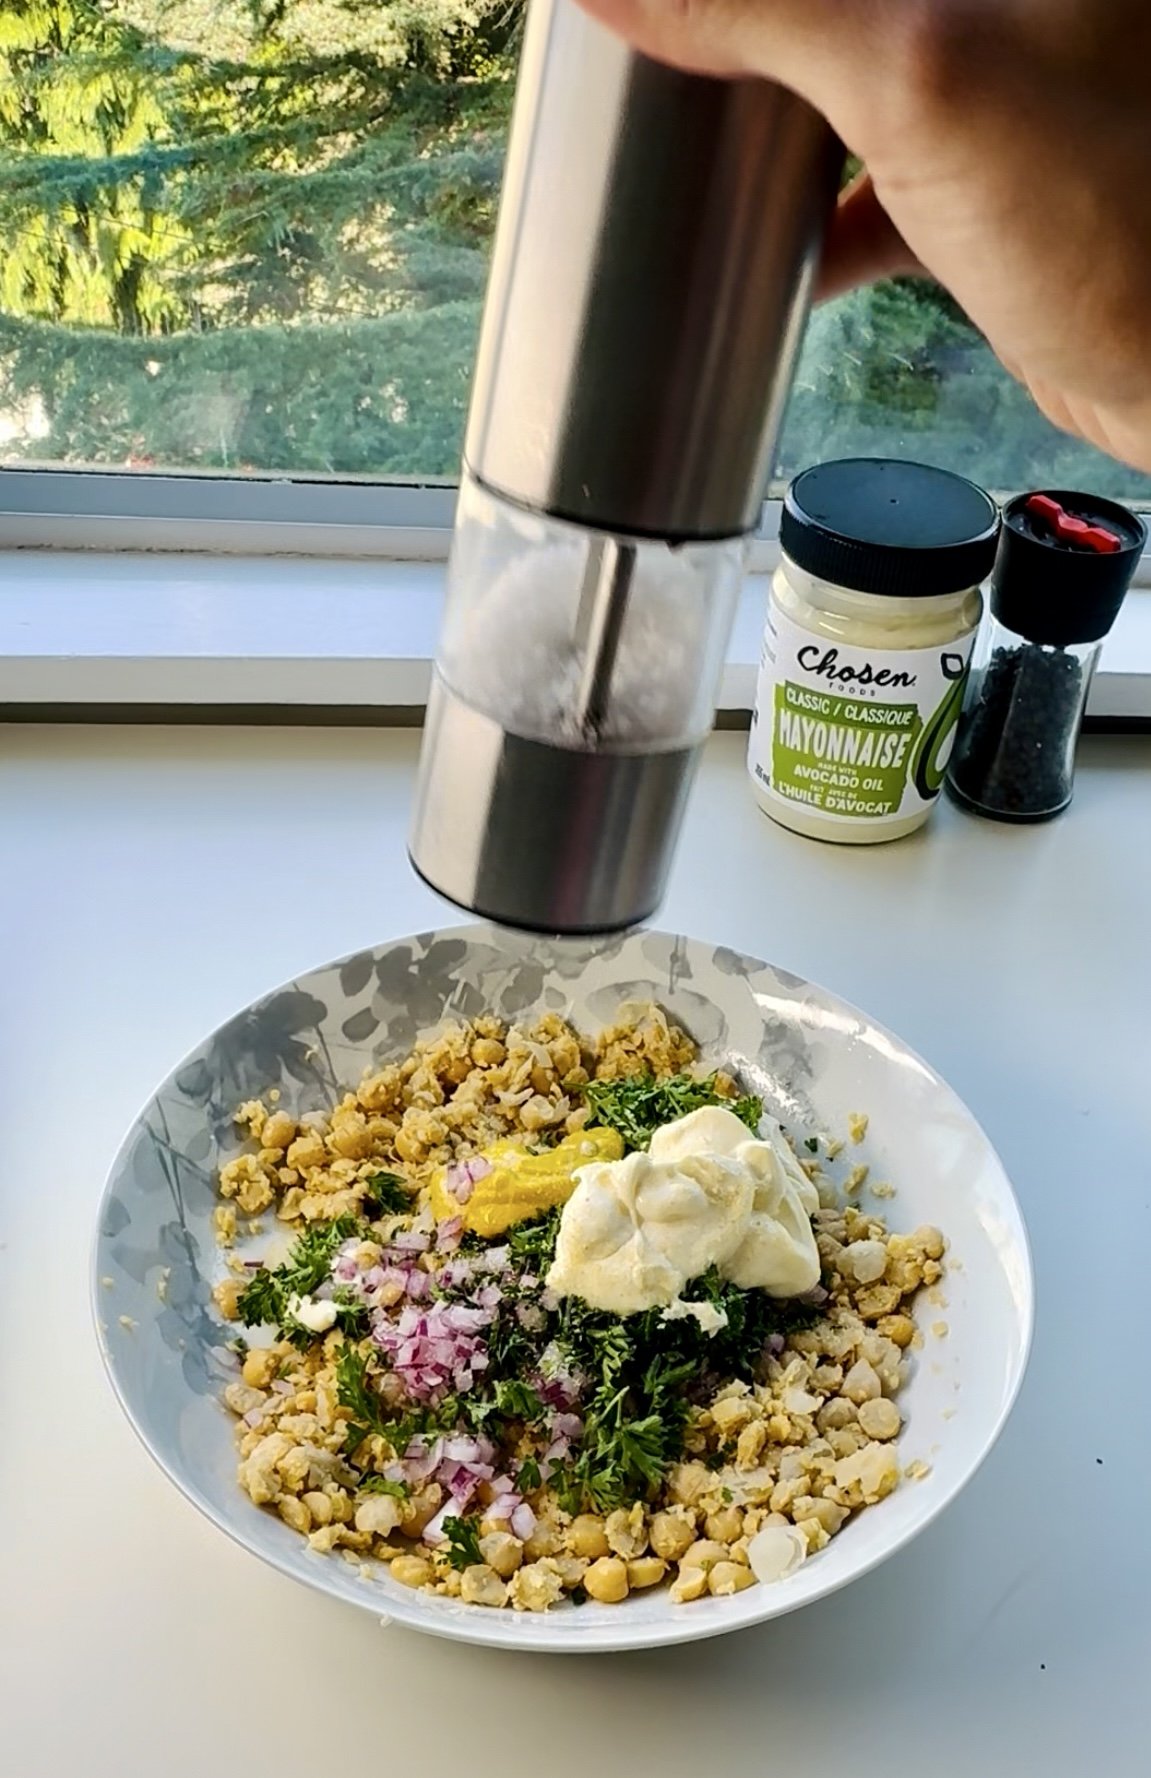
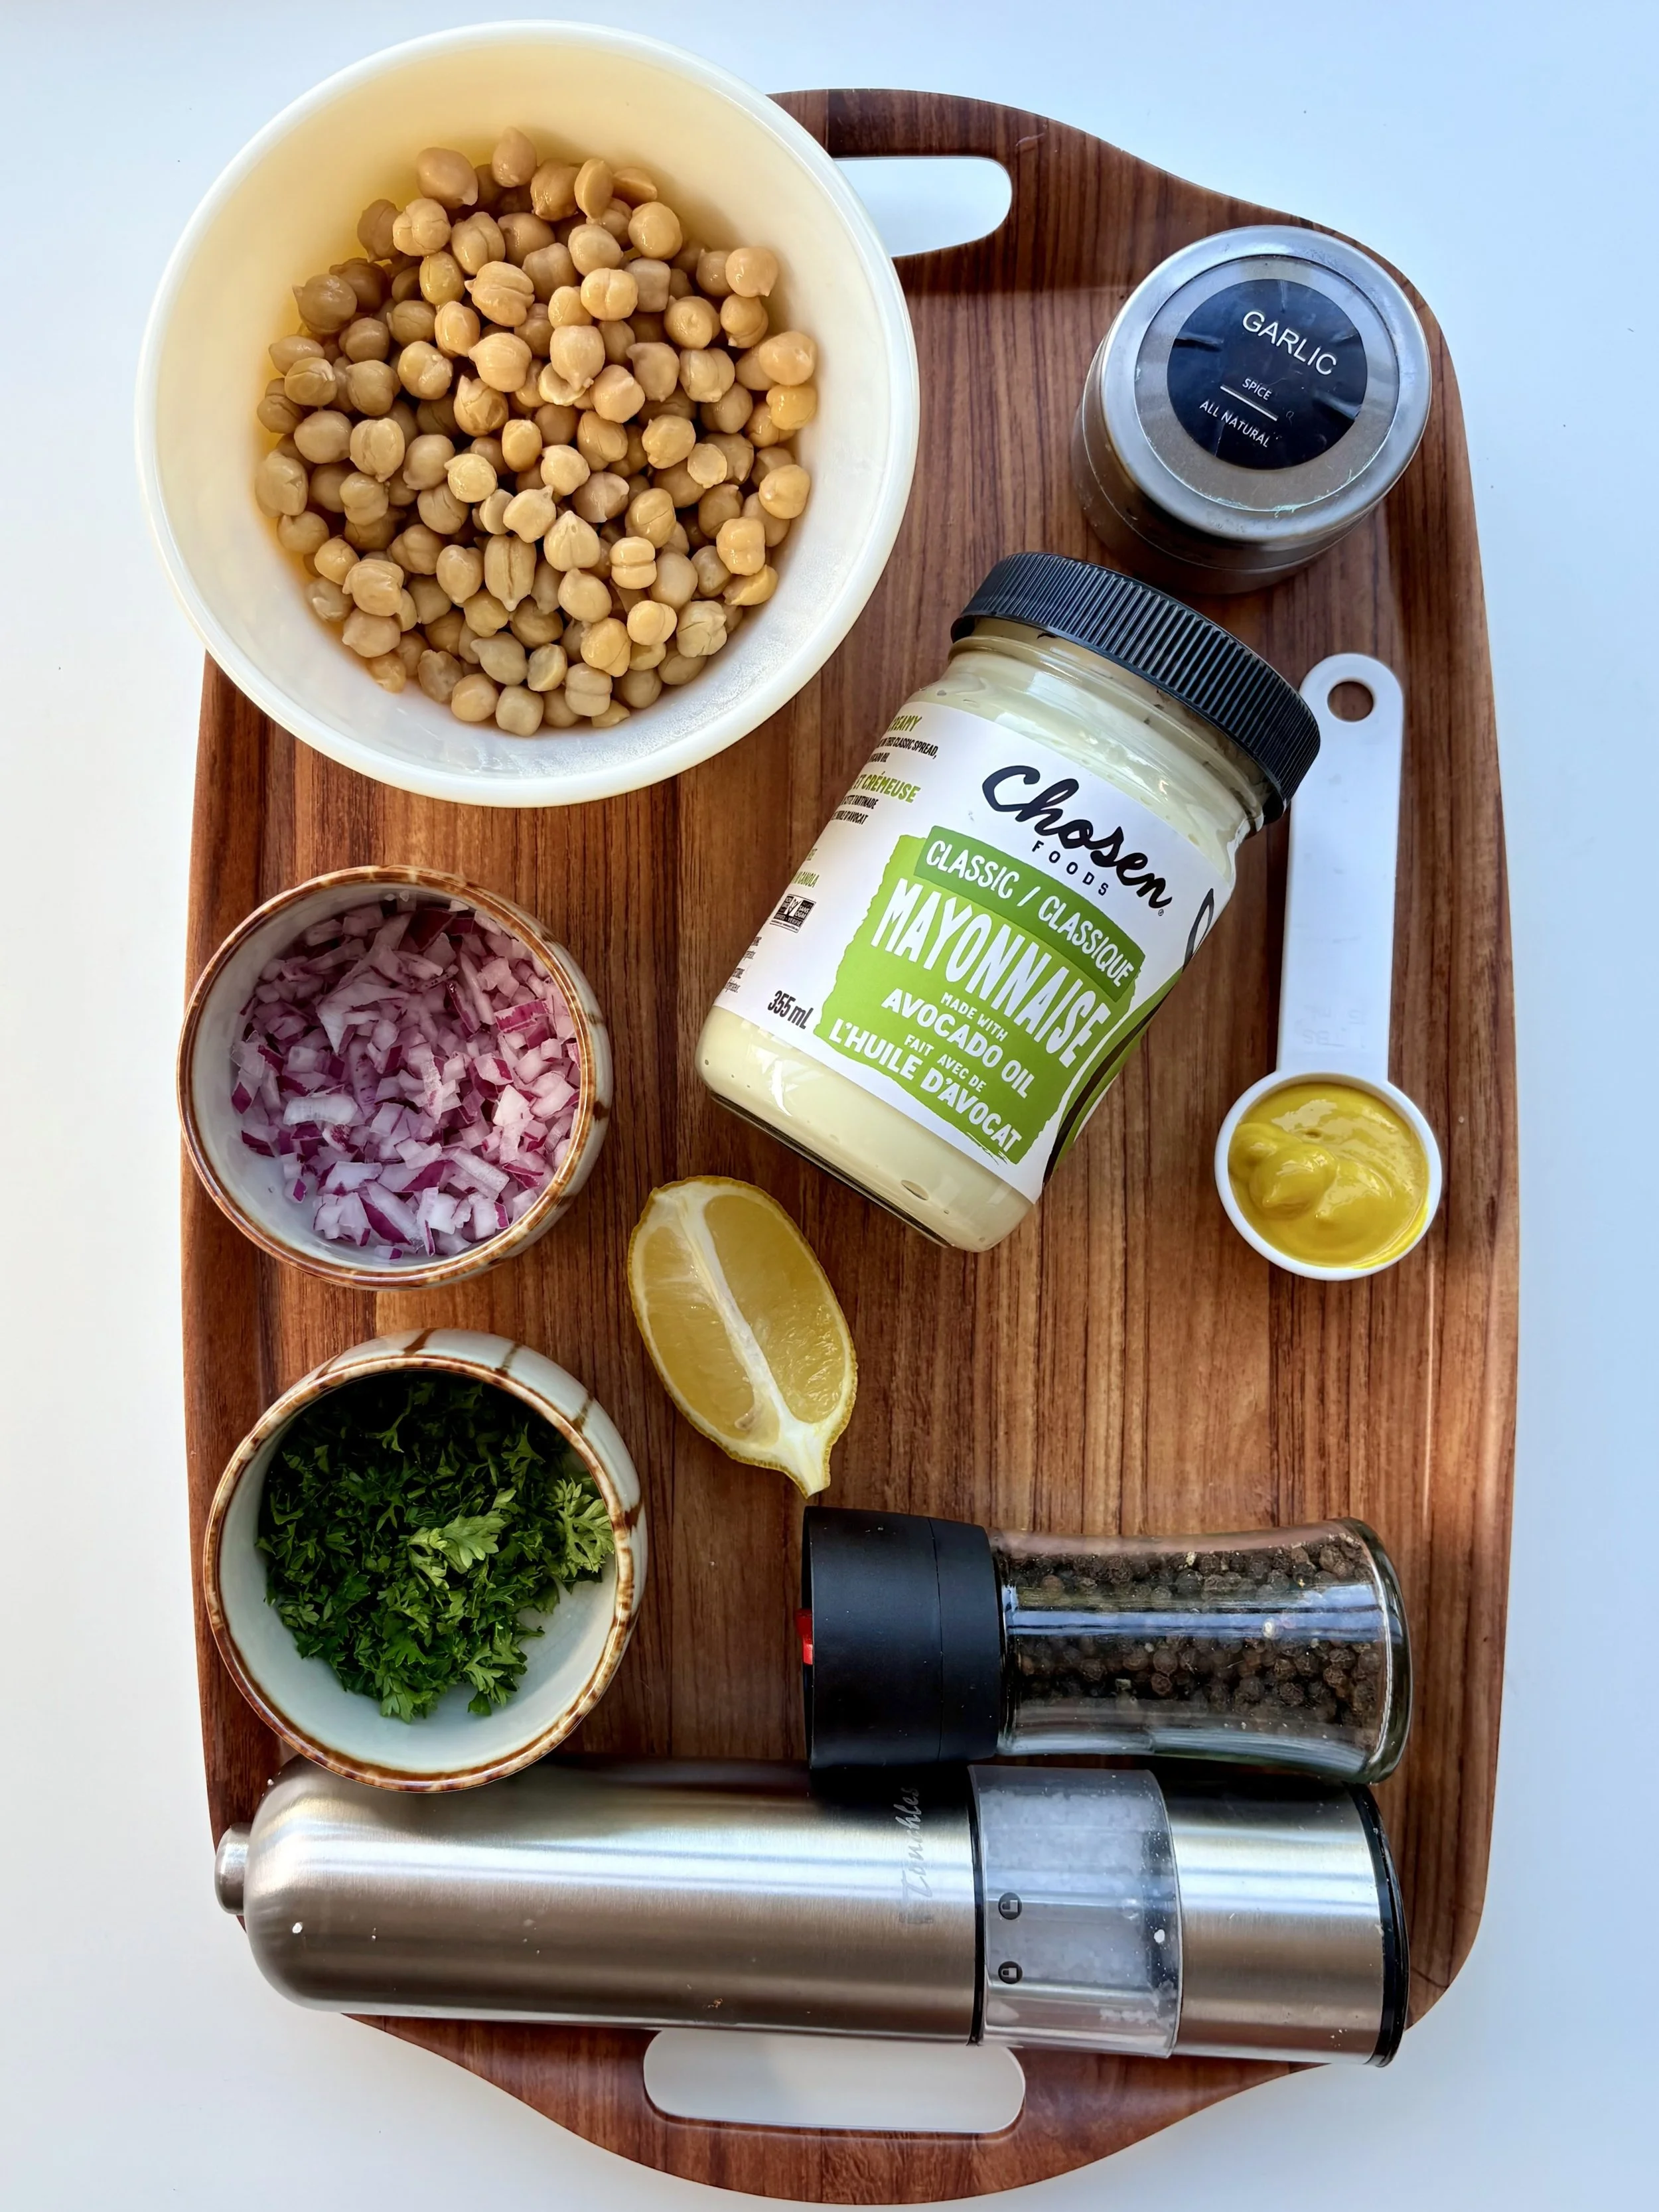
Ingredients
1 can chickpeas, rinsed and drained
¼ cup red onion, finely chopped
¼ cup parsley, finely chopped
3 tsp mayo (I use avocado-oil mayo, and if i have time, I’ll make my homemade mayo)
1 tbsp mustard
Juice from 1 lemon wedge
½ tsp garlic powder
¼ tsp salt & pepper
Instructions
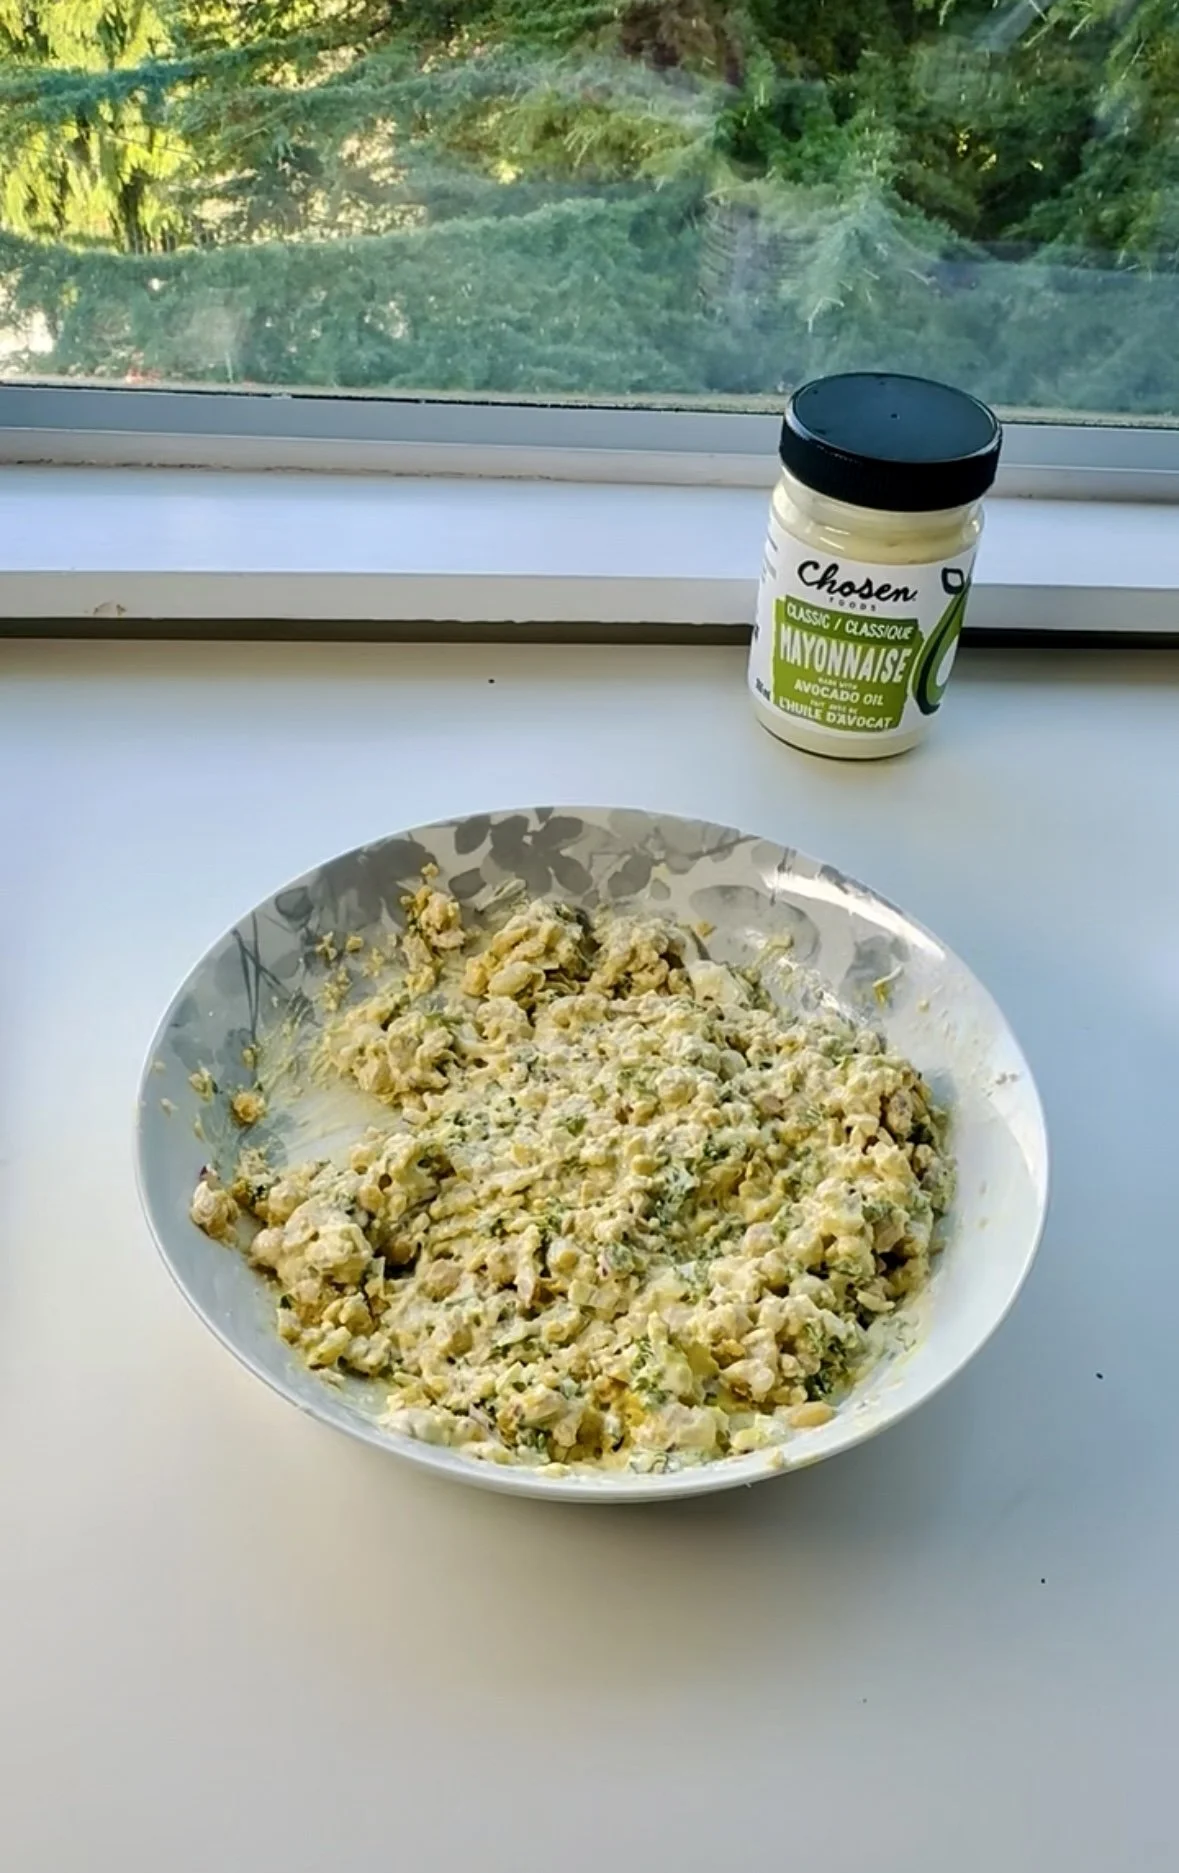
Mash chickpeas until chunky but spreadable.
Add remaining ingredients and mix well.
Taste and adjust seasoning as needed.
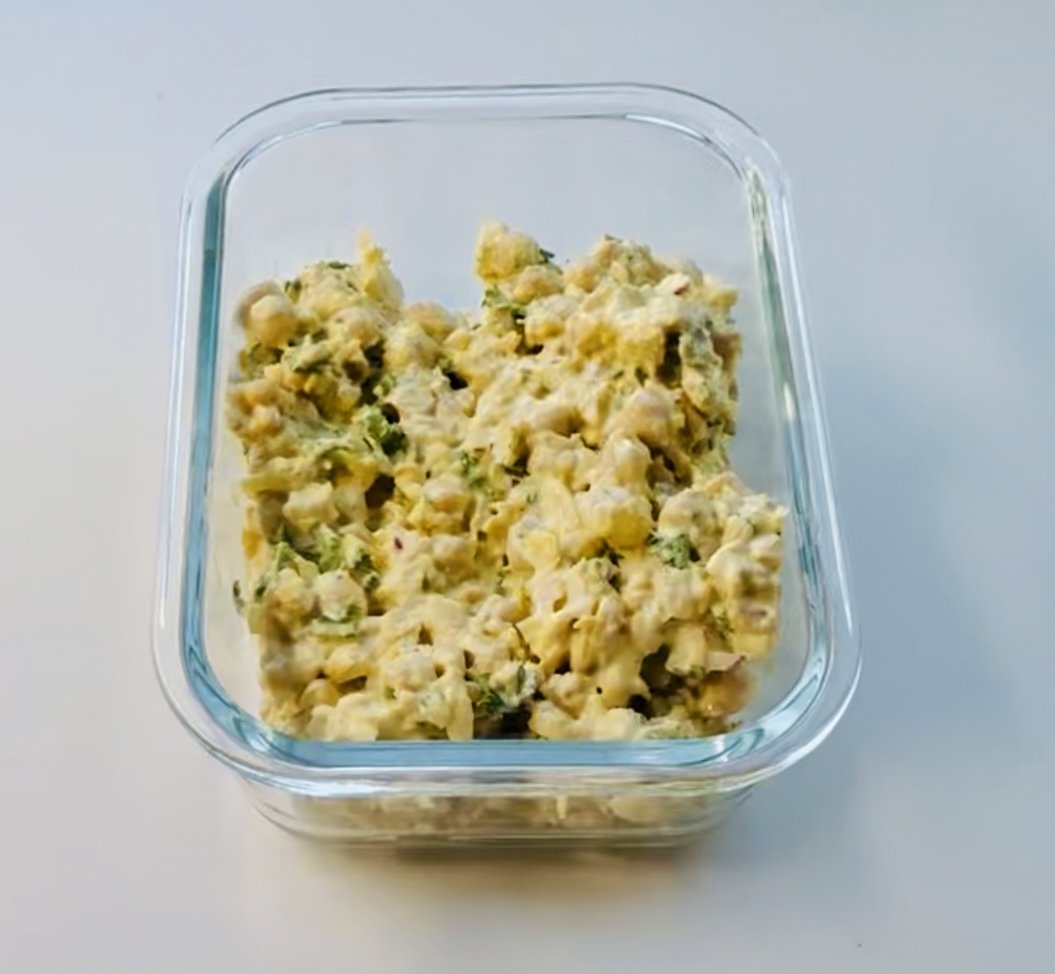
Serve in a sandwich, wrap, lettuce cup, or with crackers and veggies.
How to Boost Protein
If you want this chickpea salad to be more filling or higher in protein, here are a few easy swaps and add-ons:
Swap the mayo for Greek yogurt or cottage cheese
Serve it on sprouted or high-protein bread
Make it into a sandwich on my protein bagels
Add halloumi, grilled chicken, or tofu to the sandwich
Pair it with a side of quinoa or lentil salad
These small changes help keep blood sugar steady and make this lunch more supportive for focus and energy.
Serving Ideas
This chickpea salad works beautifully as:
A sandwich on sprouted bread
A protein bagel sandwich
A wrap or lettuce cup
A lunch bowl with greens and quinoa
It’s flexible and perfect for meal prep.
Meal Prep Tips
Keeps well in the fridge for 3–4 days
Great for quick lunches, school lunches, or snack plates
Make once, eat multiple ways
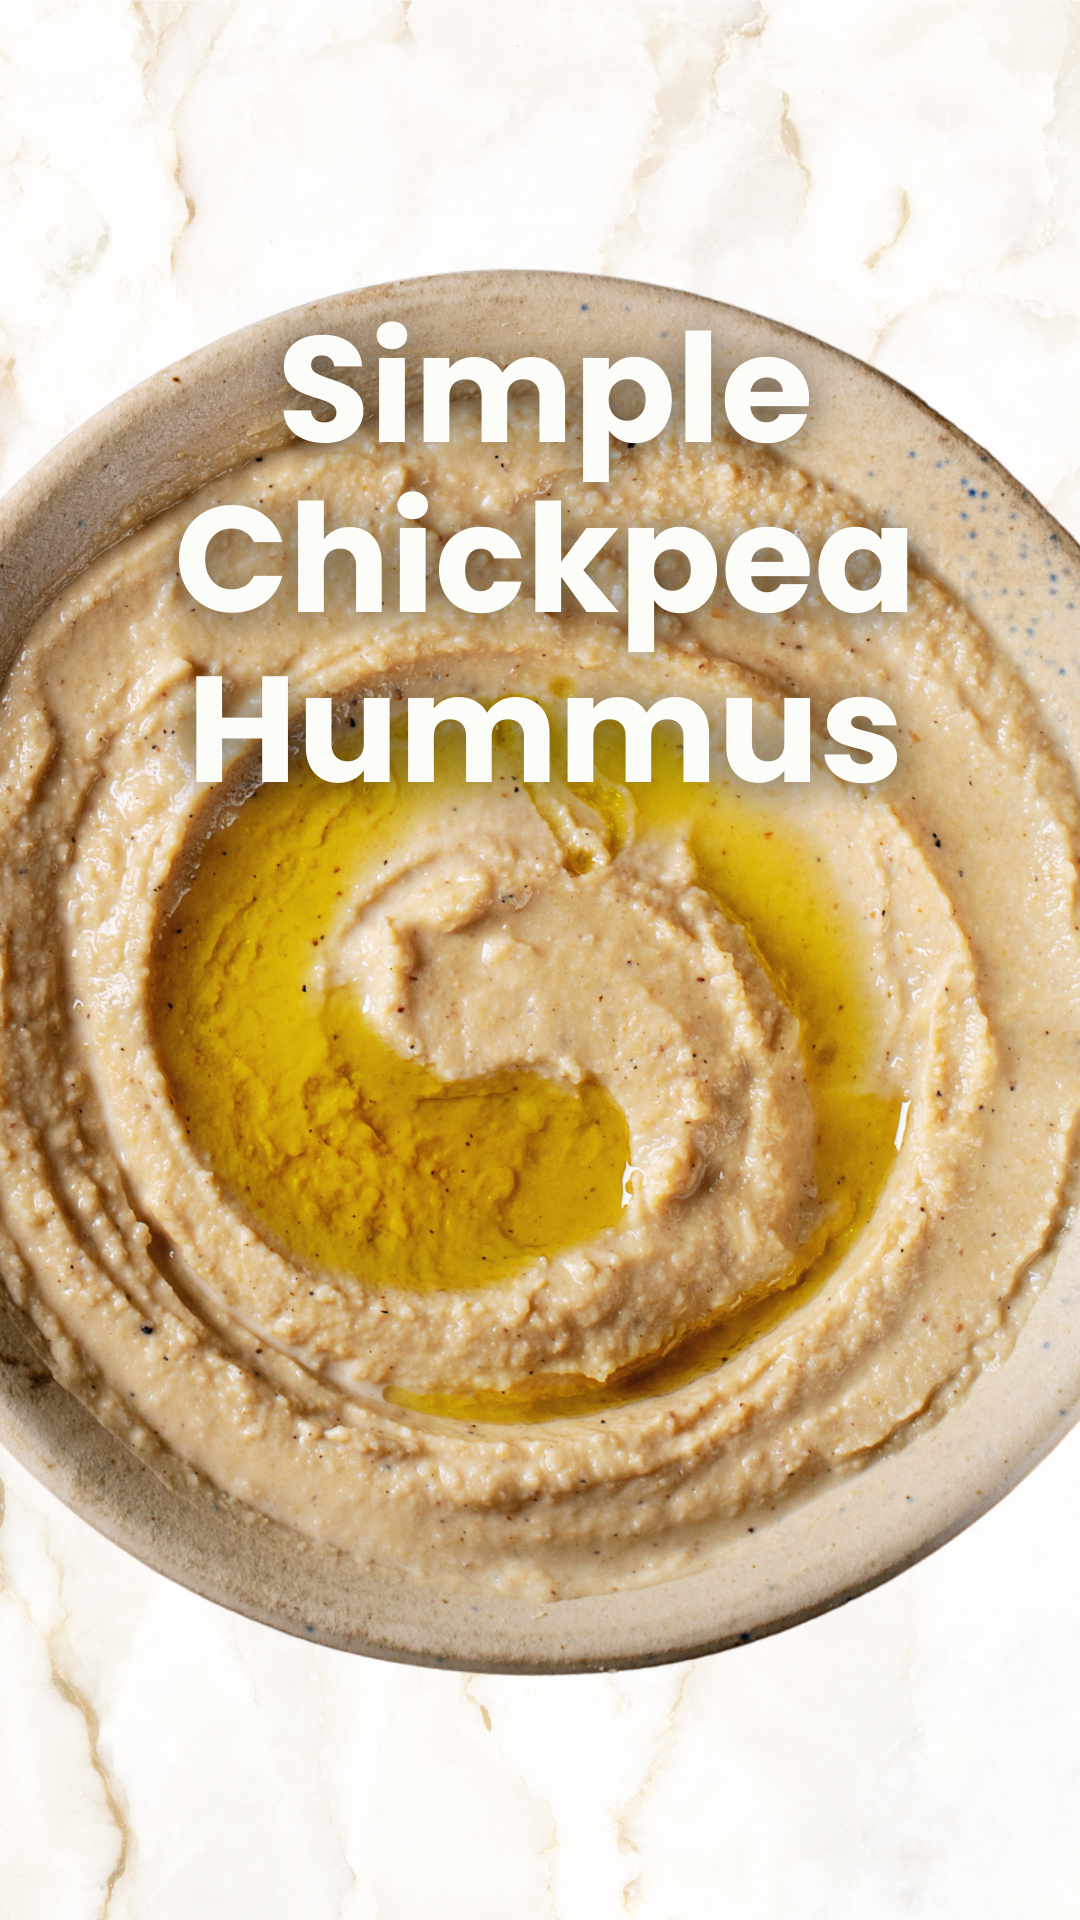
Easy Homemade Hummus (2-Minute Healthy Recipe)
If you’re looking for a quick, nourishing, high-fiber snack, this homemade hummus is about to become a weekly staple.
It’s high in plant-based protein, rich in fiber, and made with extra virgin olive oil — not the refined oils commonly found in store-bought dips.
This version blends up creamy, smooth, and full of Mediterranean flavor. Perfect for veggies, pita, bowls, wraps, or as a spread in healthy lunches.
Ingredients
1 can chickpeas, rinsed + drained
1 clove garlic
1 tsp tahini
Juice of ½ lemon
½ tsp cumin
Salt + pepper
2 tbsp extra virgin olive oil
¼ cup cold water
Instructions
Add chickpeas, garlic, tahini, lemon juice, cumin, salt, and pepper to a blender or food processor.
Pour in 2 tbsp EVOO and ¼ cup cold water.
Blend until smooth and creamy.
Adjust seasoning or water for your preferred texture.
Serve with veggies, pita, crackers, bowls, or wraps.
Why This Hummus Is Better Than Store-Bought
Most packaged hummus contains refined seed oils like canola or soybean oil, which are added for texture and shelf-life.
This homemade version uses extra virgin olive oil, which is:
naturally anti-inflammatory
rich in antioxidants
supportive of heart and brain health
more compatible with balancing energy and mood
A simple swap — but a meaningful upgrade.
For a deeper look at the healthiest oils to keep in your kitchen, check out my blog post: Cooking Oils for a Healthier You.
What to Serve It With
Veggie sticks
Whole grain crackers
Pita or naan
Falafel (recipe coming soon!)
Quinoa or rice bowls
Wraps and sandwiches
If you’re looking for other simple, healthy sauces, you might also enjoy:
Each one is fast, family-friendly, and made with clear, whole-food ingredients.
Storage
Store in an airtight container in the fridge for up to 4 days.
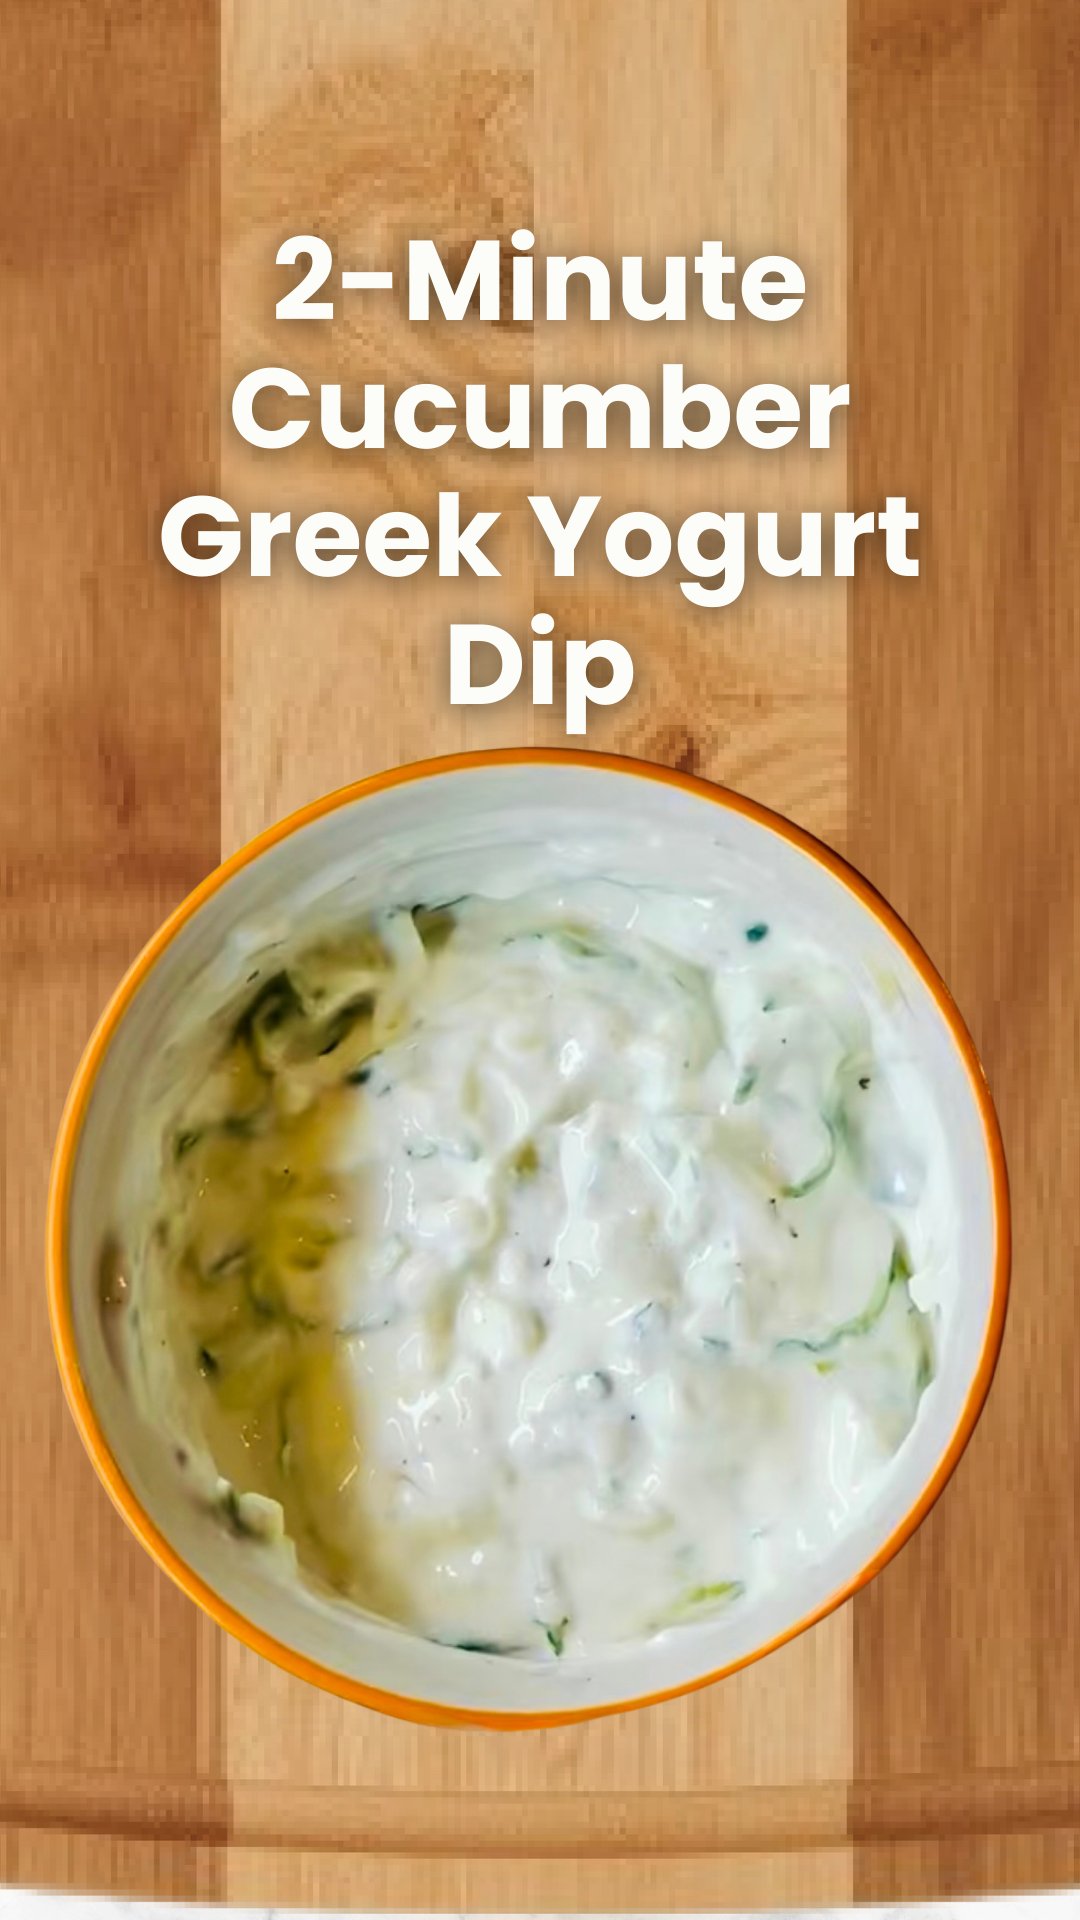
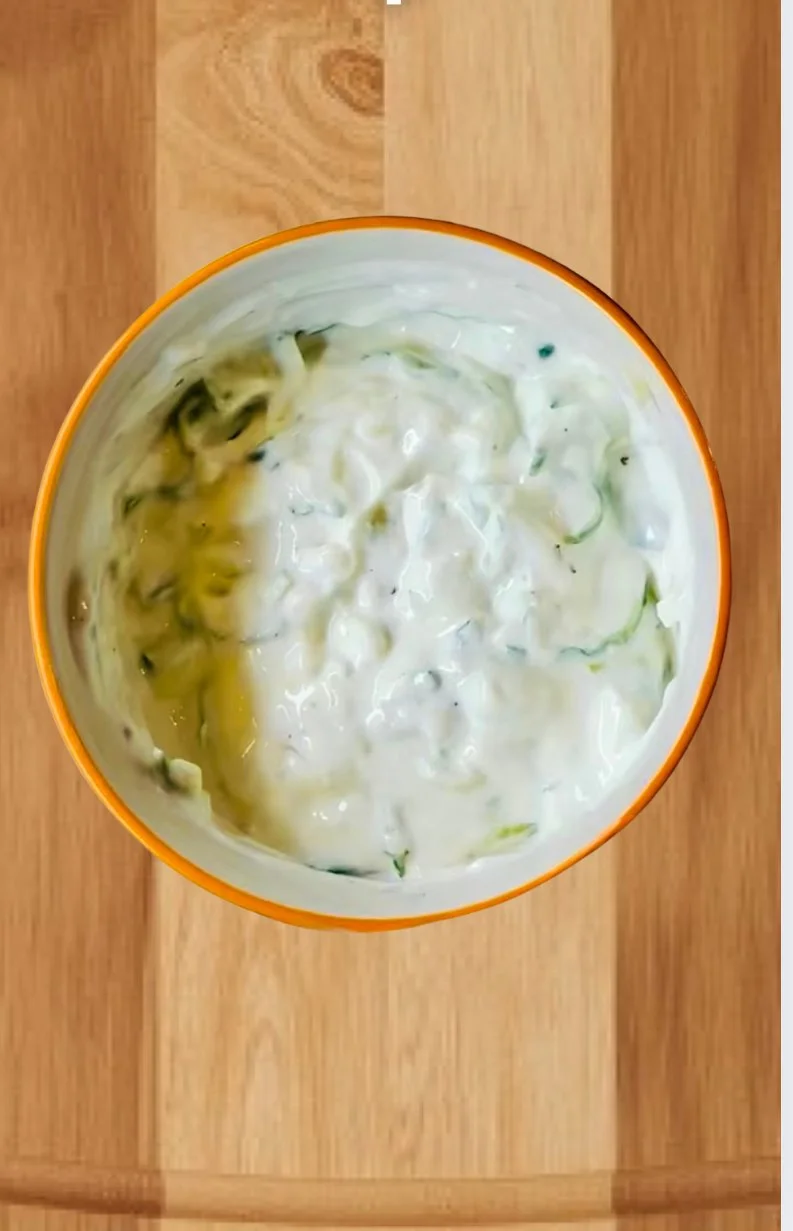
High-Protein Cucumber Greek Yogurt Dip (Easy, Refreshing, and ADHD-Friendly)
If you’re looking for a quick, nourishing, high-protein snack that supports steady energy and focus, this Cucumber Greek Yogurt Dip is a staple worth adding to your weekly routine.
It takes under two minutes to make, uses simple ingredients, and pairs beautifully with veggies, crackers, or wraps.
For families navigating ADHD, busy school days, or after-school blood sugar crashes, this dip offers a balanced combination of protein, fiber, and healthy fats — the exact trio that helps stabilize mood, focus, and appetite.
Let’s dive in.
🧠 Why This Recipe Supports Focus and Energy
This recipe isn’t just delicious — it’s functional.
Here’s why it works so well for ADHD brains and anyone who struggles with mid-day crashes:
✔ High-Protein Base (Greek Yogurt)
Greek yogurt provides slow-digesting protein that helps:
stabilize blood sugar
keep hunger steady
support dopamine production
prevent “crash and crave” cycles
✔ Hydrating, Fiber-Rich Cucumber
Cucumber adds hydration and gut-friendly fiber without weighing the dip down.
✔ Lemon + Garlic for Flavor Without Sugar
Bright flavor helps reduce the need for sugary dips or store-bought options filled with additives.
✔ Simple Ingredients = No Overwhelm
ADHD-friendly cooking means easy steps, minimal clean-up, and sensory-friendly textures — this dip checks all the boxes.
ADHD-Friendly Tip
If your child (or you!) struggles with grazing or low appetite in the afternoon:
👉 Keep this dip prepped in the fridge
👉 Pair it with a carb + veggie
👉 Add a fun container or dipping cup
Balanced snacks help regulate energy, mood, and executive functioning — especially during homework time.
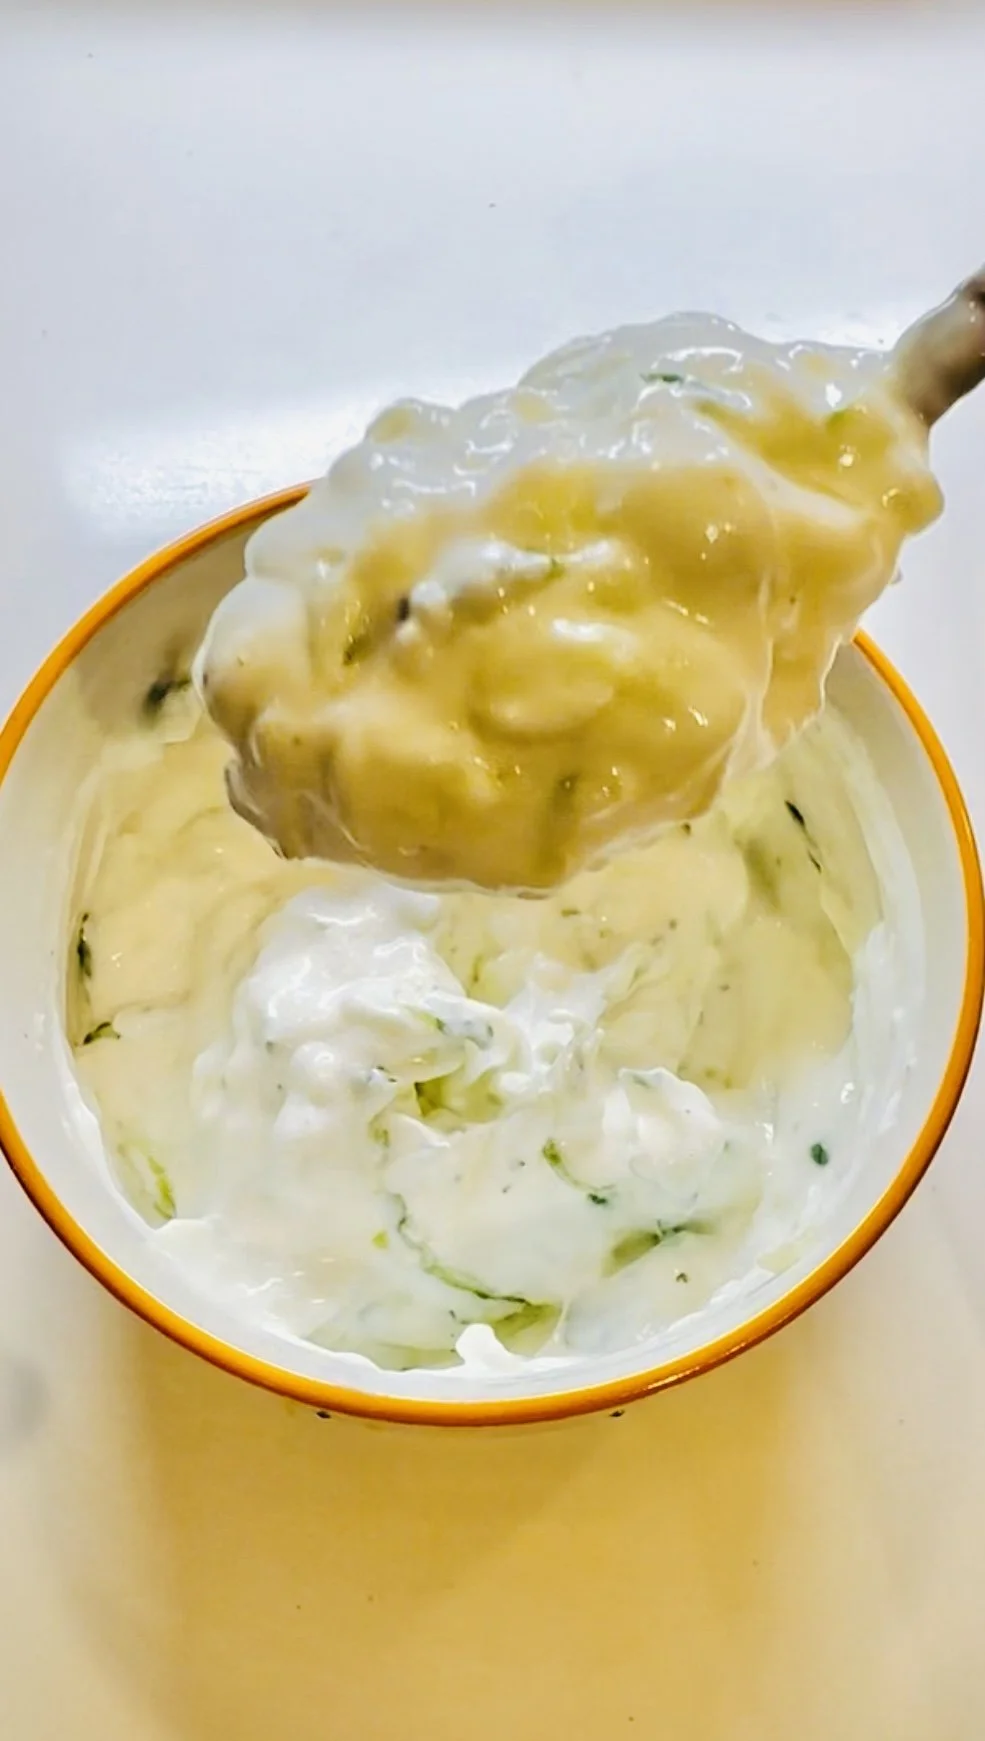
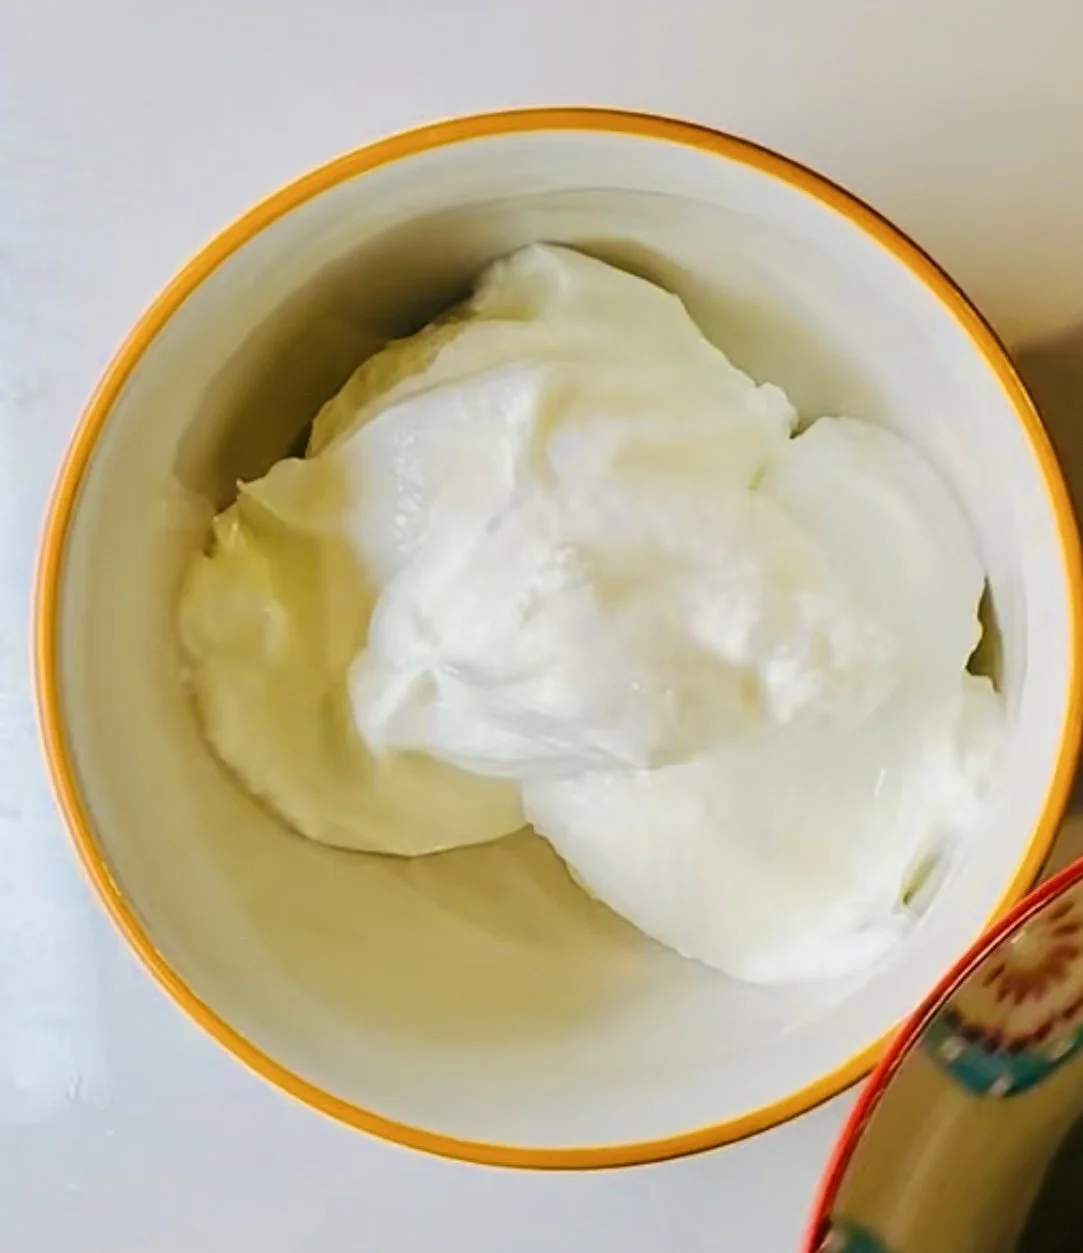
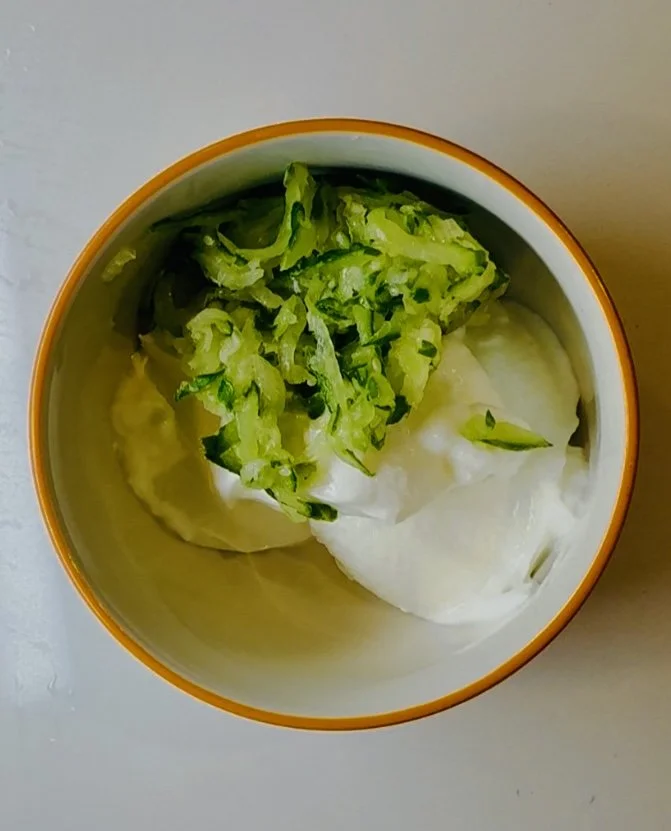
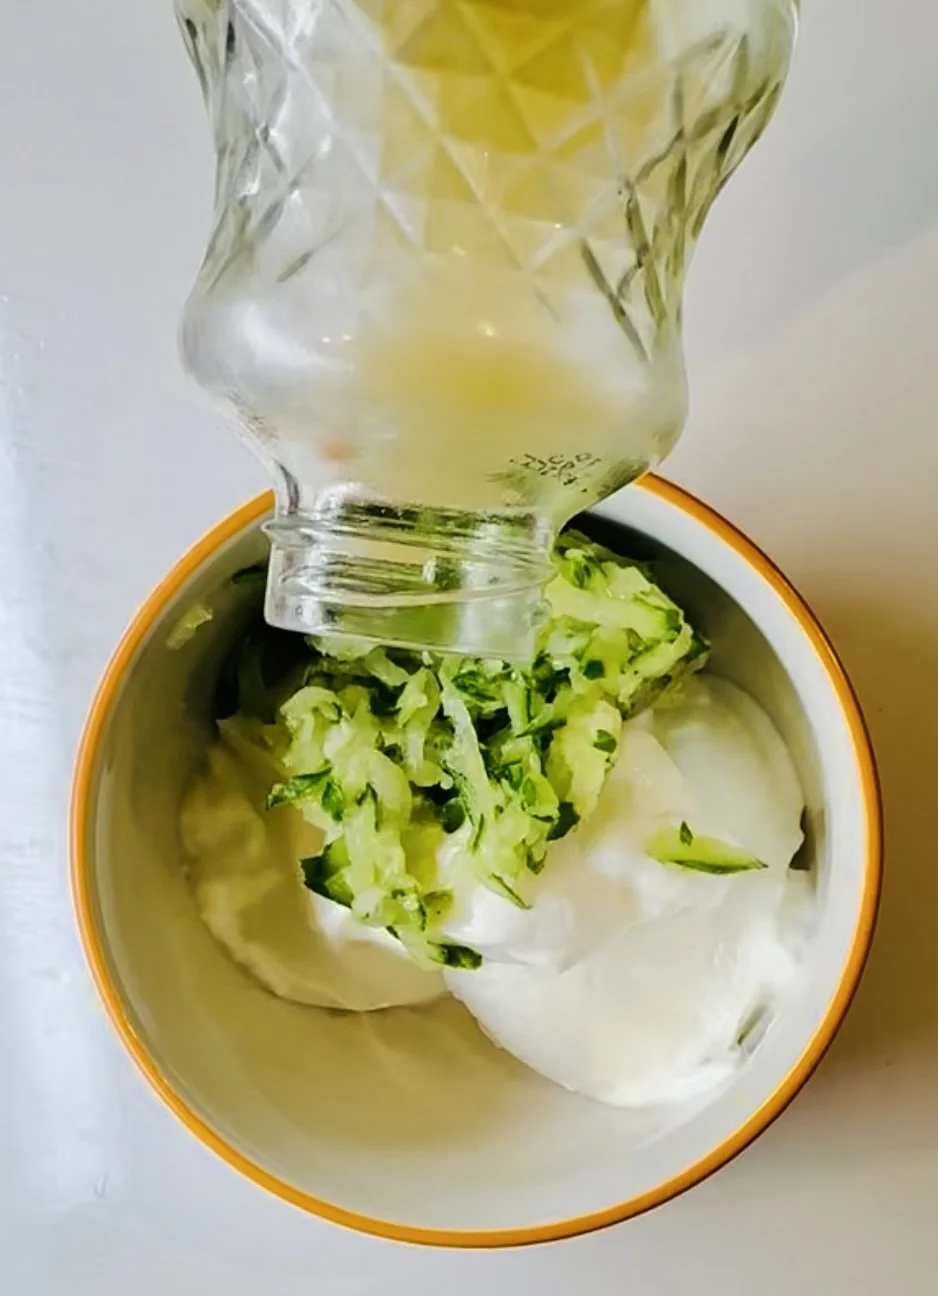
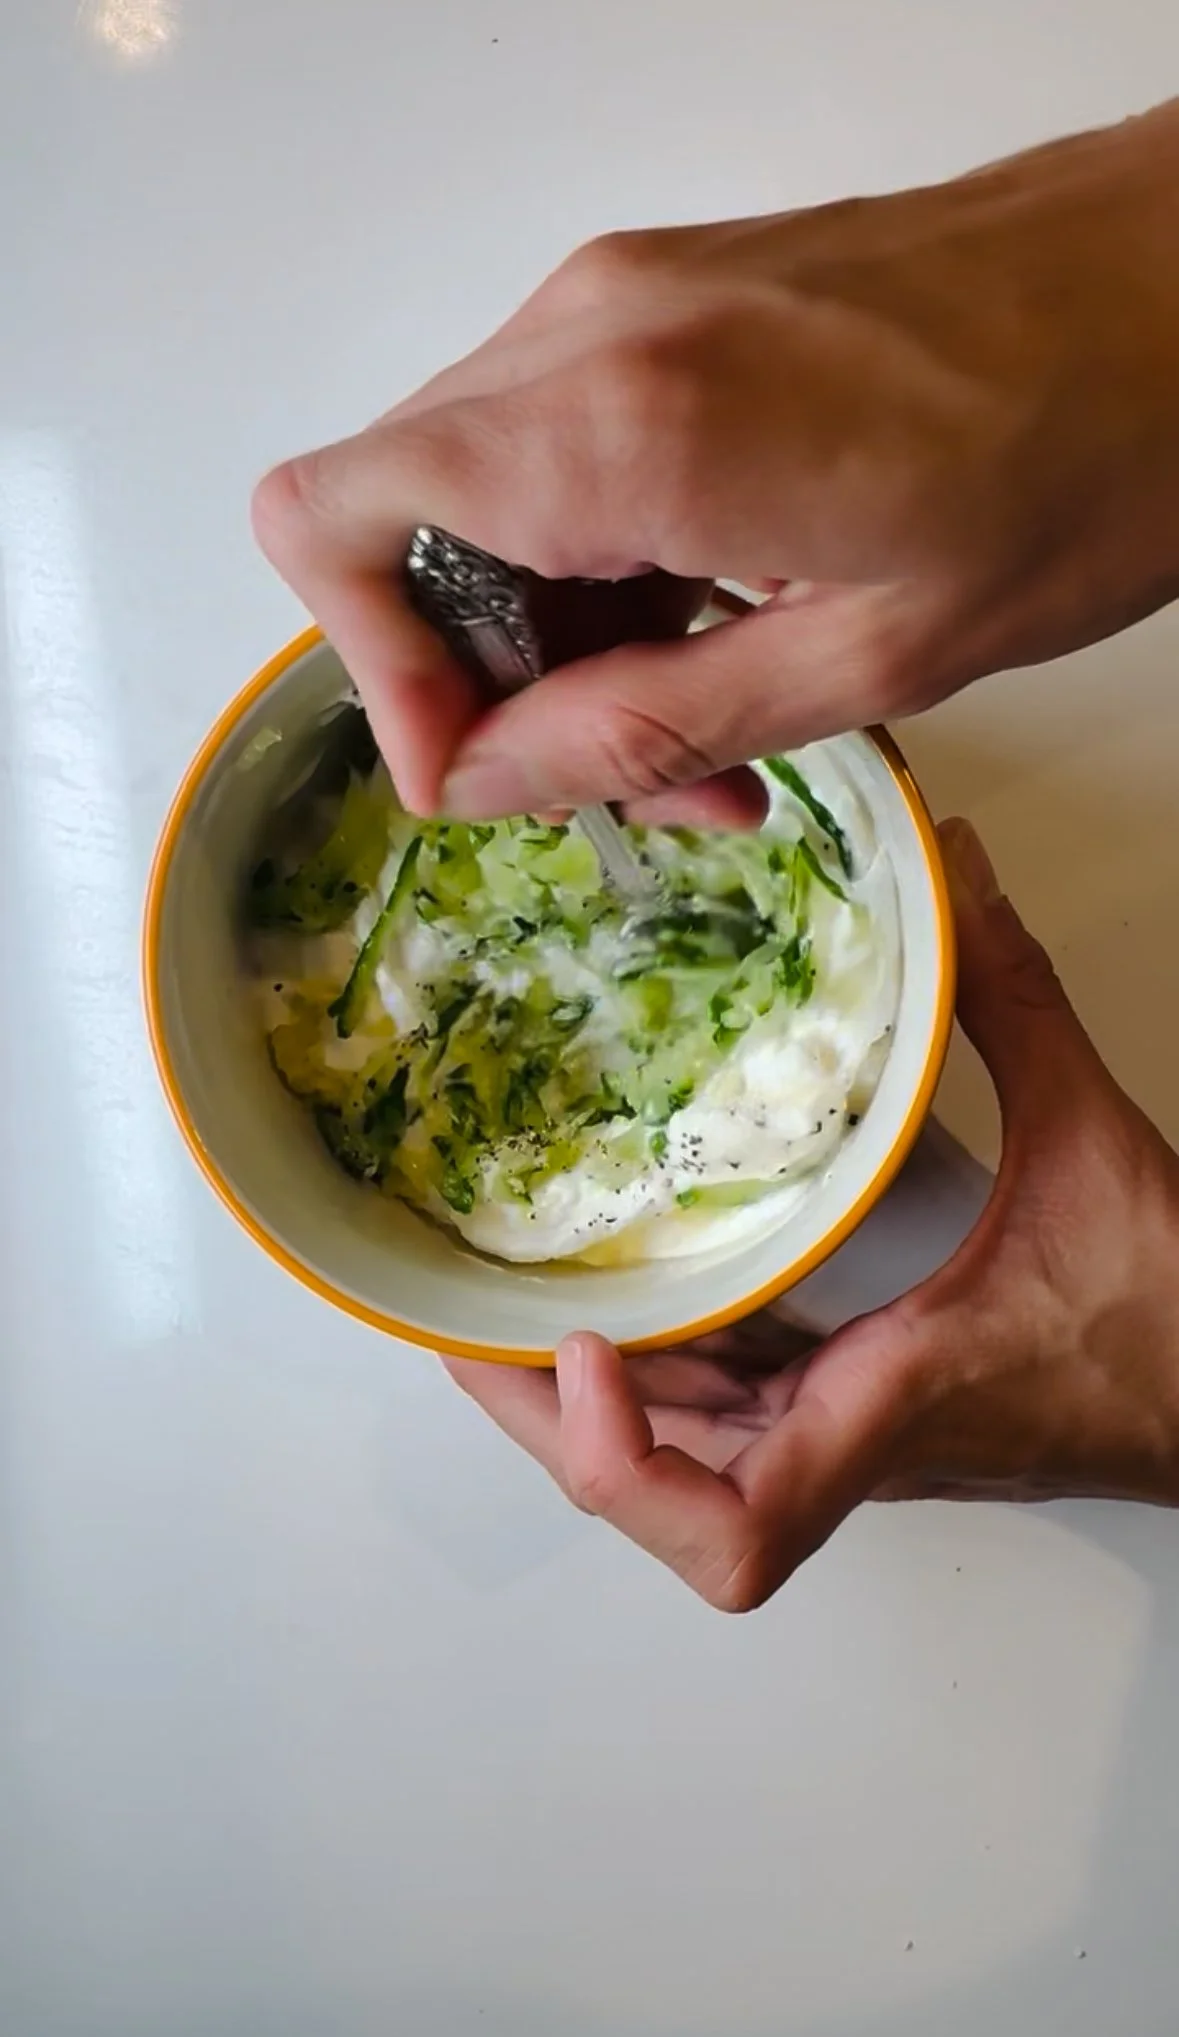
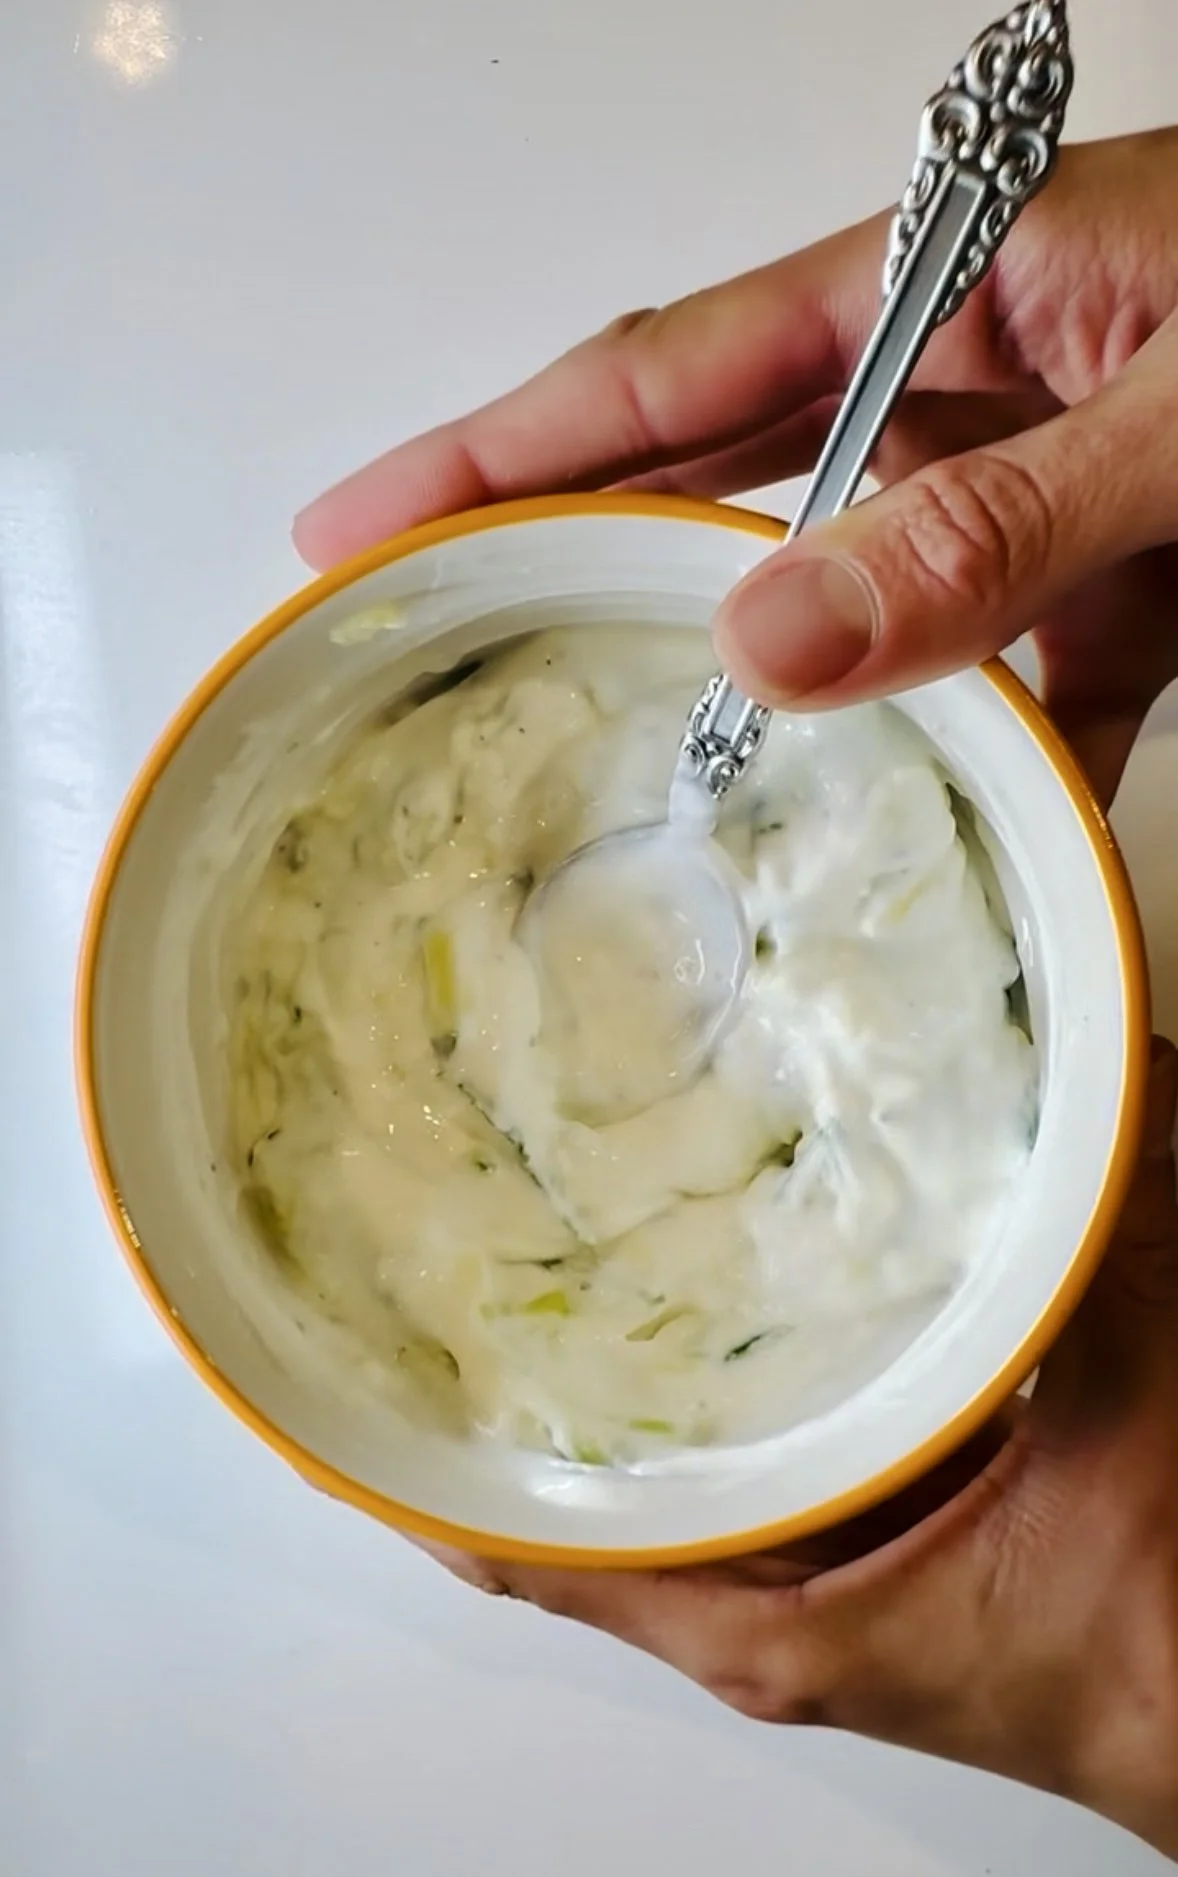
Cucumber Greek Yogurt Dip Recipe
Ingredients
½ cucumber, shredded
⅔ cup Greek yogurt
2 tbsp lemon juice
1 clove garlic, minced
Salt + pepper, to taste
Instructions
Shred the cucumber using a grater.
Squeeze out the excess liquid with your hands — this keeps the dip thick and creamy.
In a bowl, combine the Greek yogurt, shredded cucumber, lemon juice, garlic, salt, and pepper.
Mix well until everything is combined.
Add a lid or cover and refrigerate for 10–15 minutes for the flavors to develop (optional but worth it!).
That’s it — a simple, refreshing dip loaded with nutrients.
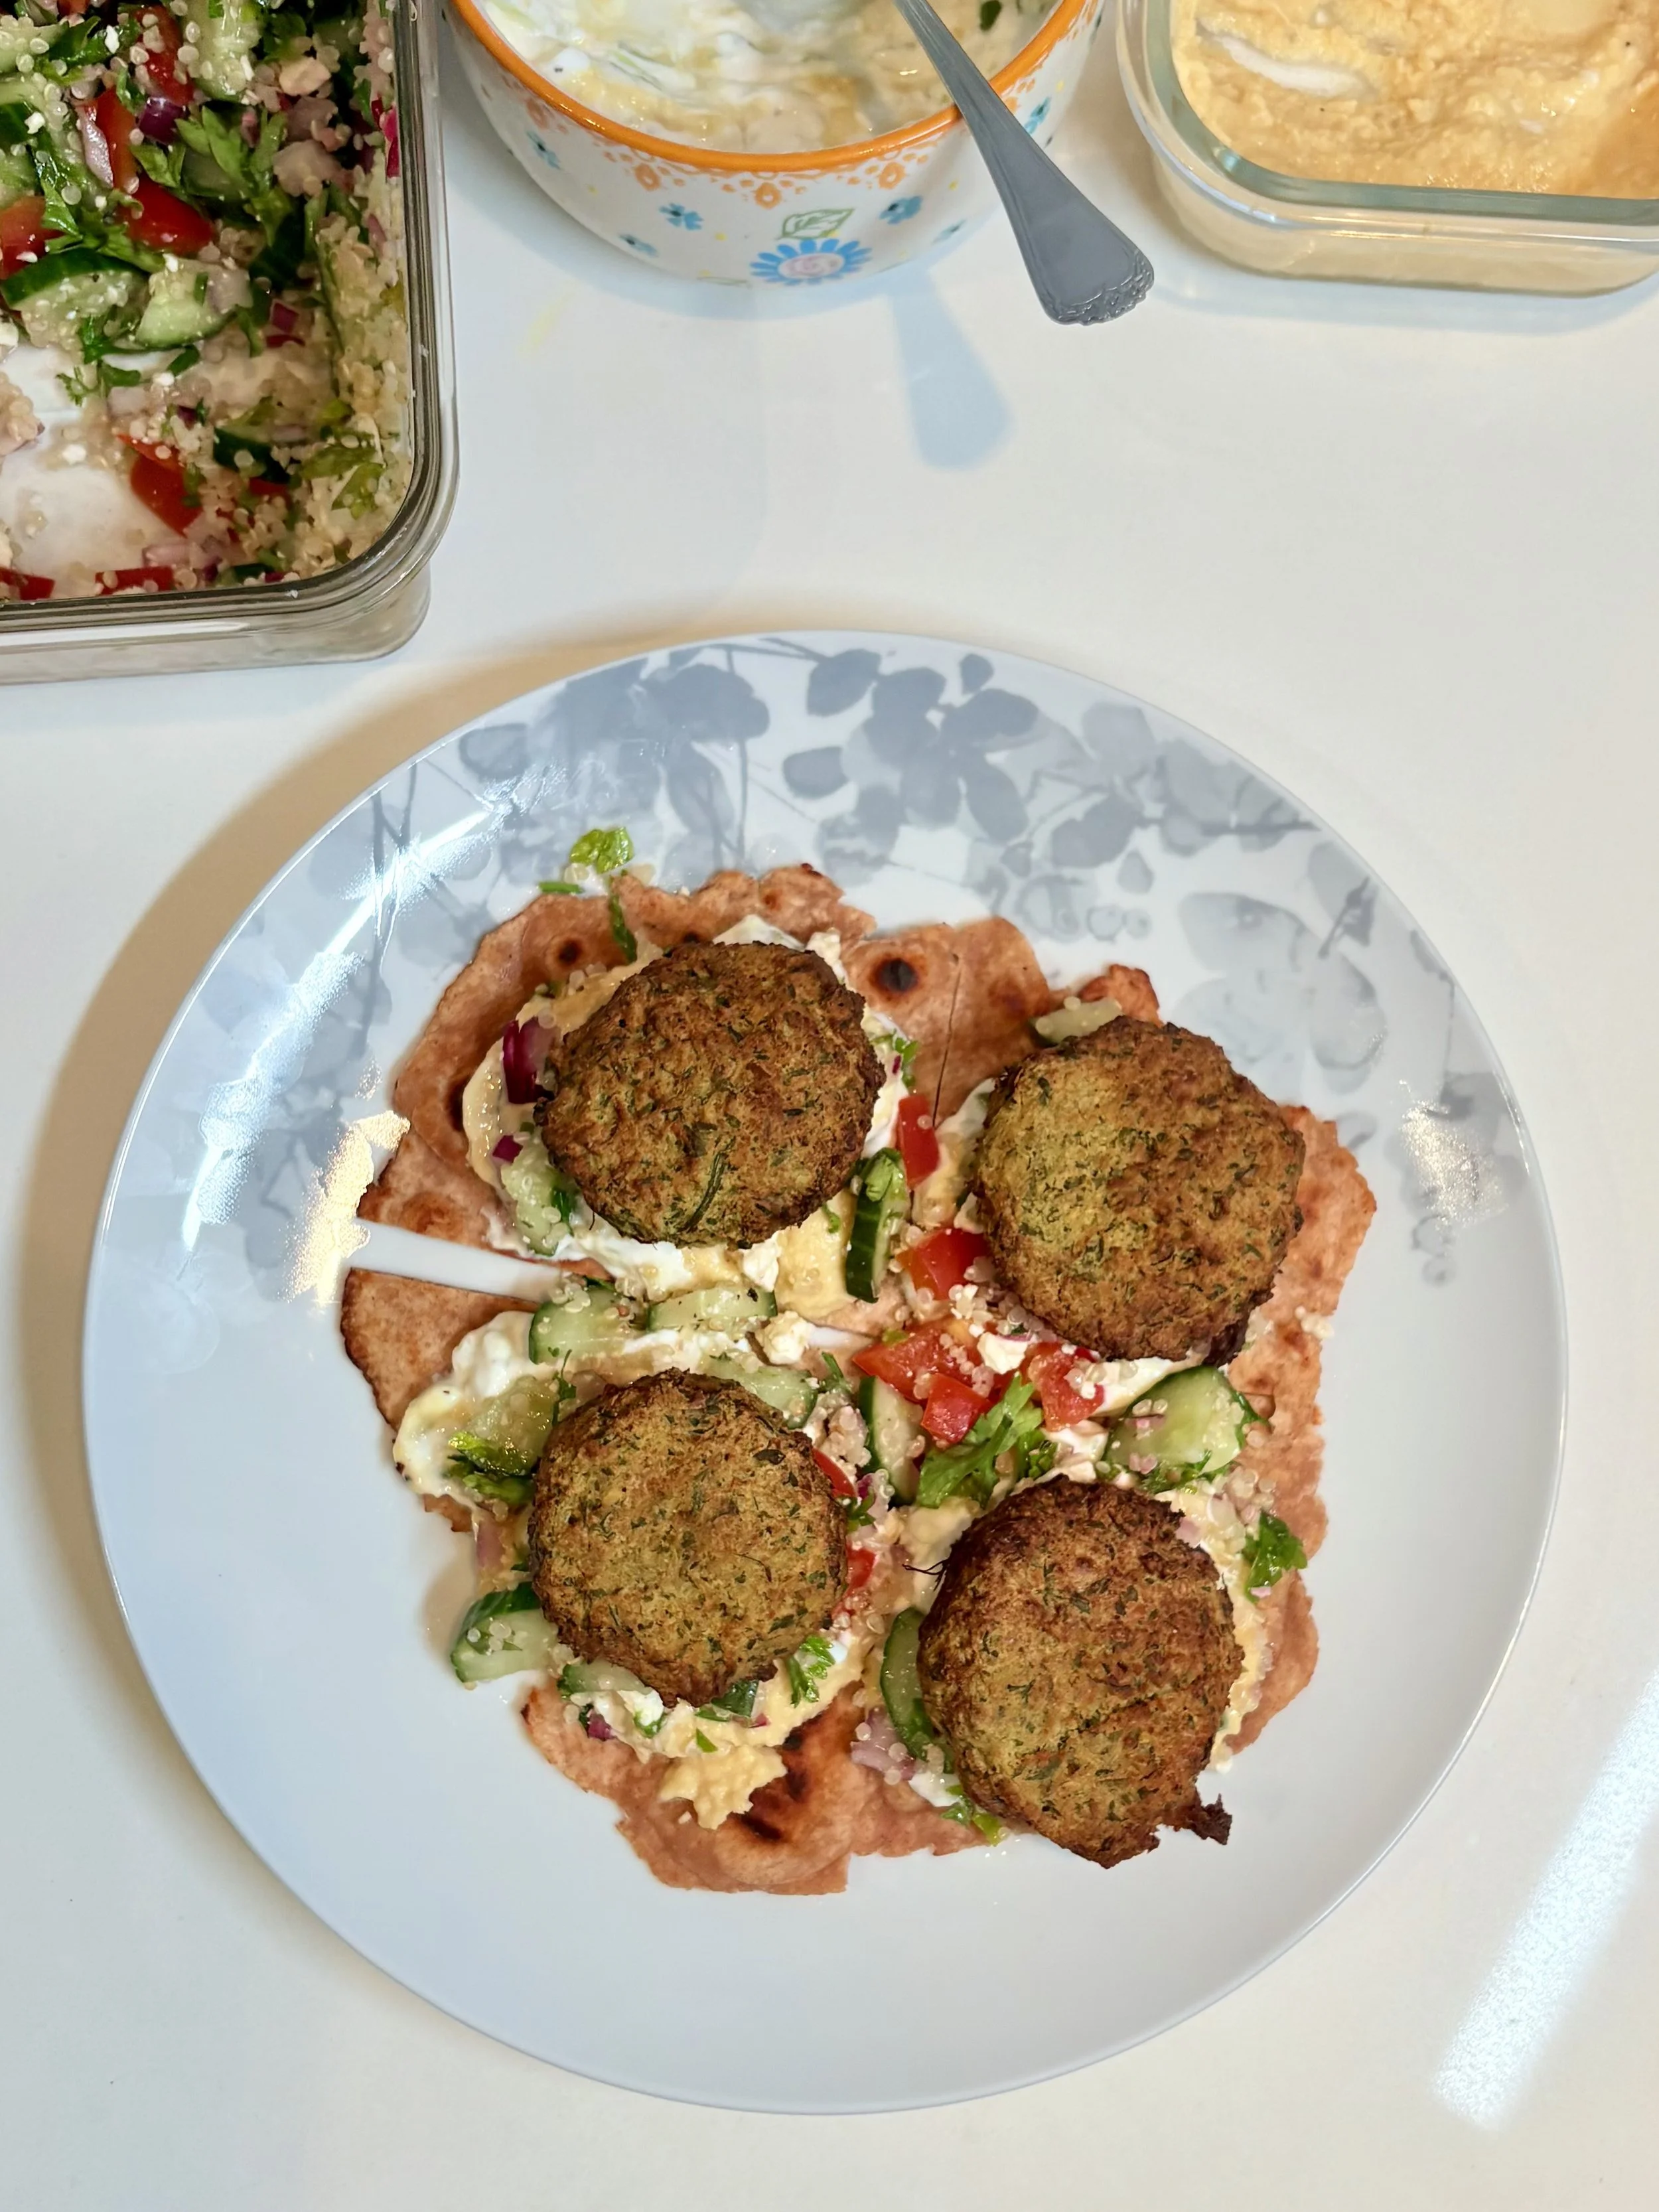
What to Serve It With
This dip is incredibly versatile. Try pairing it with:
Sliced cucumbers, peppers, or carrots
Whole grain crackers
Pita wedges
Grilled chicken or salmon
Falafel (recipe coming soon!)
Spread inside wraps or sandwiches
Dolloped on grain bowls
Because it’s protein-rich and low in sugar, it’s a great after-school snack, lunchbox addition, or midday energy stabilizer.
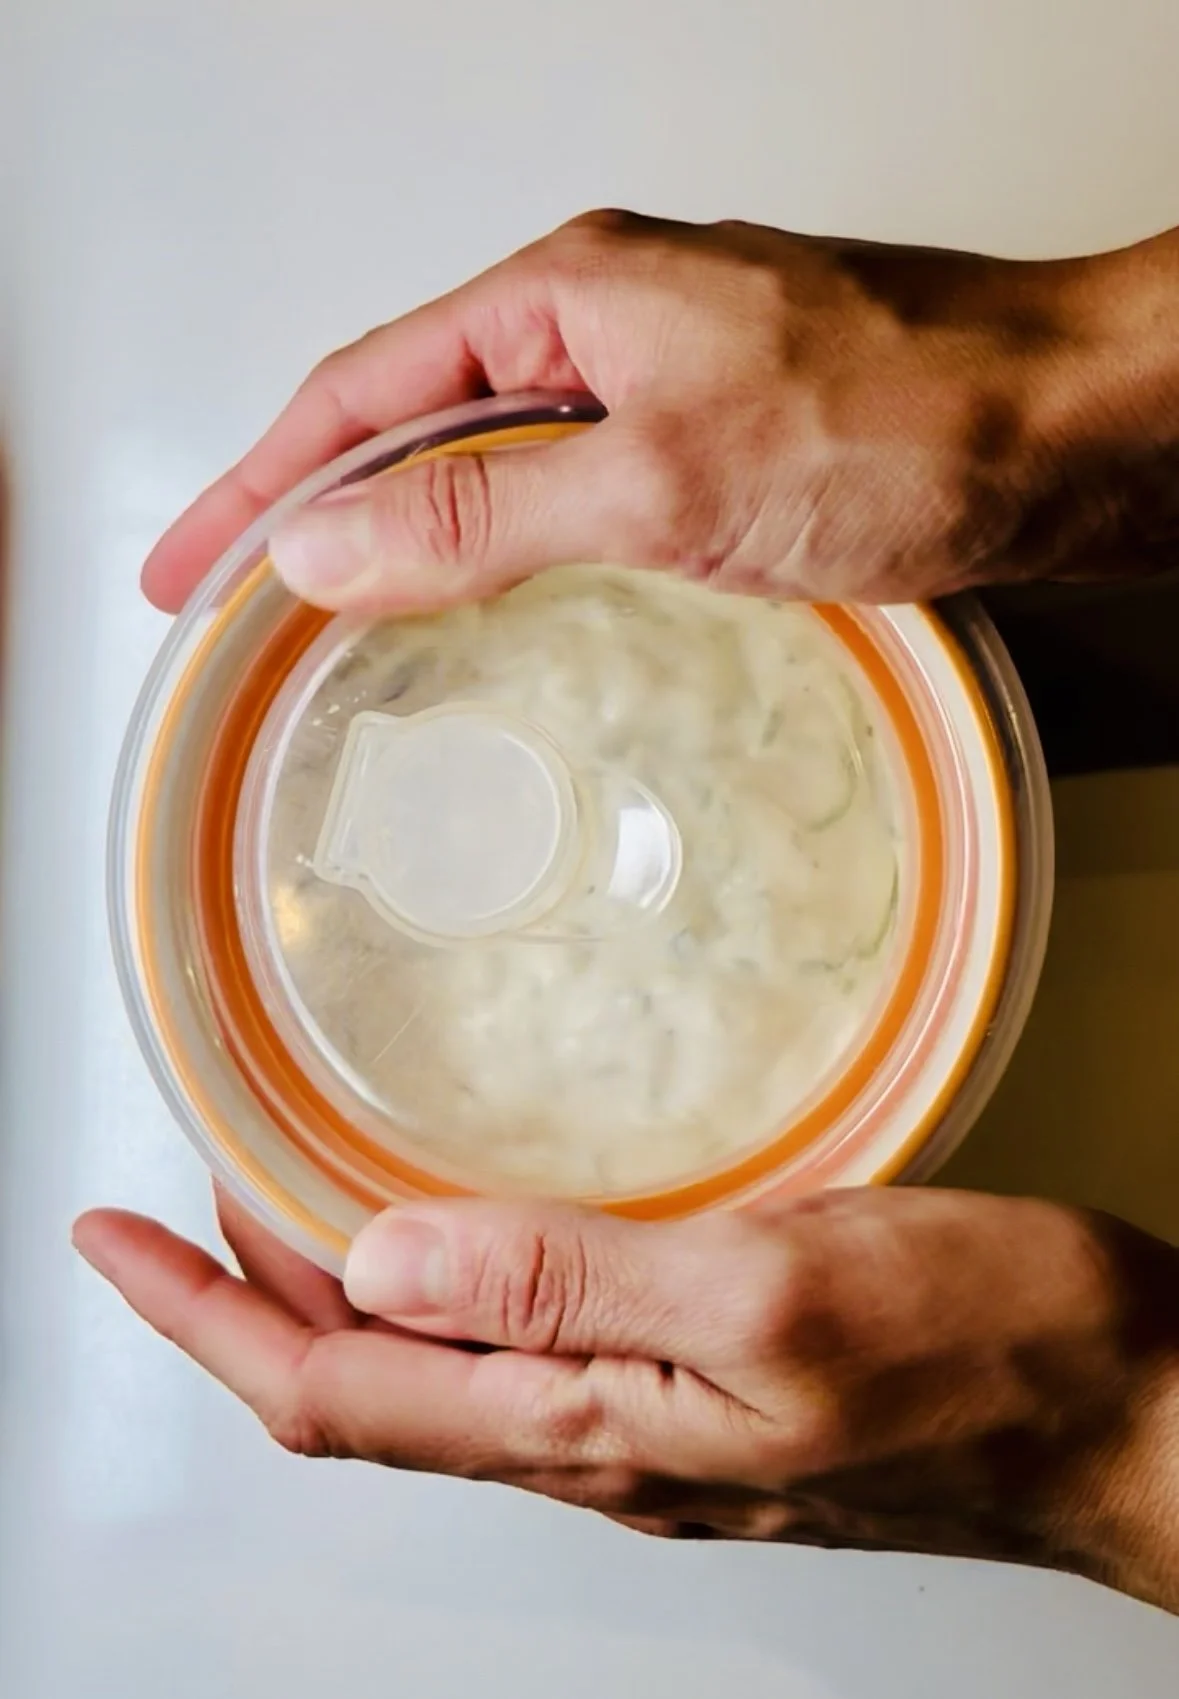
Storage Tips
Store the dip in an airtight container in the fridge for up to 3 days.
It may release a little liquid over time — just give it a quick stir.
Final Thoughts
This Cucumber Greek Yogurt Dip is the perfect example of how simple ingredients can make a big impact on energy, focus, and nourishment.
It’s affordable, kid-friendly, customizable, and packed with brain-supportive nutrients — a win for the whole family.
If you want more ADHD-friendly meals or personalized nutrition support, you can book a free discovery call with Growing Minds Nutrition. I’d love to help you build routines that support focus, calm, and steady energy.
Energizing Beet & Quinoa Power Salad

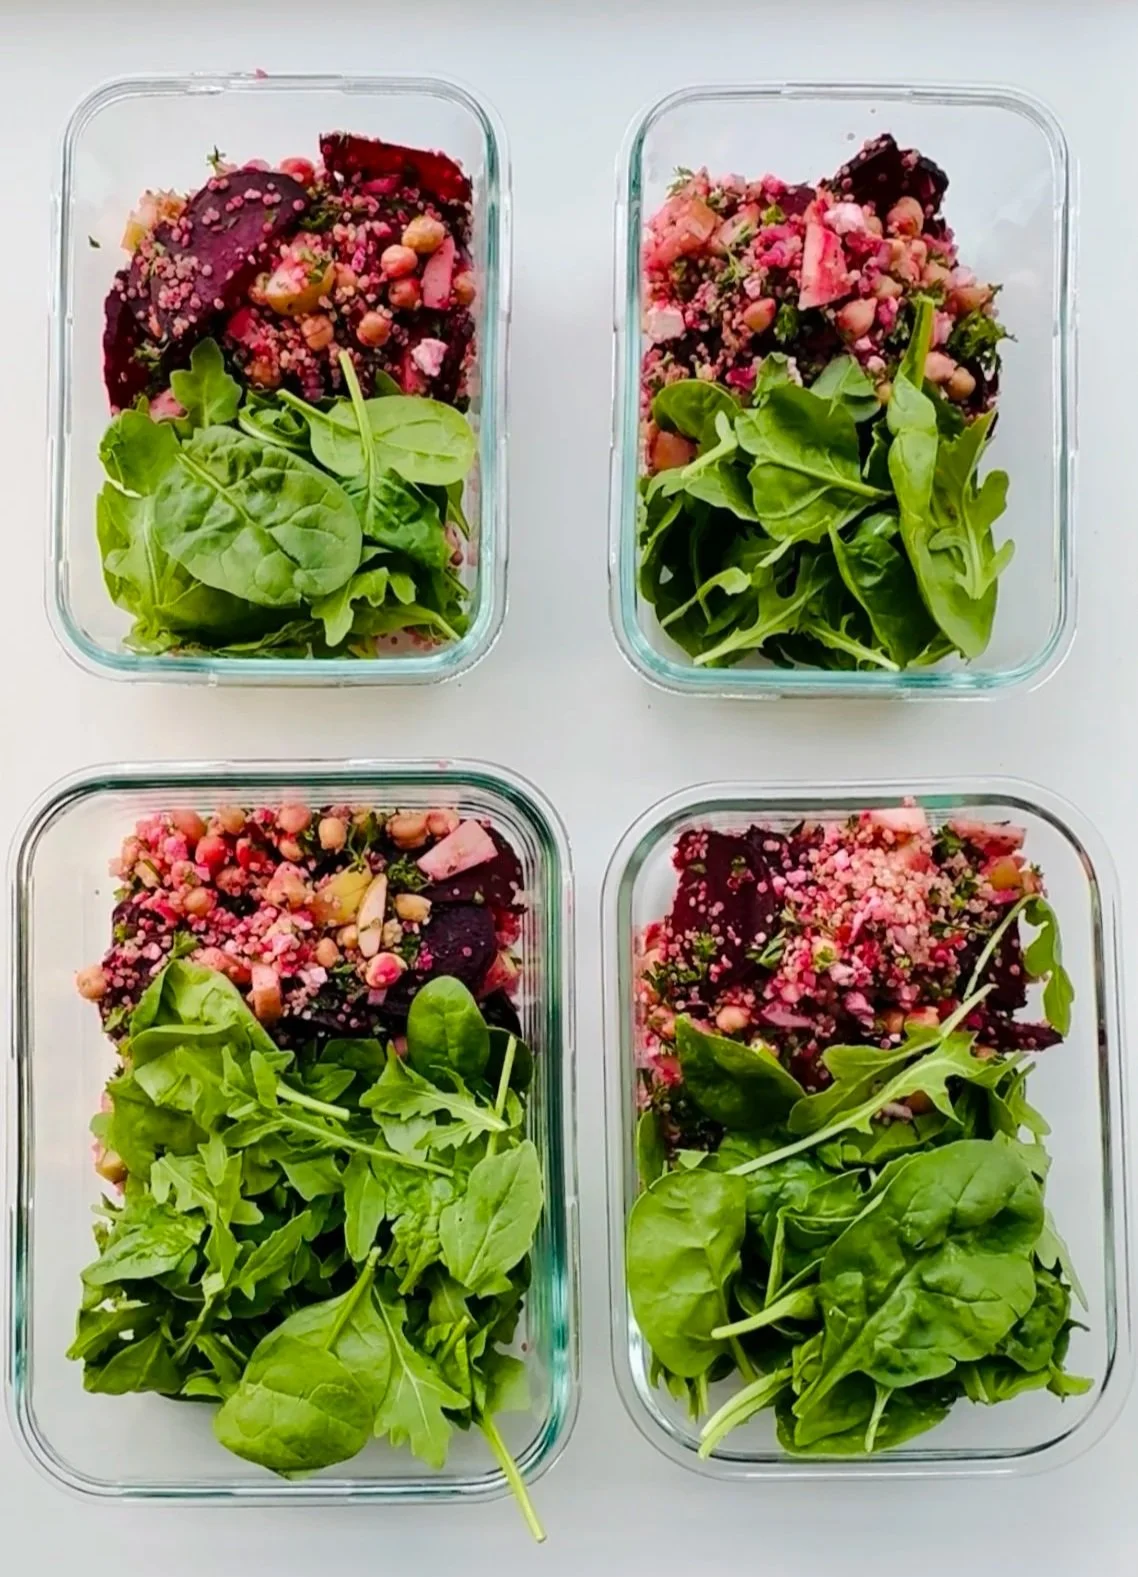
If your lunches tend to leave you sluggish or snacky an hour later, this Energizing Beet & Quinoa Power Salad is the antidote.
It’s colorful, high in plant-based protein, and loaded with fiber — everything your brain and gut need for steady energy and focus.
It also holds up beautifully for meal prep, making it an ideal ADHD-friendly or workday lunch that tastes even better the next day.
Why It Works
This salad isn’t just pretty — it’s functional nutrition in every bite. Each ingredient supports brain health, gut balance, and steady focus:
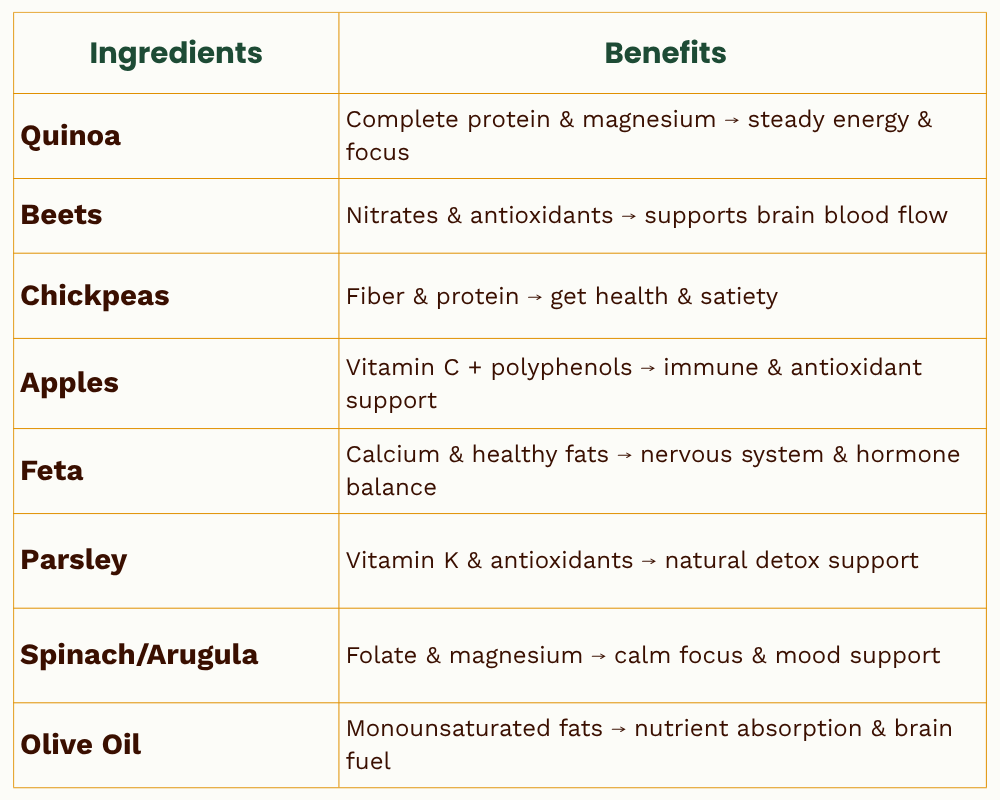
Quinoa: Complete protein and slow-digesting carb that stabilizes blood sugar and supports neurotransmitter production.
Beets: Rich in nitrates that improve blood flow to the brain and naturally support focus and endurance.
Chickpeas: Packed with fiber and plant-based protein to help regulate energy and support gut microbes.
Apple: Adds crunch and sweetness with vitamin C and polyphenols for antioxidant support.
Feta: Adds calcium and healthy fats for brain and nerve function.
Parsley + Red Onion: Fresh herbs and antioxidants that aid detoxification and digestion.
Spinach + Arugula: Leafy greens packed with magnesium and folate — nutrients linked to calm focus and improved mood.
Maple-Balsamic Dressing: Olive oil provides healthy fats that boost nutrient absorption and satisfaction.

Energizing Beet & Quinoa Power Salad
Prep time: 15 minutes
Servings: 4
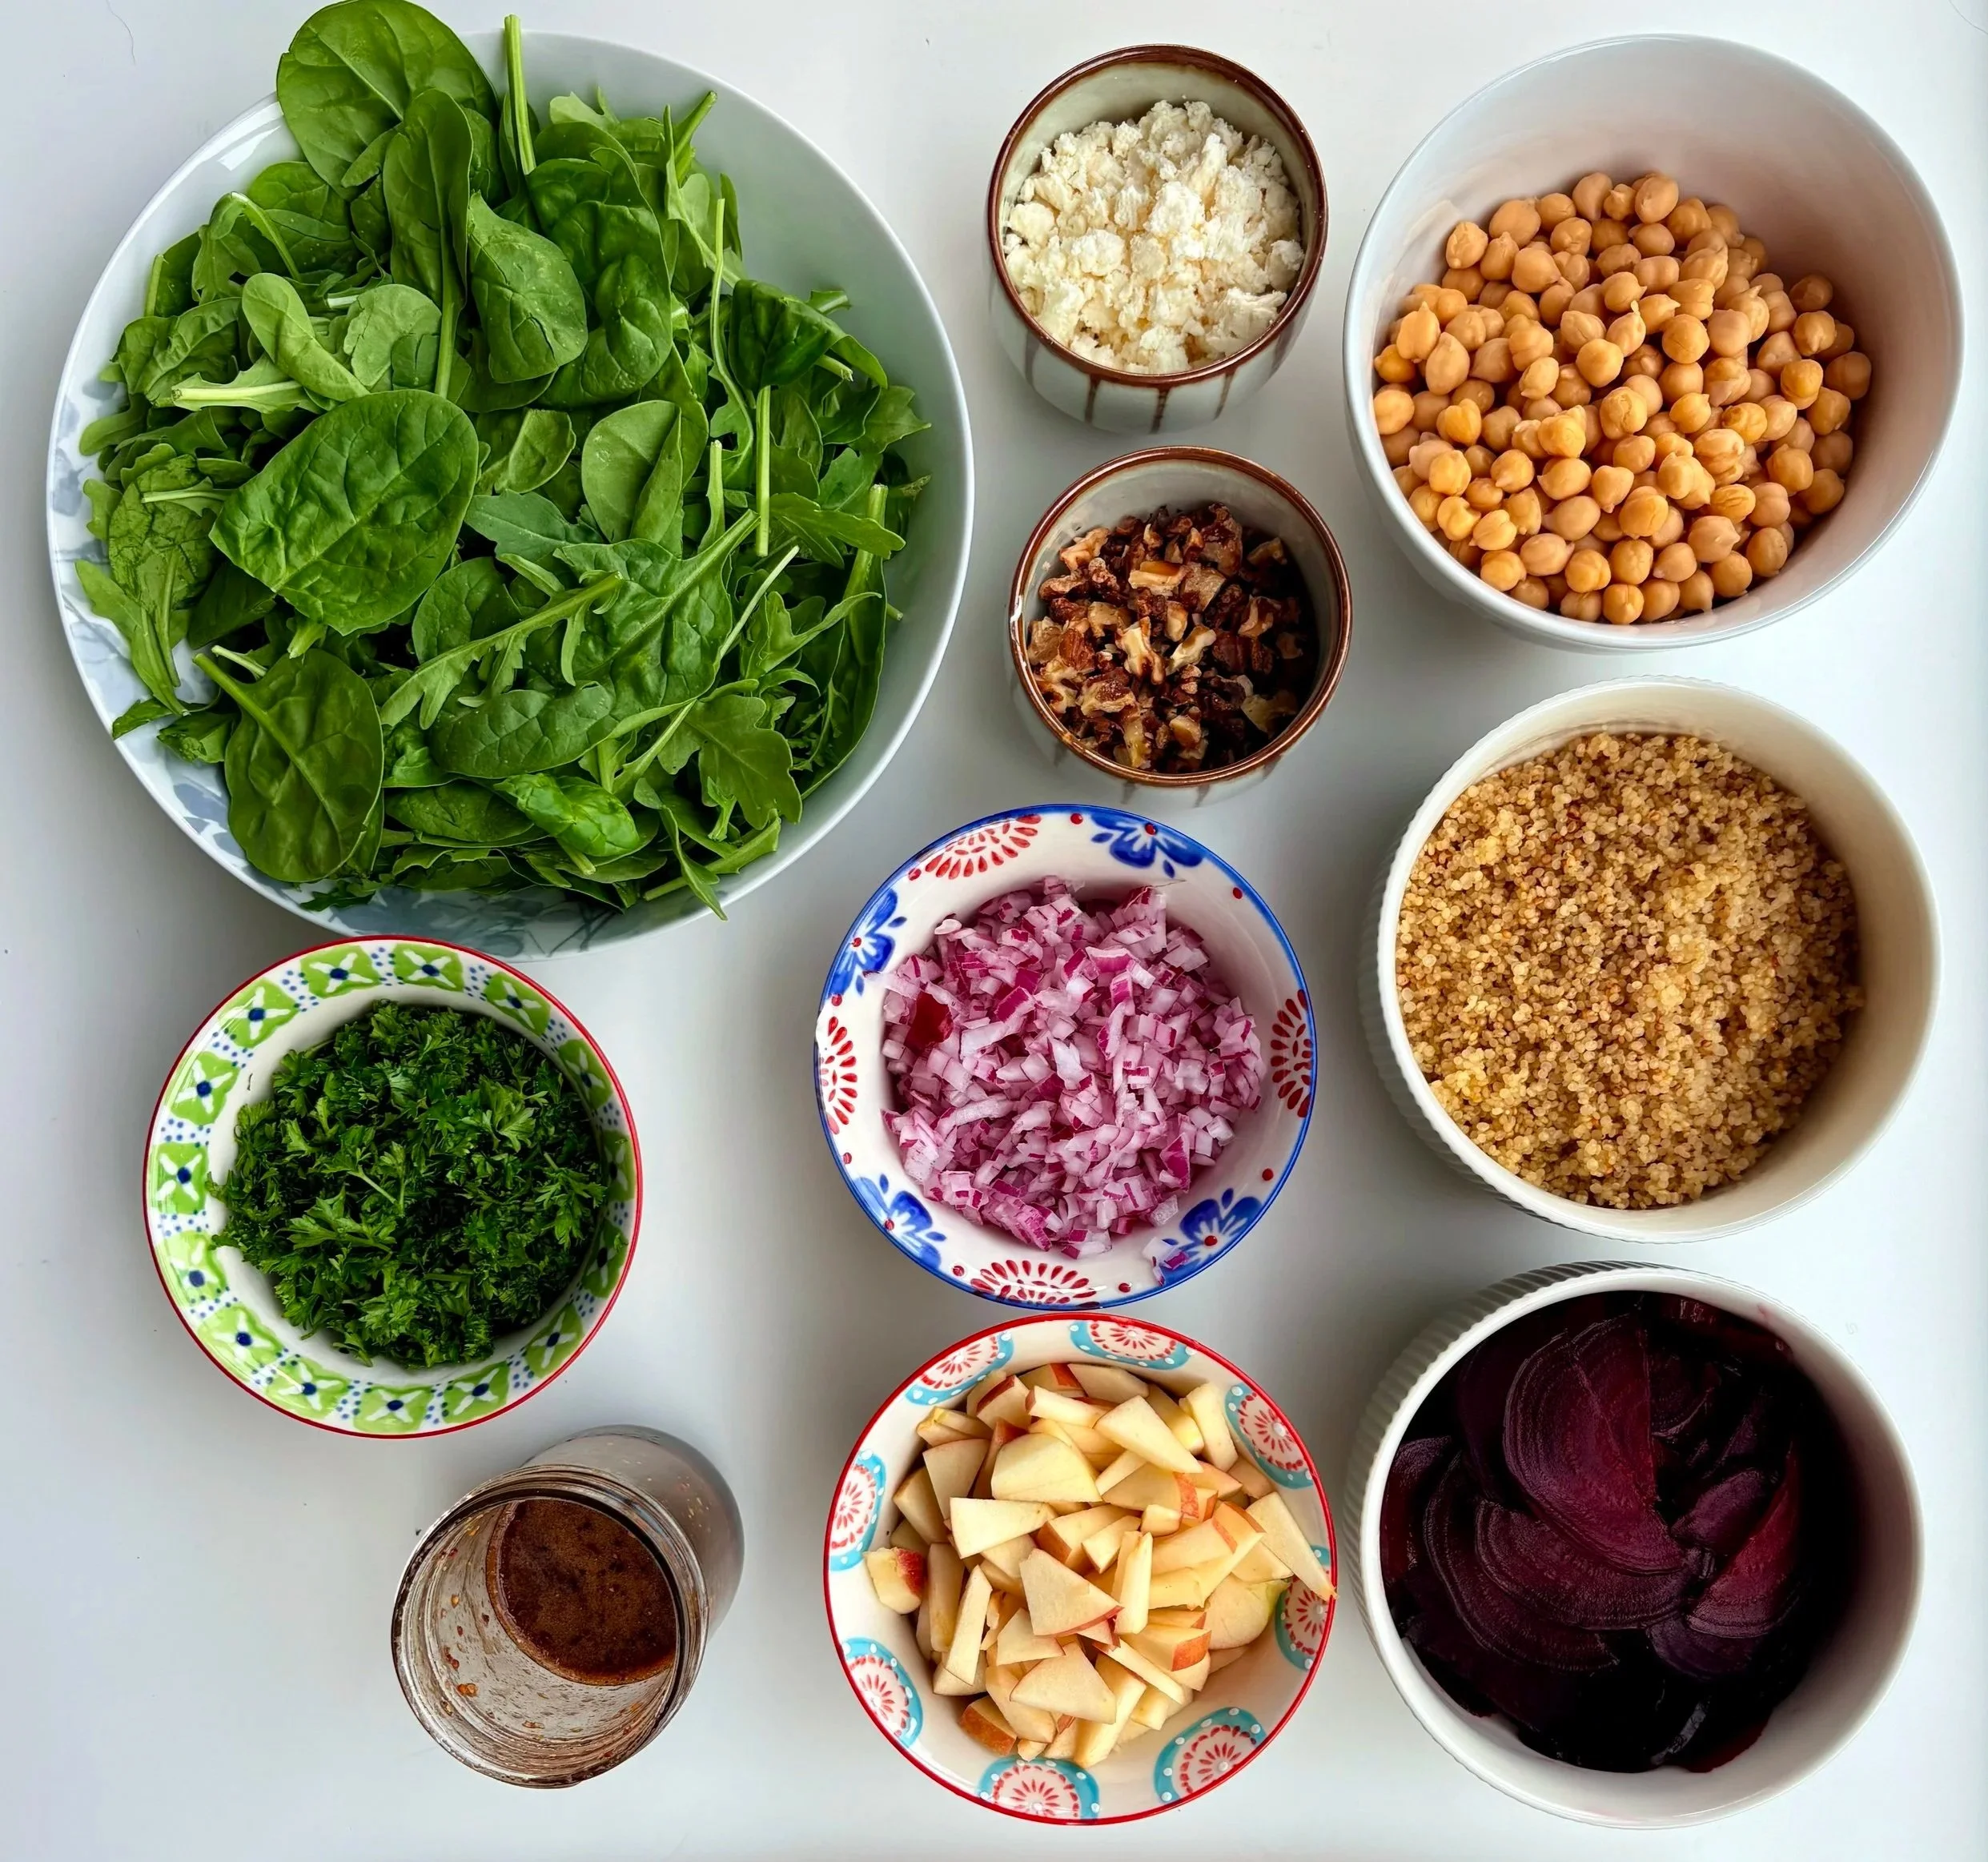
Ingredients
Bowl:
2 cups cooked quinoa
1 can chickpeas, rinsed and drained
2 cups sliced cooked beets
1 diced apple
½ cup feta cheese (or dairy-free alternative)
1 cup parsley, chopped
¼ cup red onion, finely diced
Greens:
A few handfuls of spinach and arugula
Dressing (shake in a jar):
4 tbsp balsamic vinegar
4 tbsp extra virgin olive oil
1 tsp grainy Dijon mustard
1 minced garlic clove
1–2 tsp maple syrup (optional, to balance acidity)
Salt + pepper, to taste
Instructions
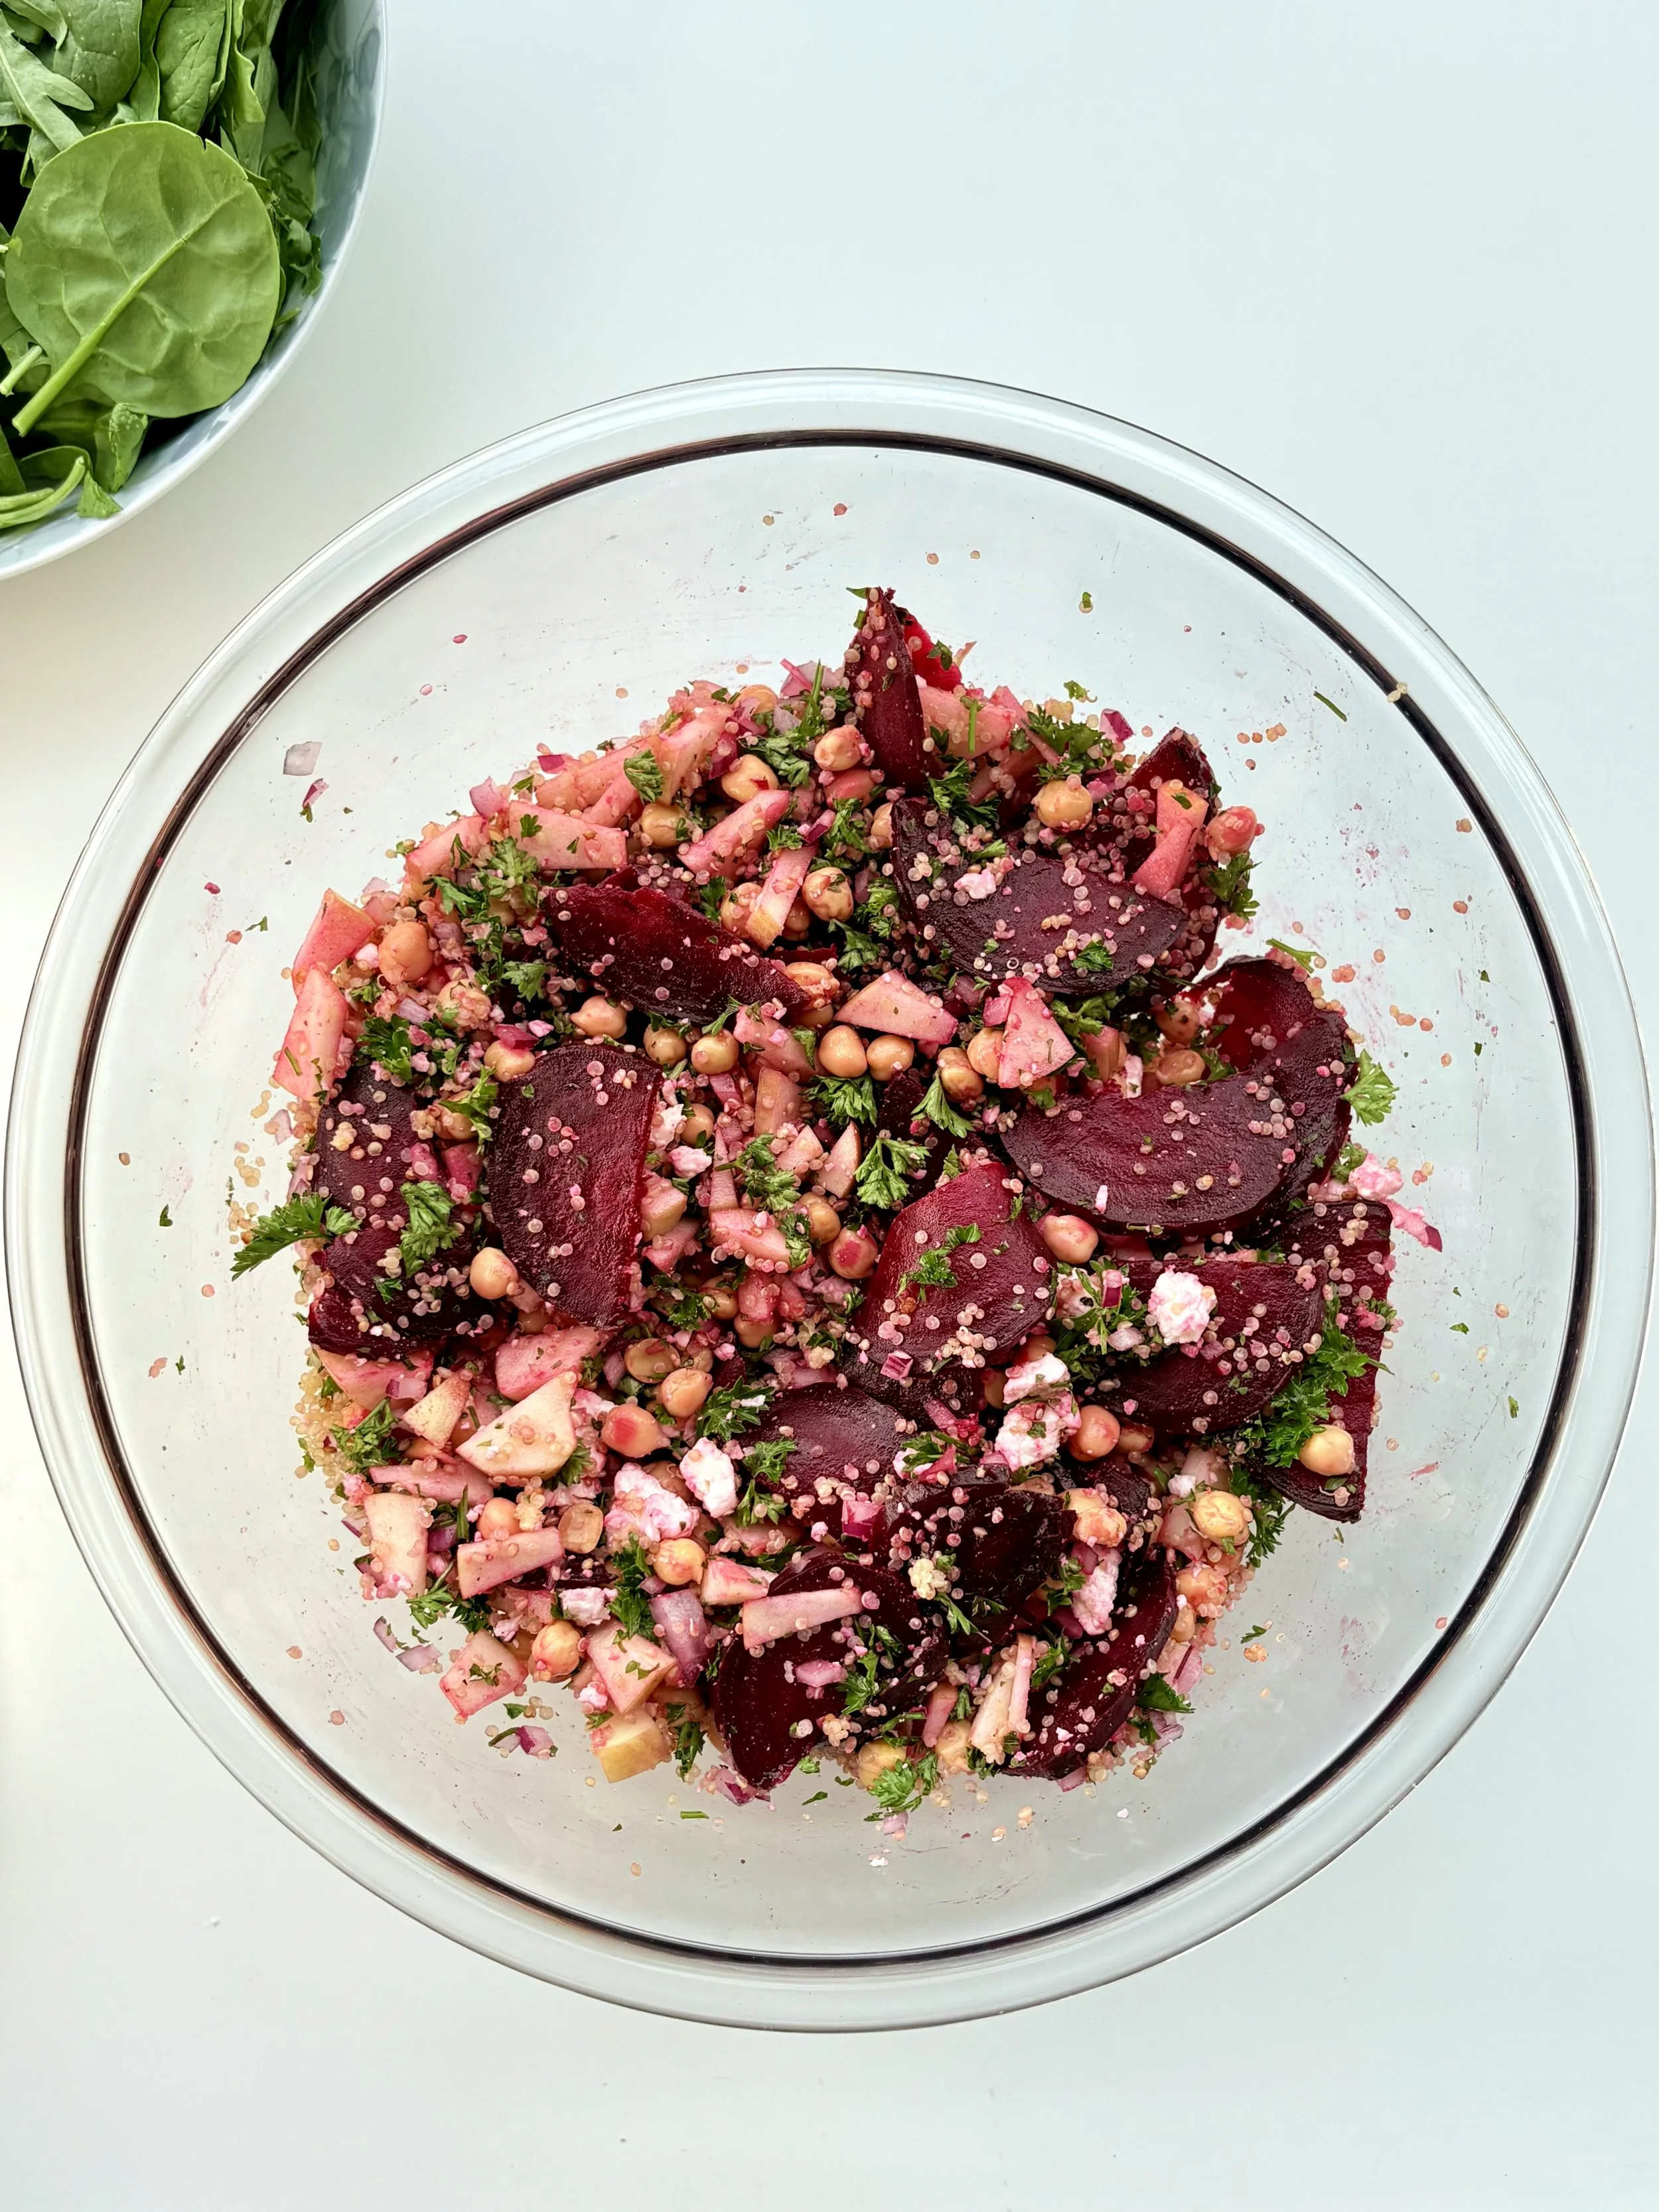
In a large bowl, combine quinoa, chickpeas, beets, apple, feta, parsley, and red onion.
In a small jar, shake together all dressing ingredients until smooth.
Pour the dressing over the salad and toss to coat evenly.
Serve over a bed of spinach and arugula.
💡 Quick cooking tips:
Beets: Drizzle whole beets with avocado oil, wrap in parchment paper, and air fry until tender. Once cooled, the skins peel off easily.
Quinoa: Cook in a rice cooker for perfect texture every time — no stirring needed!
💚 Keeps well in the fridge for 3–4 days, so it’s perfect for meal prep or quick weekday lunches.
Make It Your Own
Swap feta for goat cheese or vegan cheese.
Add pumpkin seeds or walnuts for crunch.
Use lentils instead of chickpeas.
Make it warm: toss cooked beets and quinoa while still slightly warm before adding greens.
Nutritional Benefits
More ADHD-Friendly Lunches to Try
This salad delivers steady energy and focus — no crash, no brain fog.
If you’re looking to add more balanced, ADHD-friendly lunches to your week, try these next:
And for more nutrition insights:
Final Thoughts
Healthy eating shouldn’t feel complicated.
This Energizing Beet & Quinoa Power Salad is proof that real food can be both vibrant and functional — fueling your gut, brain, and body with the nutrients they need to thrive.
Make a batch for meal prep, and enjoy calm, focused energy all week long.
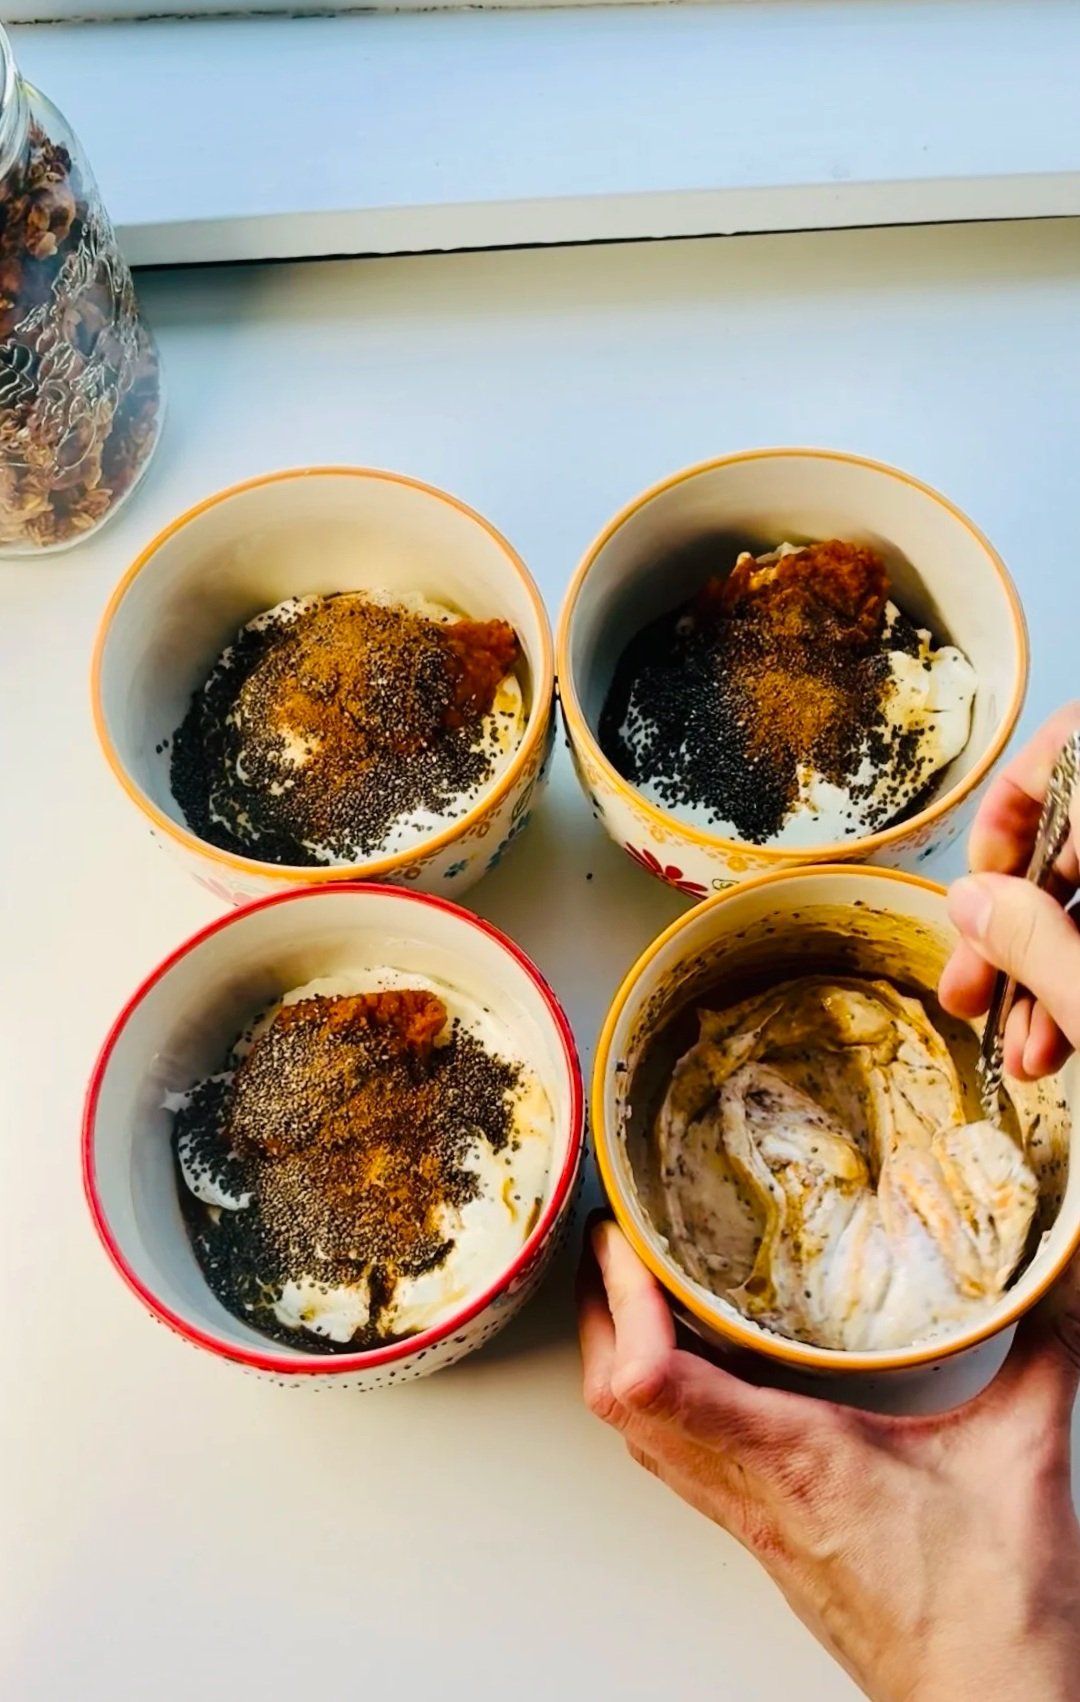
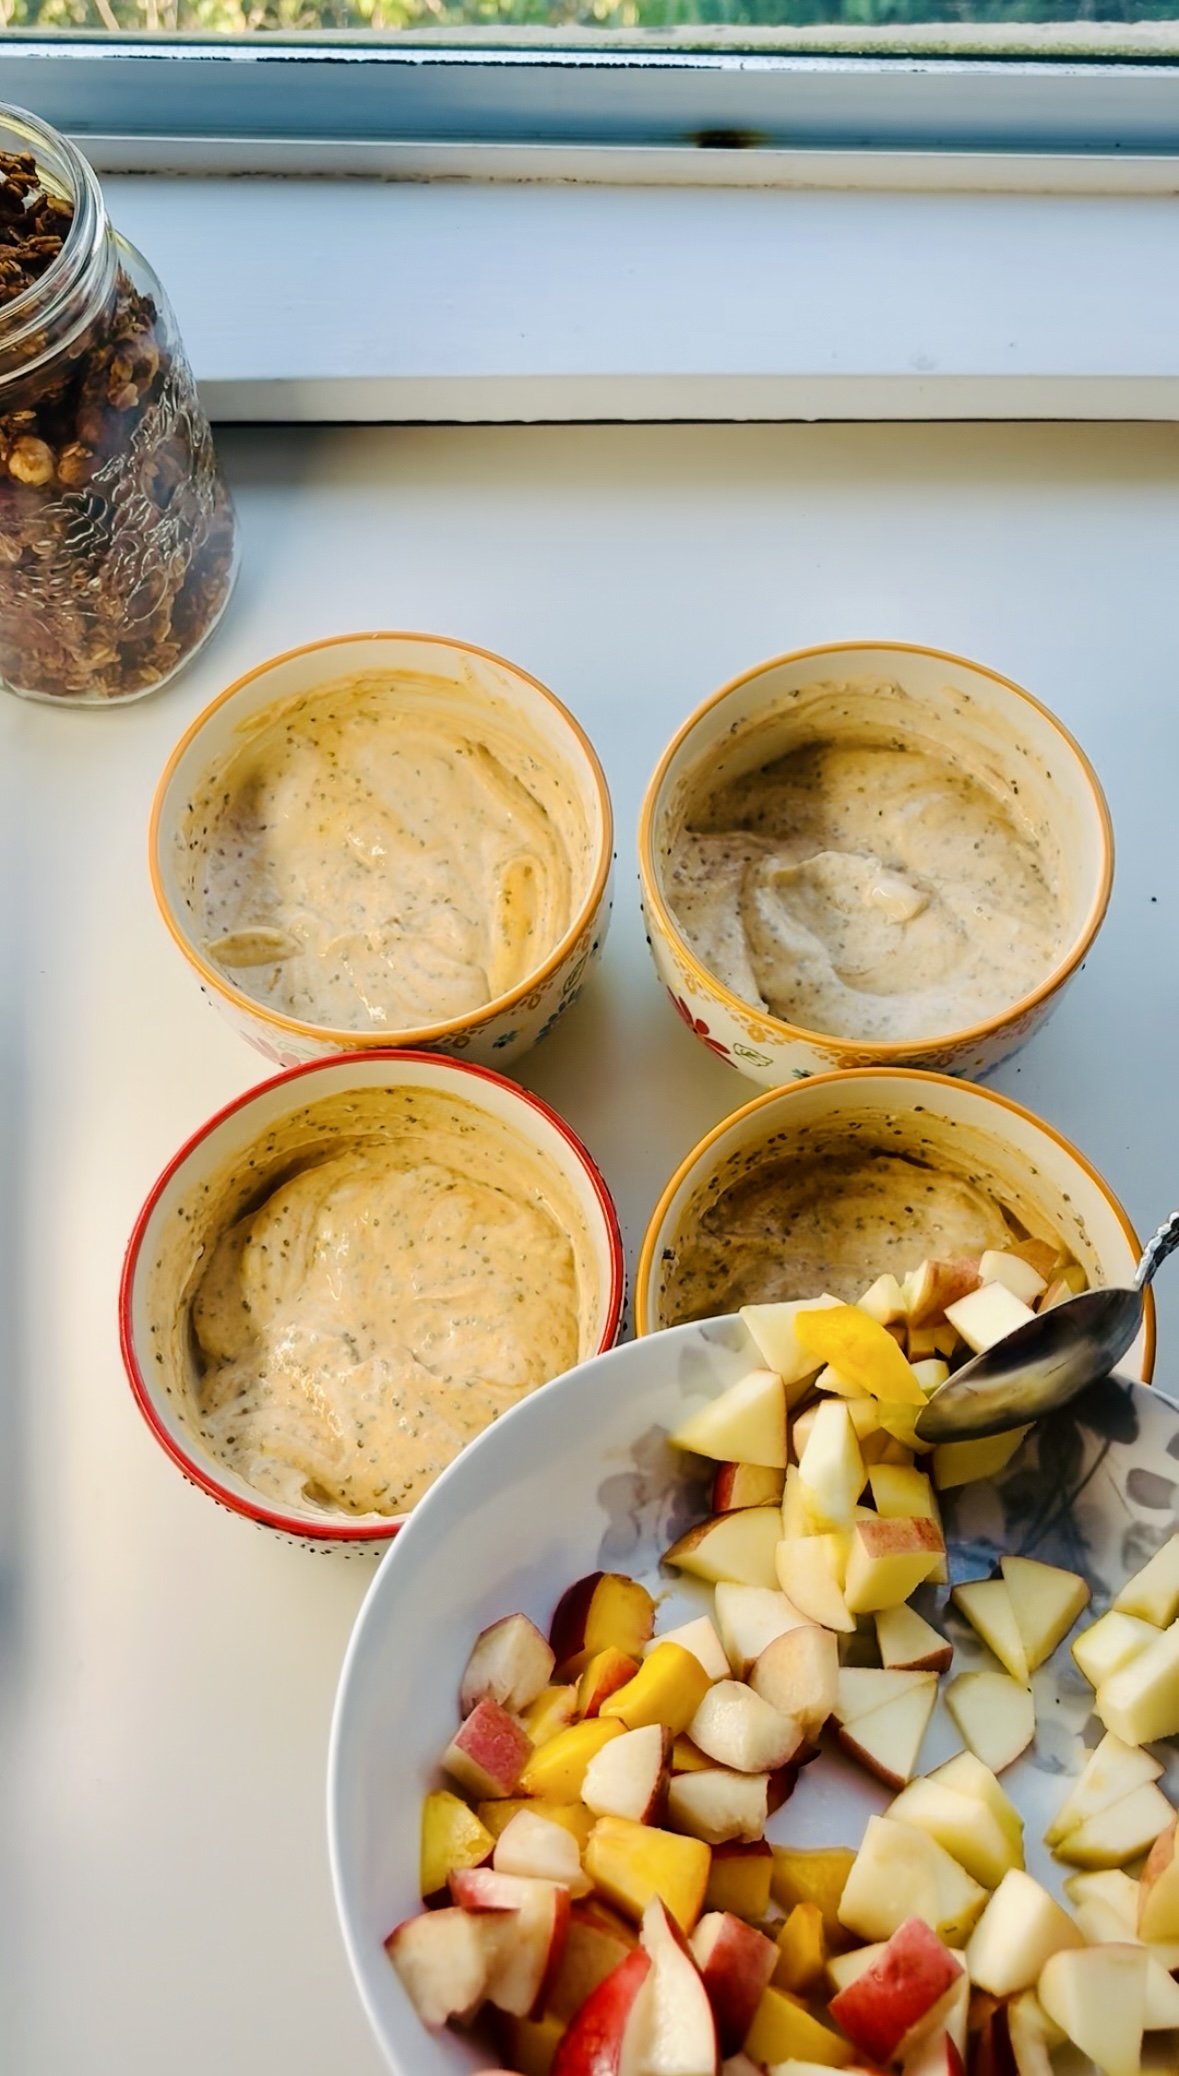
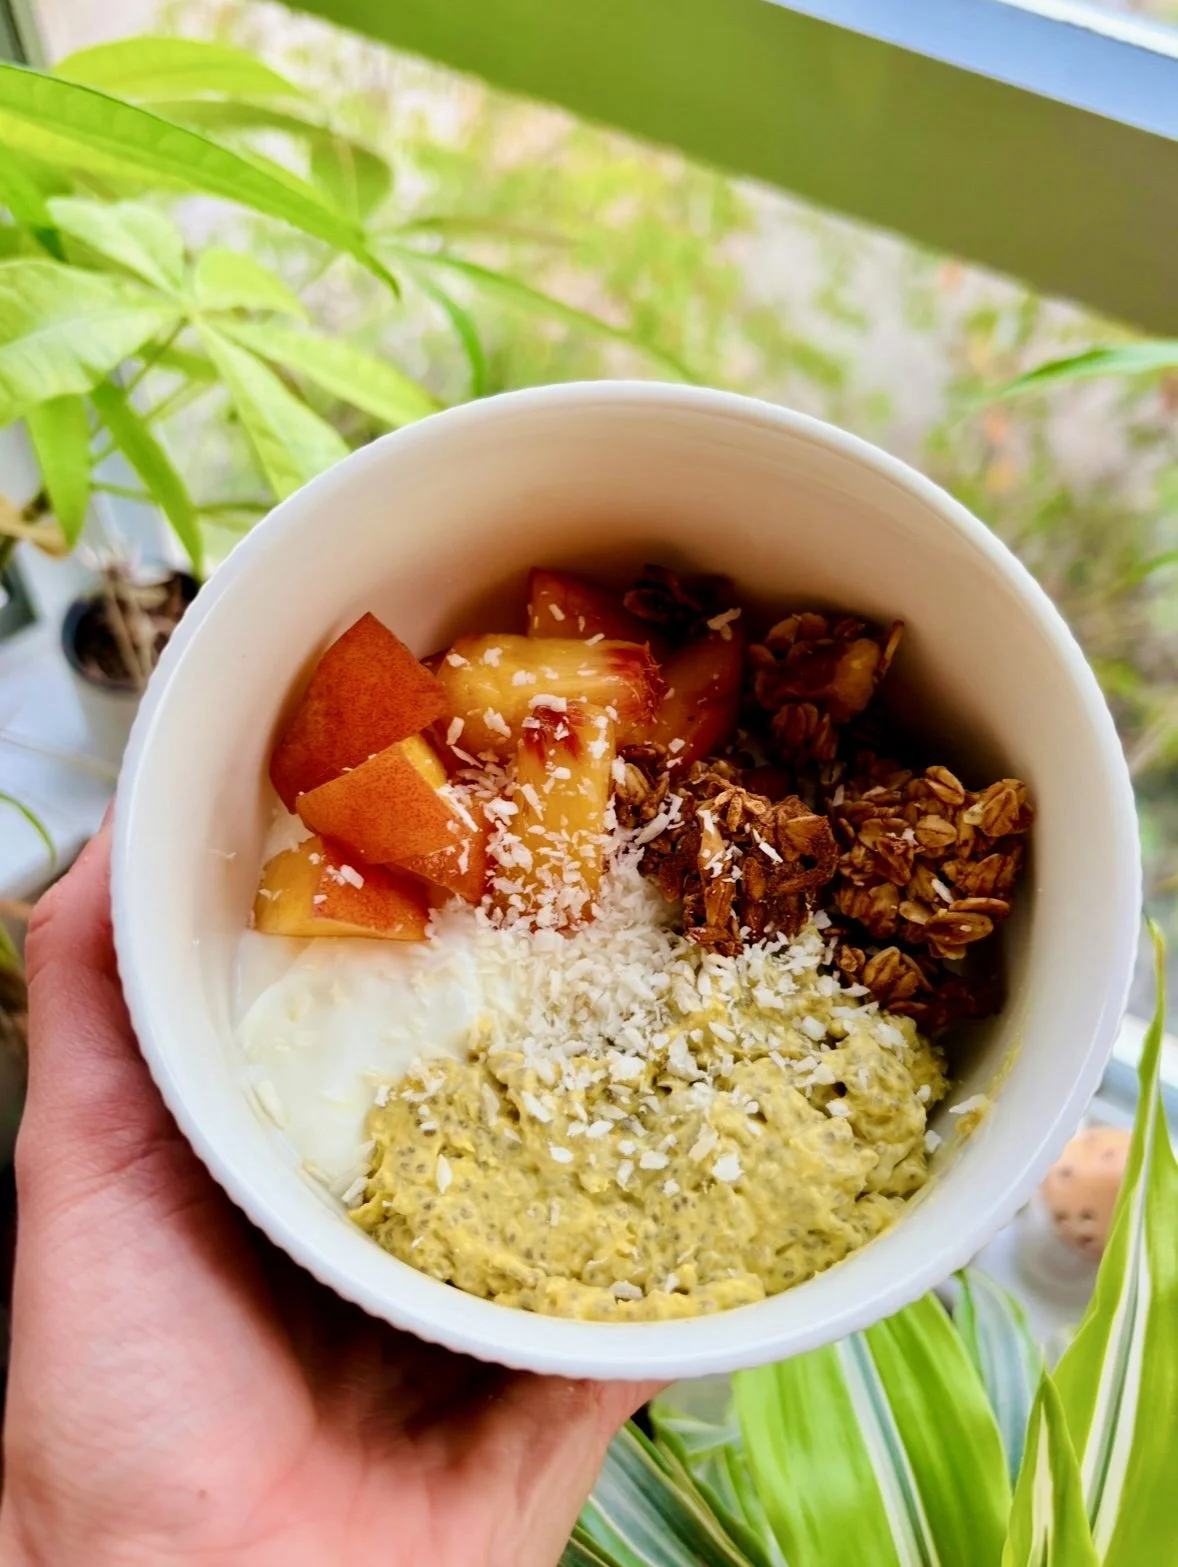
Pumpkin Pie Yogurt Chia Bowls: A Gut-Brain Boosting Breakfast
If your mornings are rushed or your focus feels off before noon, this quick Pumpkin Pie Yogurt Chia Bowl might be the reset your brain (and gut) needs.
It’s creamy, high-protein, full of fiber, and tastes like dessert—but it fuels like breakfast.
Even better? The combo of yogurt and chia does more for your focus and fullness than chia pudding alone.
🧠 Why Yogurt + Chia Is a Smarter Pairing
Most people soak chia seeds in water or milk, but pairing them with yogurt creates next-level benefits:
Gut-brain synergy: Yogurt provides prebiotics that feed probiotics in your gut. Chia adds fiber + omega-3s, which support both digestion and neurotransmitter balance.
Better absorption: The fats and proteins in yogurt help your body absorb omega-3s and fat-soluble vitamins from chia and pumpkin.
Steady energy + satiety: Protein + fiber = balanced blood sugar, fewer cravings, calmer focus.
Broader nutrients: You’re getting calcium, magnesium, zinc, vitamin A, and plant-based omega-3s in one bowl.
This means fewer energy crashes, improved focus, and longer-lasting fullness—perfect for kids, students, or busy mornings.
Nutritional Highlights
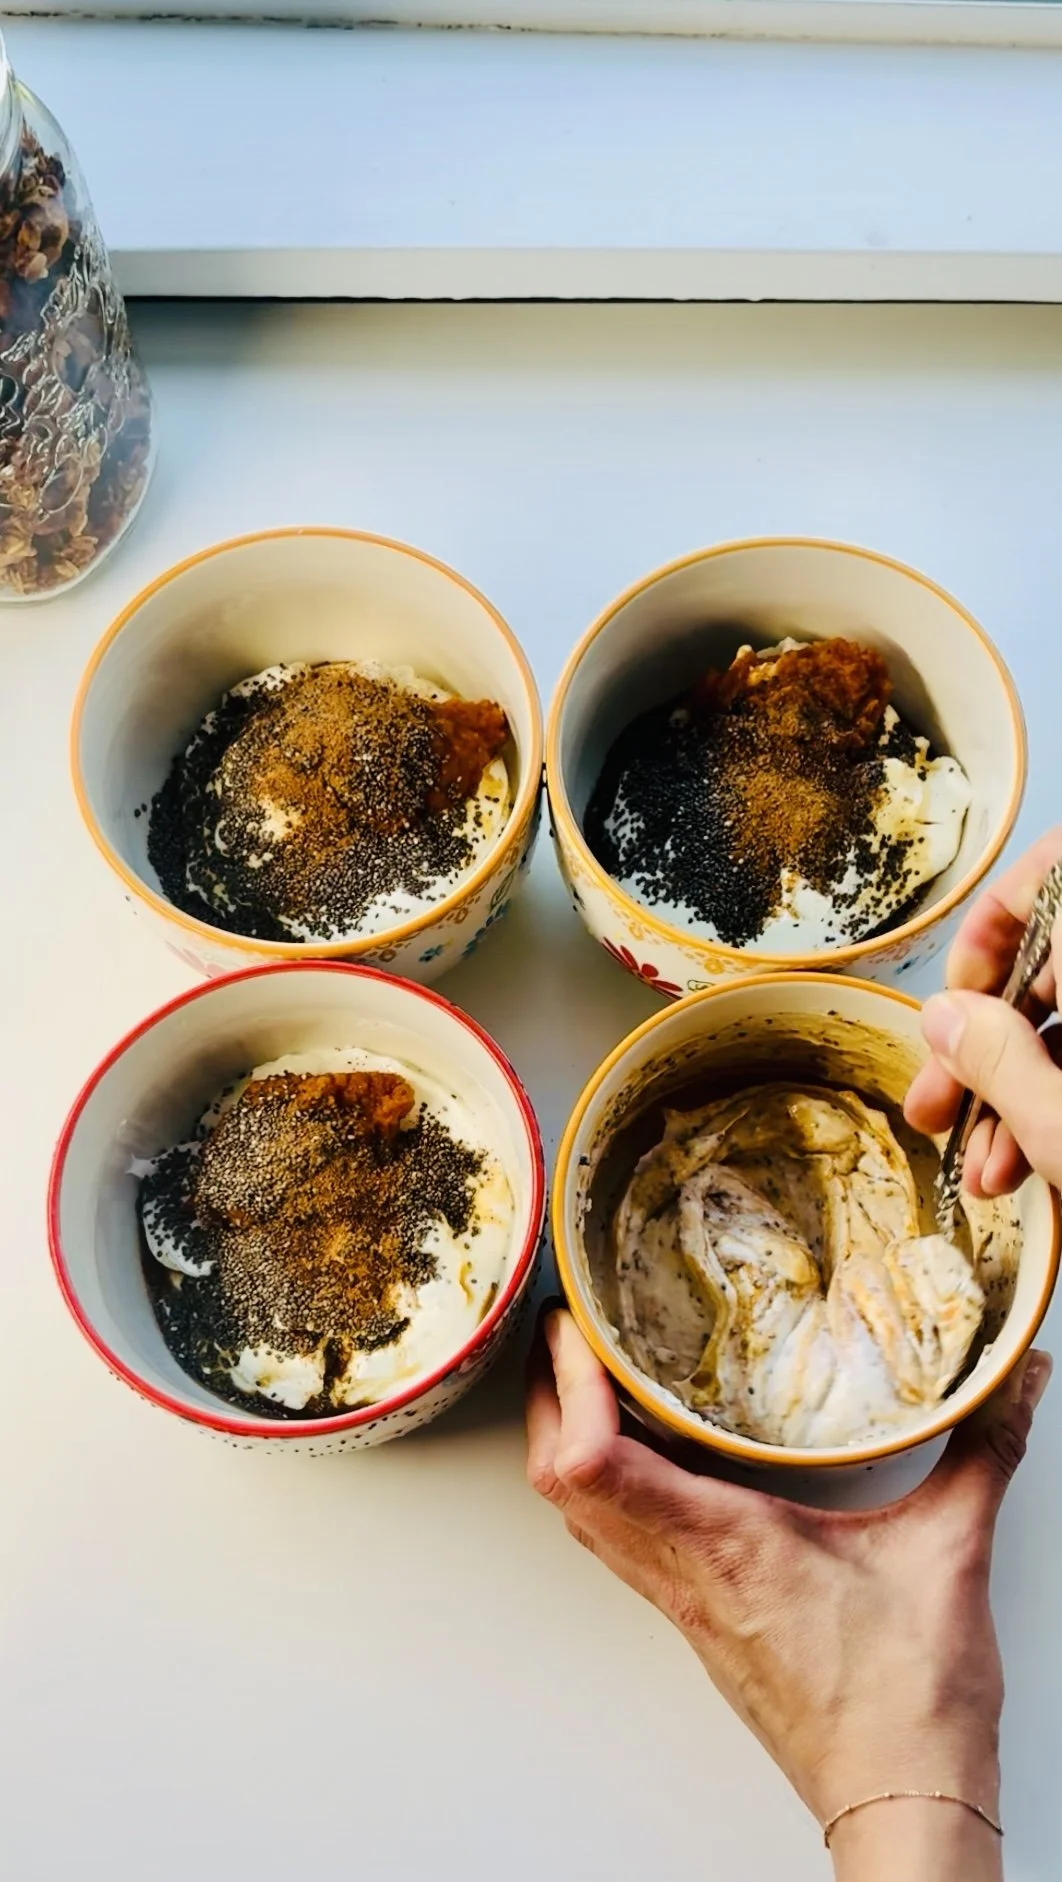
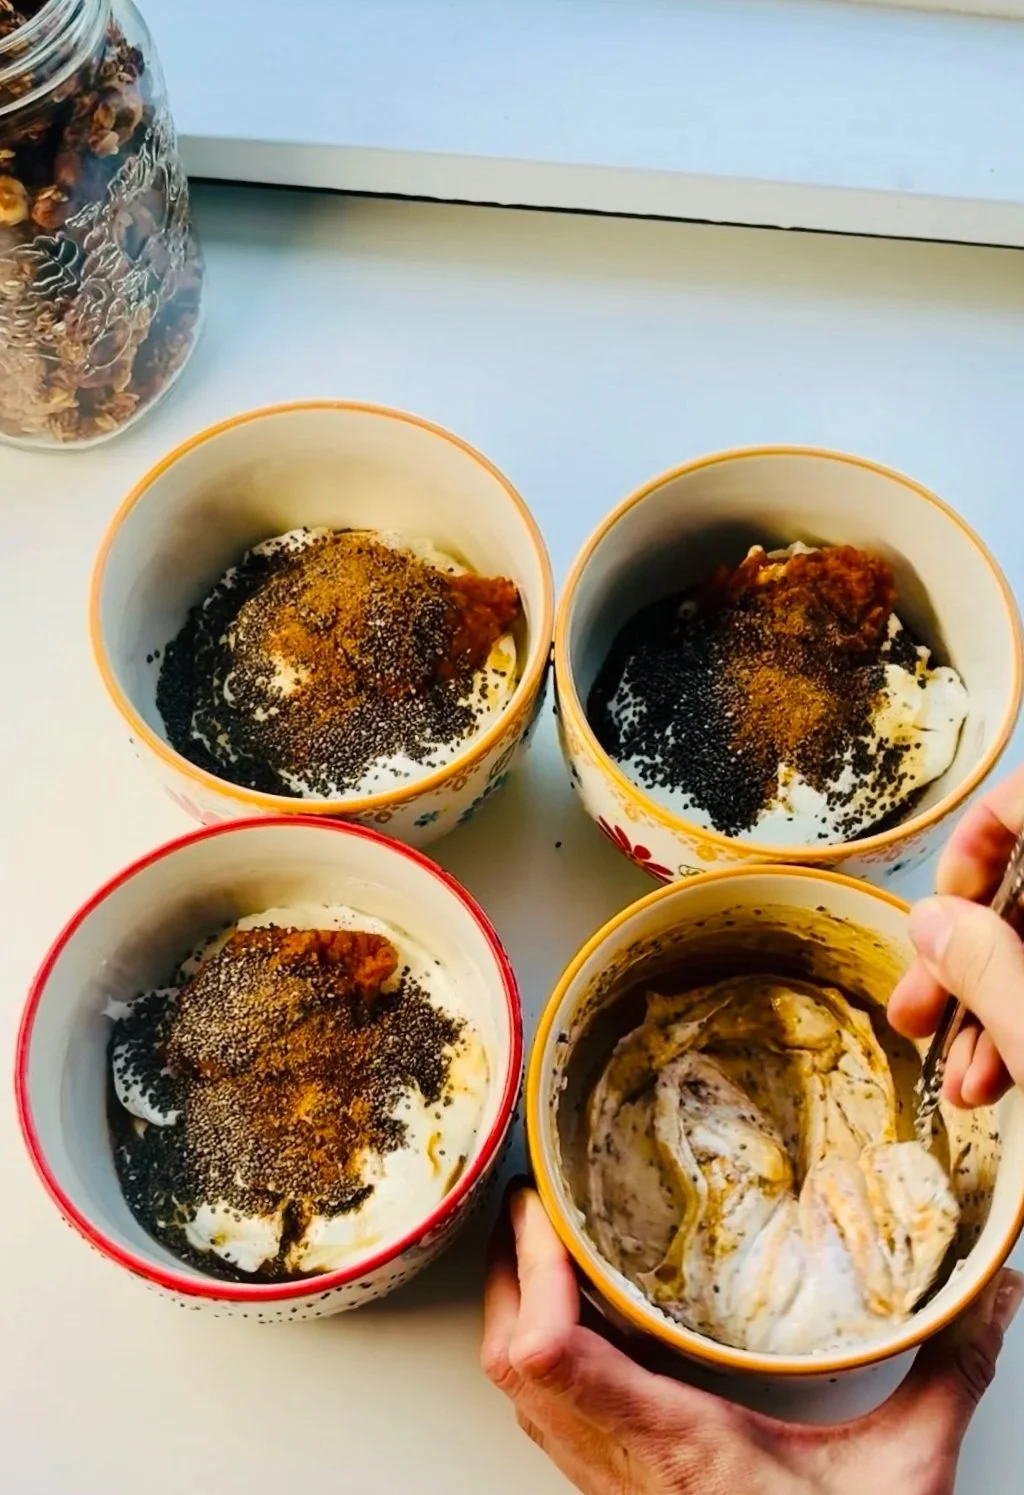
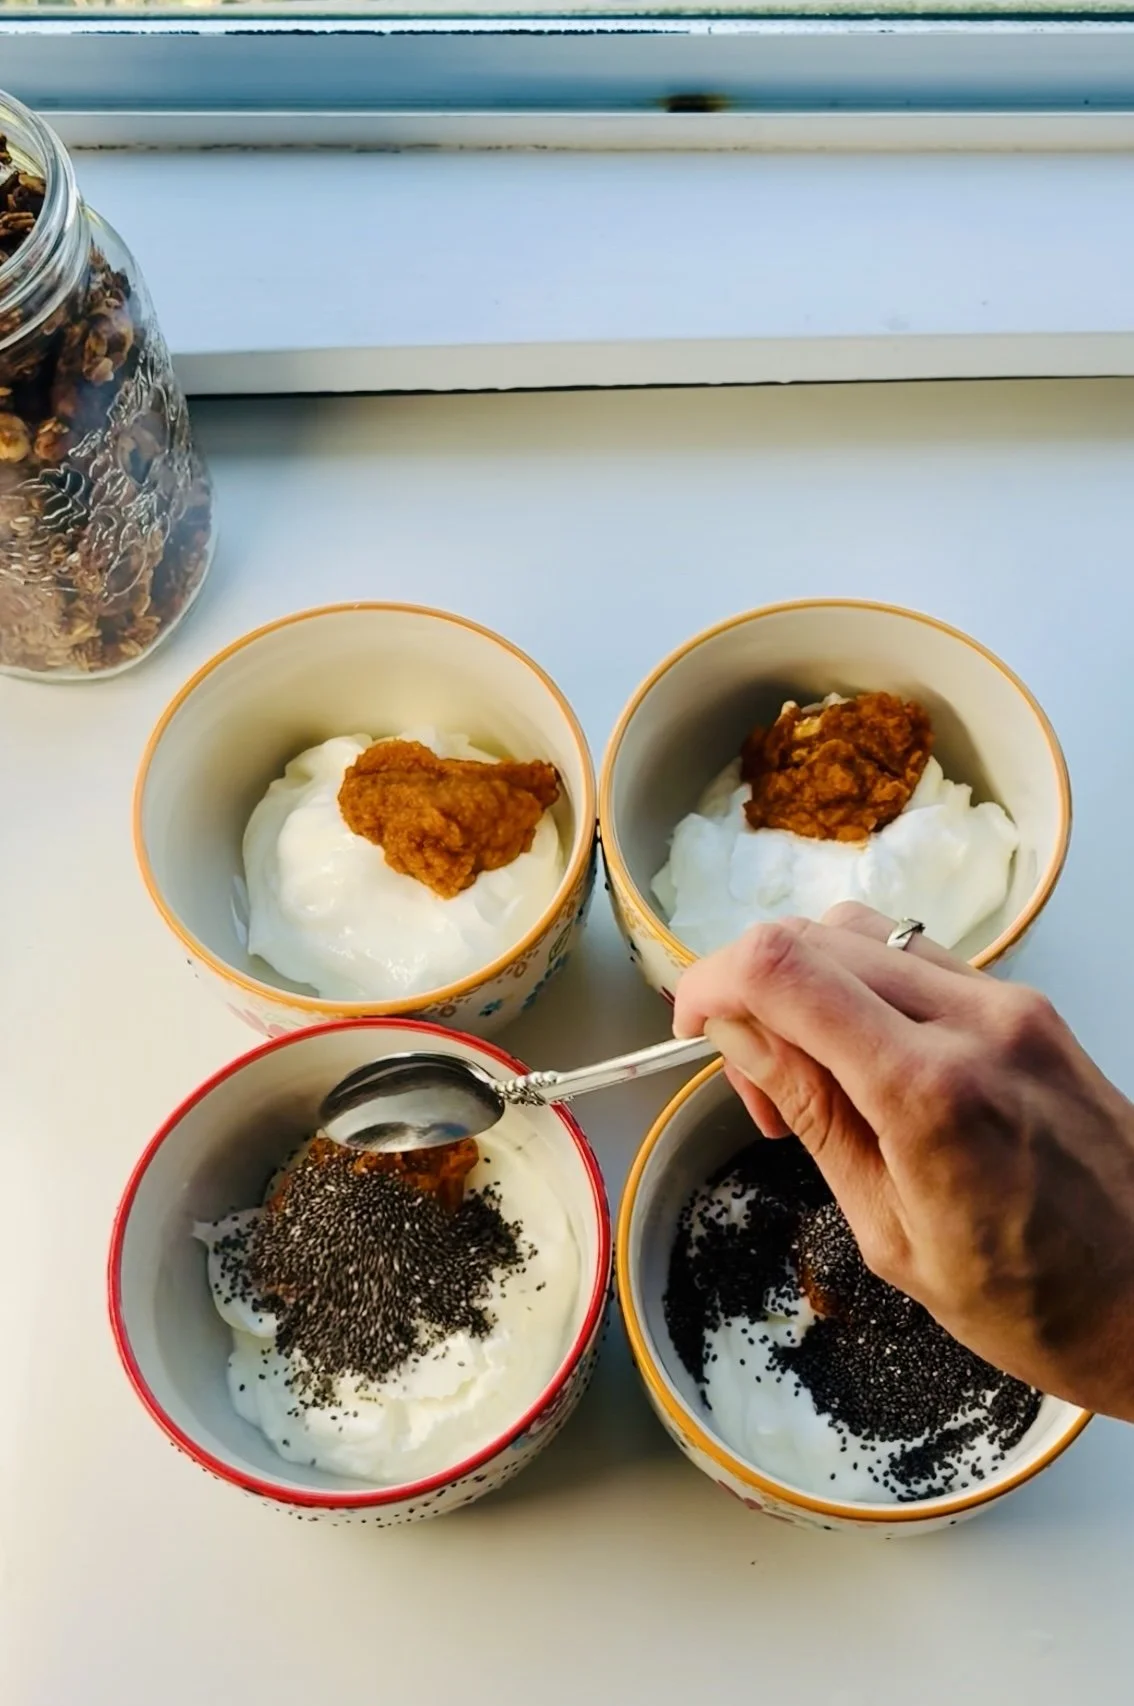
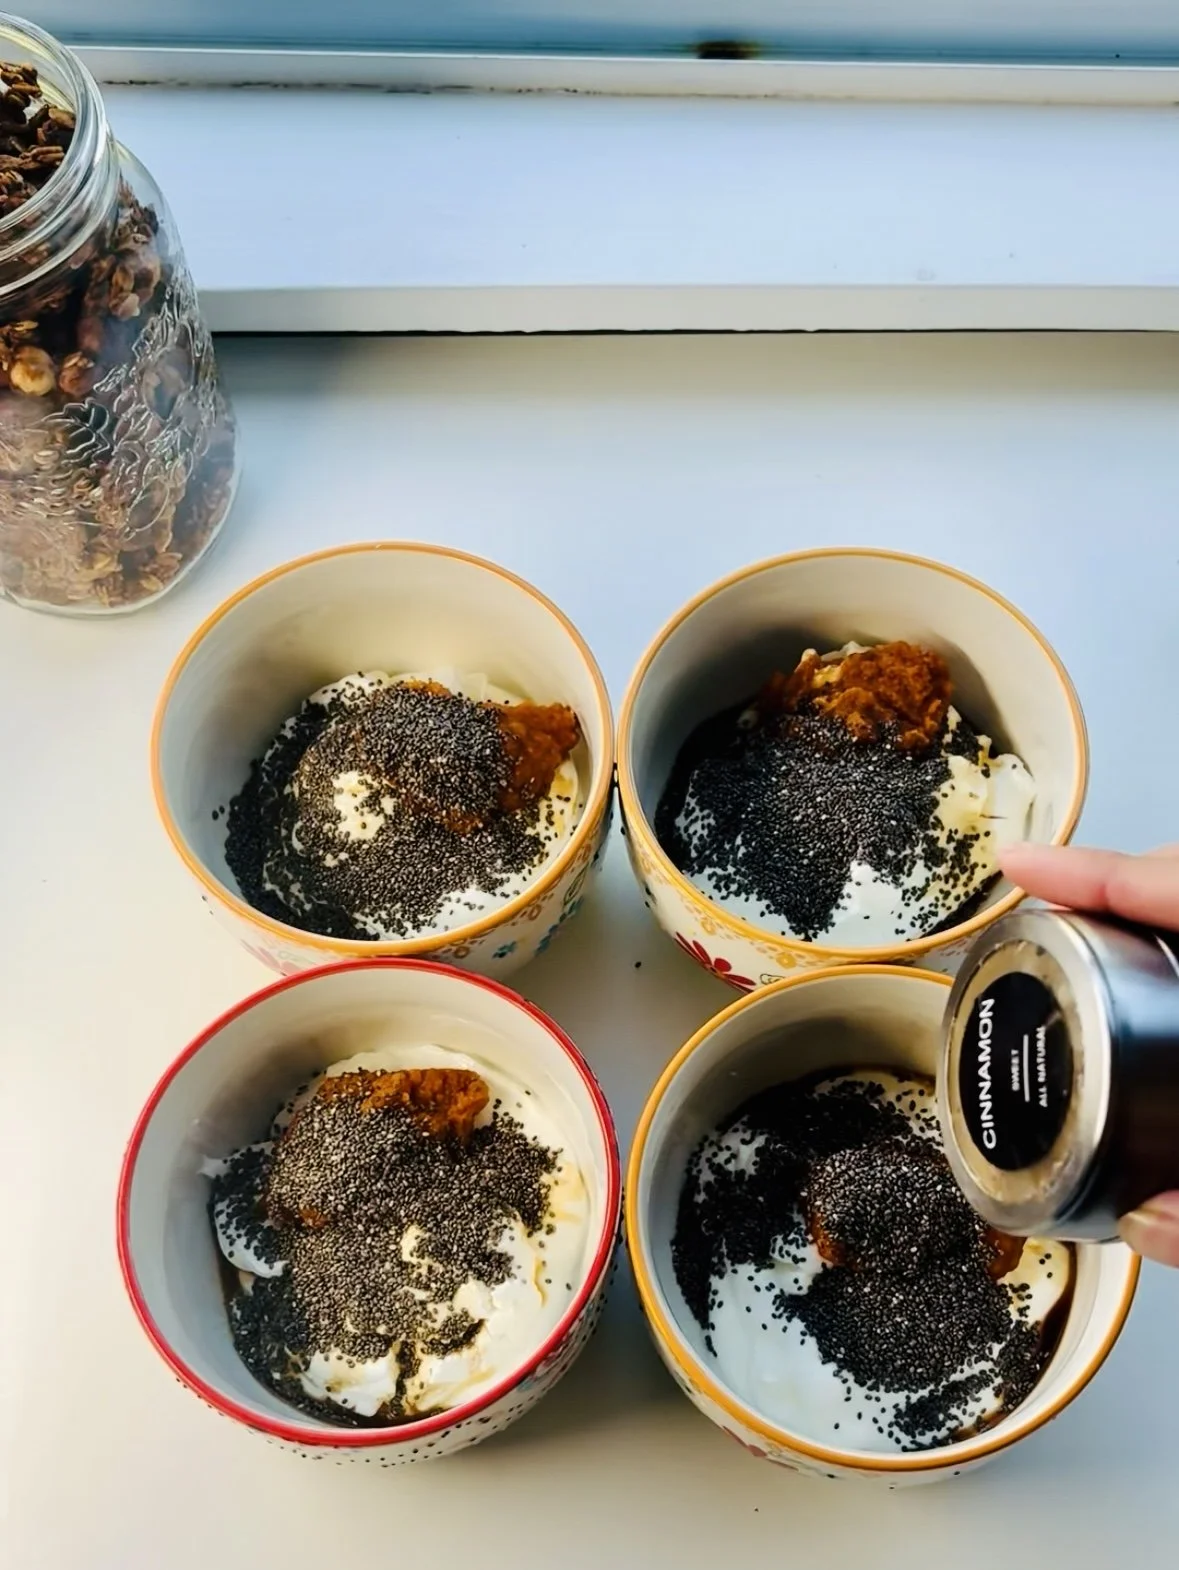
Pumpkin Pie Yogurt Chia Bowl Recipe
Prep time: 5 minutes | Servings: 1
Ingredients
1 cup Greek yogurt (plain or vanilla)
1 heaping tbsp pumpkin purée
1–2 tbsp chia seeds
¼ tsp pure vanilla extract
½ tsp pumpkin pie spice (or cinnamon + pinch nutmeg)
1 tsp maple syrup or honey (optional)
Fruit of choice – sliced banana, pear, or berries
Topping: my Banana-Nut Granola
Instructions
In a bowl, stir yogurt, pumpkin, chia, vanilla, and spices until combined.
Sweeten to taste.
Let sit 10–15 minutes (or overnight) for the chia to thicken.
Top with fruit and a sprinkle of granola.
That’s it—5 minutes to a cozy, nutrient-dense breakfast that supports brain health, focus, and gut balance.
Make It Yours
Swap Greek yogurt for coconut yogurt to make it dairy-free.
Stir in protein powder or collagen for extra protein.
Add crushed walnuts or pecans for more healthy fats.
Prep in jars for grab-and-go breakfasts.
Final Thoughts
Healthy breakfasts don’t need to be complicated. This Pumpkin Pie Yogurt Chia Bowl is the perfect blend of protein, healthy fats, fiber, and comfort—made to nourish both your gut and your brain.
👉 Pair with: Banana-Nut Granola Recipe
Pumpkin Energy Balls: A No-Bake Snack for Focus & Steady Energy

If your brain feels foggy by mid-afternoon or your kids hit that after-school crash, these Pumpkin Energy Balls are the perfect quick fix — nutrient-dense, balanced, and designed to fuel focus rather than cause a sugar spike.
What I love most about this recipe is that it’s completely customizable. Once you understand the wet-to-dry ratio, you can swap ingredients based on what’s in your pantry.

The secret?
👉 Combine about 1 part wet ingredients (nut butter, banana, pumpkin, honey) to 2 parts dry ingredients (oats, seeds, nuts, coconut, mix-ins).
This creates a sticky mixture that firms up perfectly after chilling — no baking required.

🧠 Why These Ingredients Support Brain Health
Each ingredient has a purpose beyond flavor. Here’s why this snack works so well for energy, focus, and calm:
Banana — Provides quick energy and potassium, which supports nerve function and helps regulate mood.
Peanut Butter (or Almond / Sunflower Seed Butter) — Rich in healthy fats and plant-based protein to stabilize blood sugar and provide steady energy. The healthy fats also help with dopamine production, supporting motivation and focus.
Pumpkin Purée — High in vitamin A, antioxidants, and fiber, pumpkin supports brain cell health and gut balance — both key for mental clarity.
Honey — A touch of sweetness that delivers antioxidants and trace minerals, while satisfying cravings without refined sugar.
Rolled Oats — Packed with complex carbohydrates and soluble fiber, oats provide slow-releasing energy for the brain.
Flax, Walnuts & Pumpkin Seeds — A powerhouse trio for omega-3s, magnesium, and zinc — all linked to better focus, mood regulation, and memory.
Dark Chocolate Chips — A natural source of flavonoids and a mild dopamine boost, supporting alertness and a positive mood.
Together, these ingredients make a snack that’s as nourishing as it is satisfying — perfect for busy days, homework breaks, or a post-workout refuel.

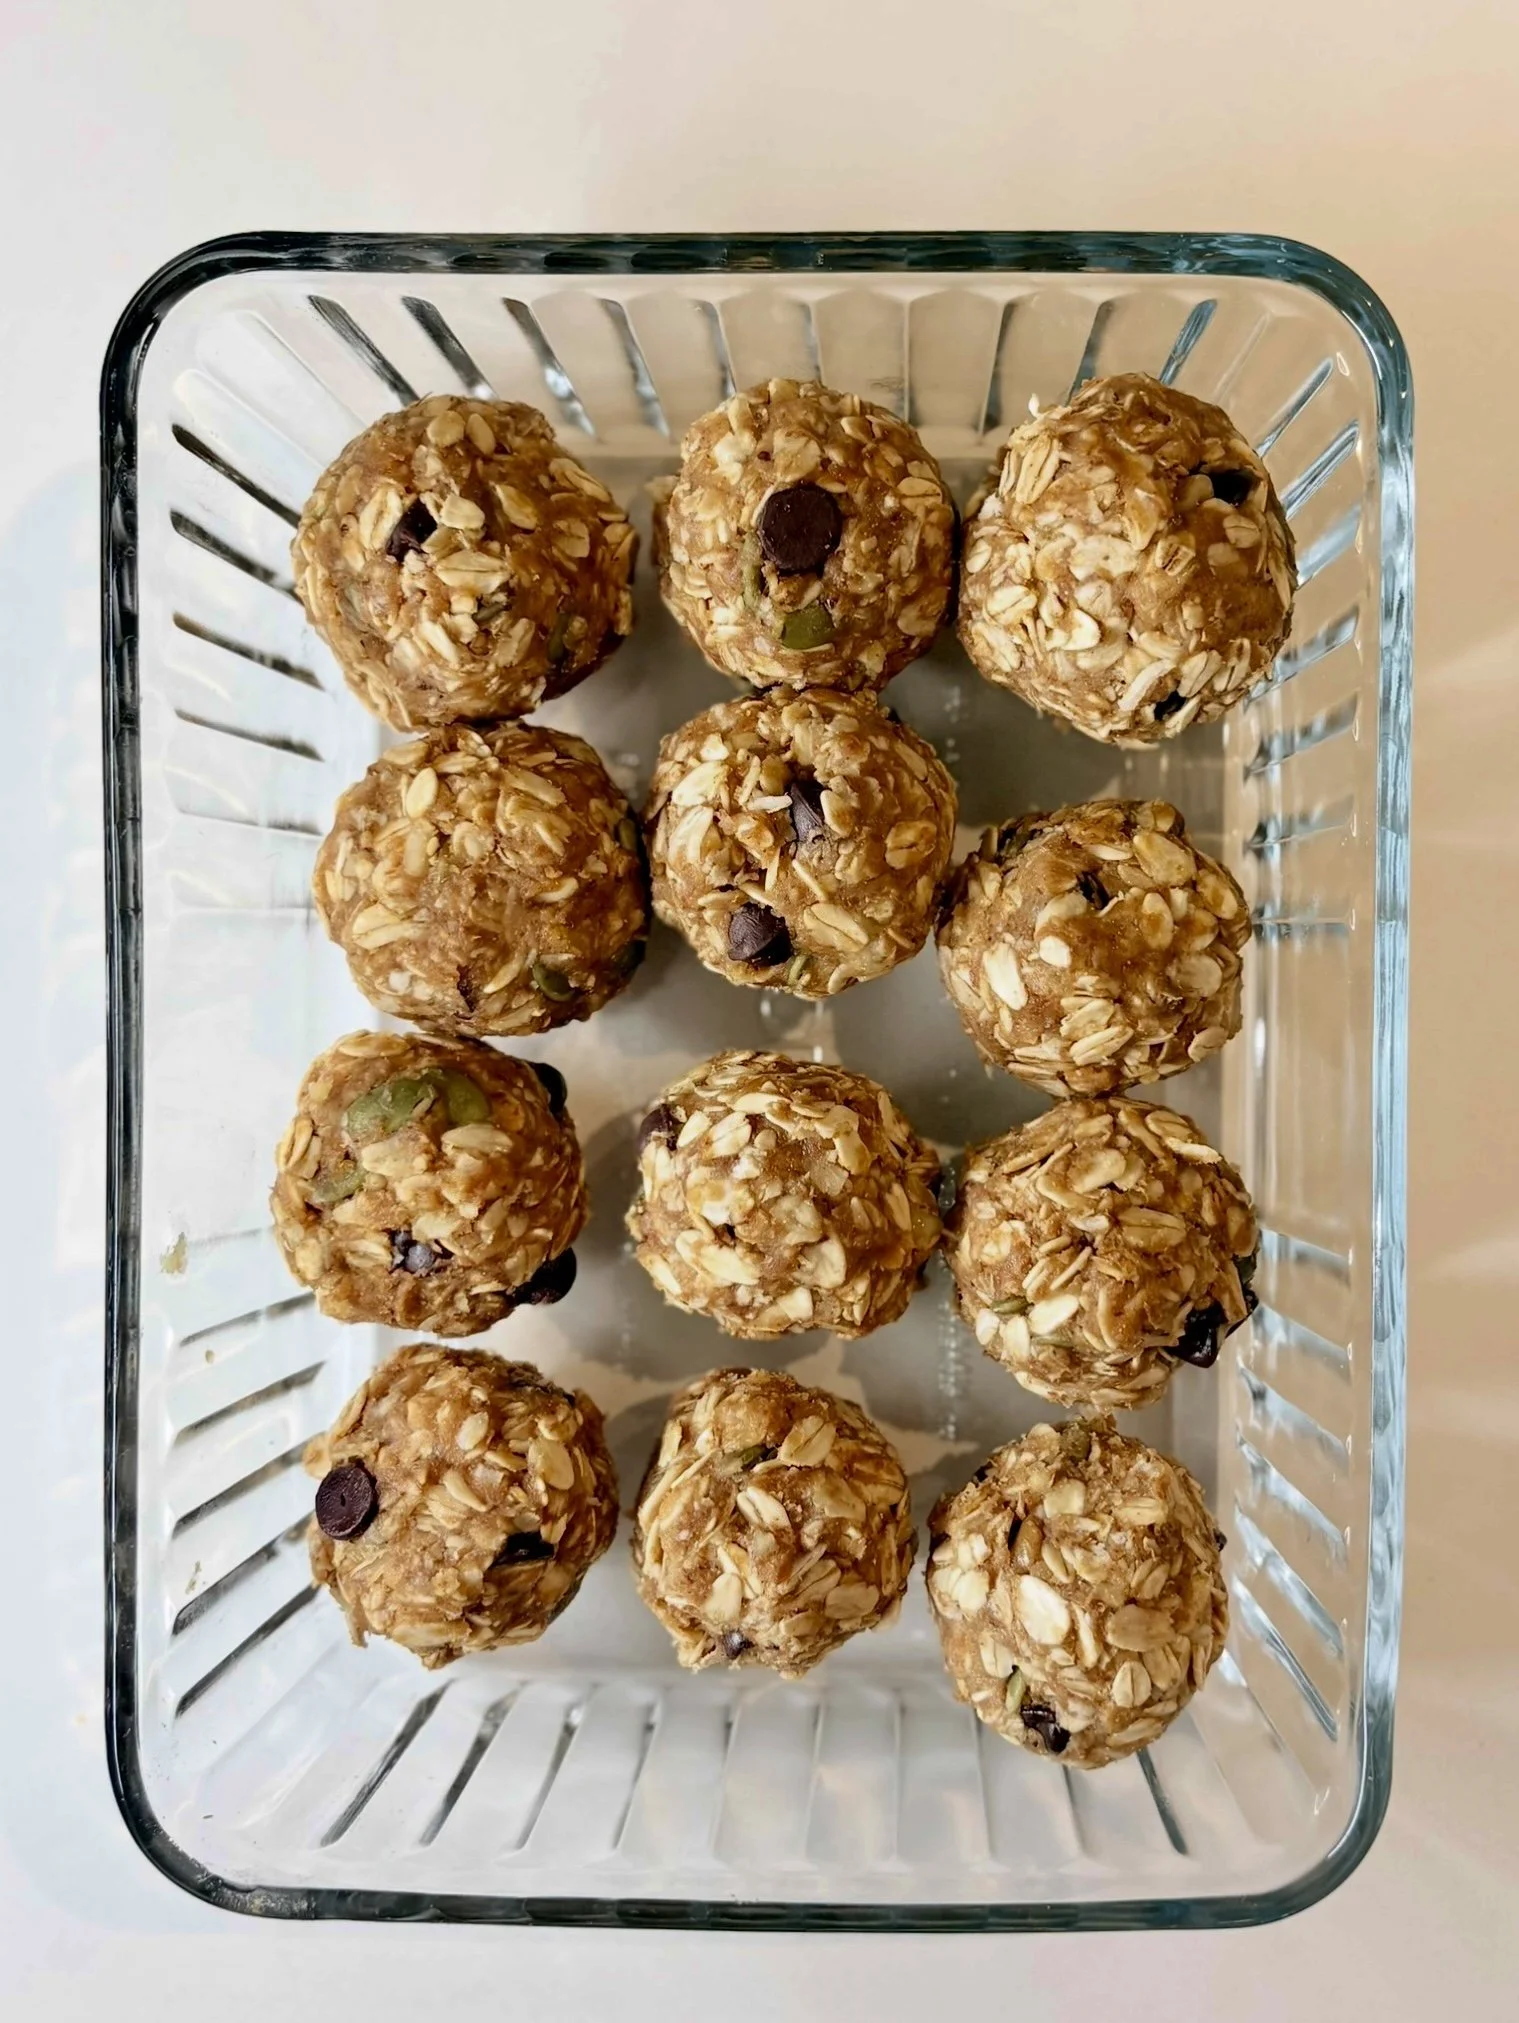
Pumpkin Energy Balls Recipe
Prep Time: 10 minutes | Chill Time: 30 minutes | Servings: ~ 18–20 balls
Ingredients:
1 mashed banana
1 cup peanut butter (or almond / sunflower seed butter)
3 tbsp pumpkin purée
1 tbsp + 1 tsp honey
1 tbsp ground flax
1 tsp cinnamon
1 tbsp coconut flakes
1 tbsp crushed walnuts
¼ cup pumpkin seeds
¼ cup dark chocolate chips
½ tsp salt
1 cup quick oats
2 cups rolled oats
Instructions:
In a large bowl, mash the banana and stir in peanut butter, pumpkin purée, honey, and ground flax until smooth.
Add cinnamon, coconut flakes, walnuts, pumpkin seeds, chocolate chips, and salt. Mix well.
Stir in oats until the mixture is thick and evenly coated.
Press the mixture into a bowl or a parchment-lined dish and refrigerate for 30 minutes.
Scoop and roll into balls.
Store in an airtight container in the fridge for up to 2 weeks (I like to keep mine cold so they stay firm and chewy).

Make Them Your Own
Once you’ve mastered the wet-to-dry ratio, you can mix and match:
Swap banana for applesauce or mashed dates.
Use almond butter, sunflower seed butter, or tahini.
Add hemp hearts, chia seeds, or raisins for texture.
Keep them school-safe by skipping nuts and using seeds only.
Every batch can taste different while still supporting brain and body balance.
Final Thoughts
You don’t need another sugar-rush snack — your brain just needs nourishment.
These Pumpkin Energy Balls deliver focus, calm, and lasting energy in a few simple bites.
👉 Related post: The Dopamine Diet: How Food Can Help ADHD Brains Thrive
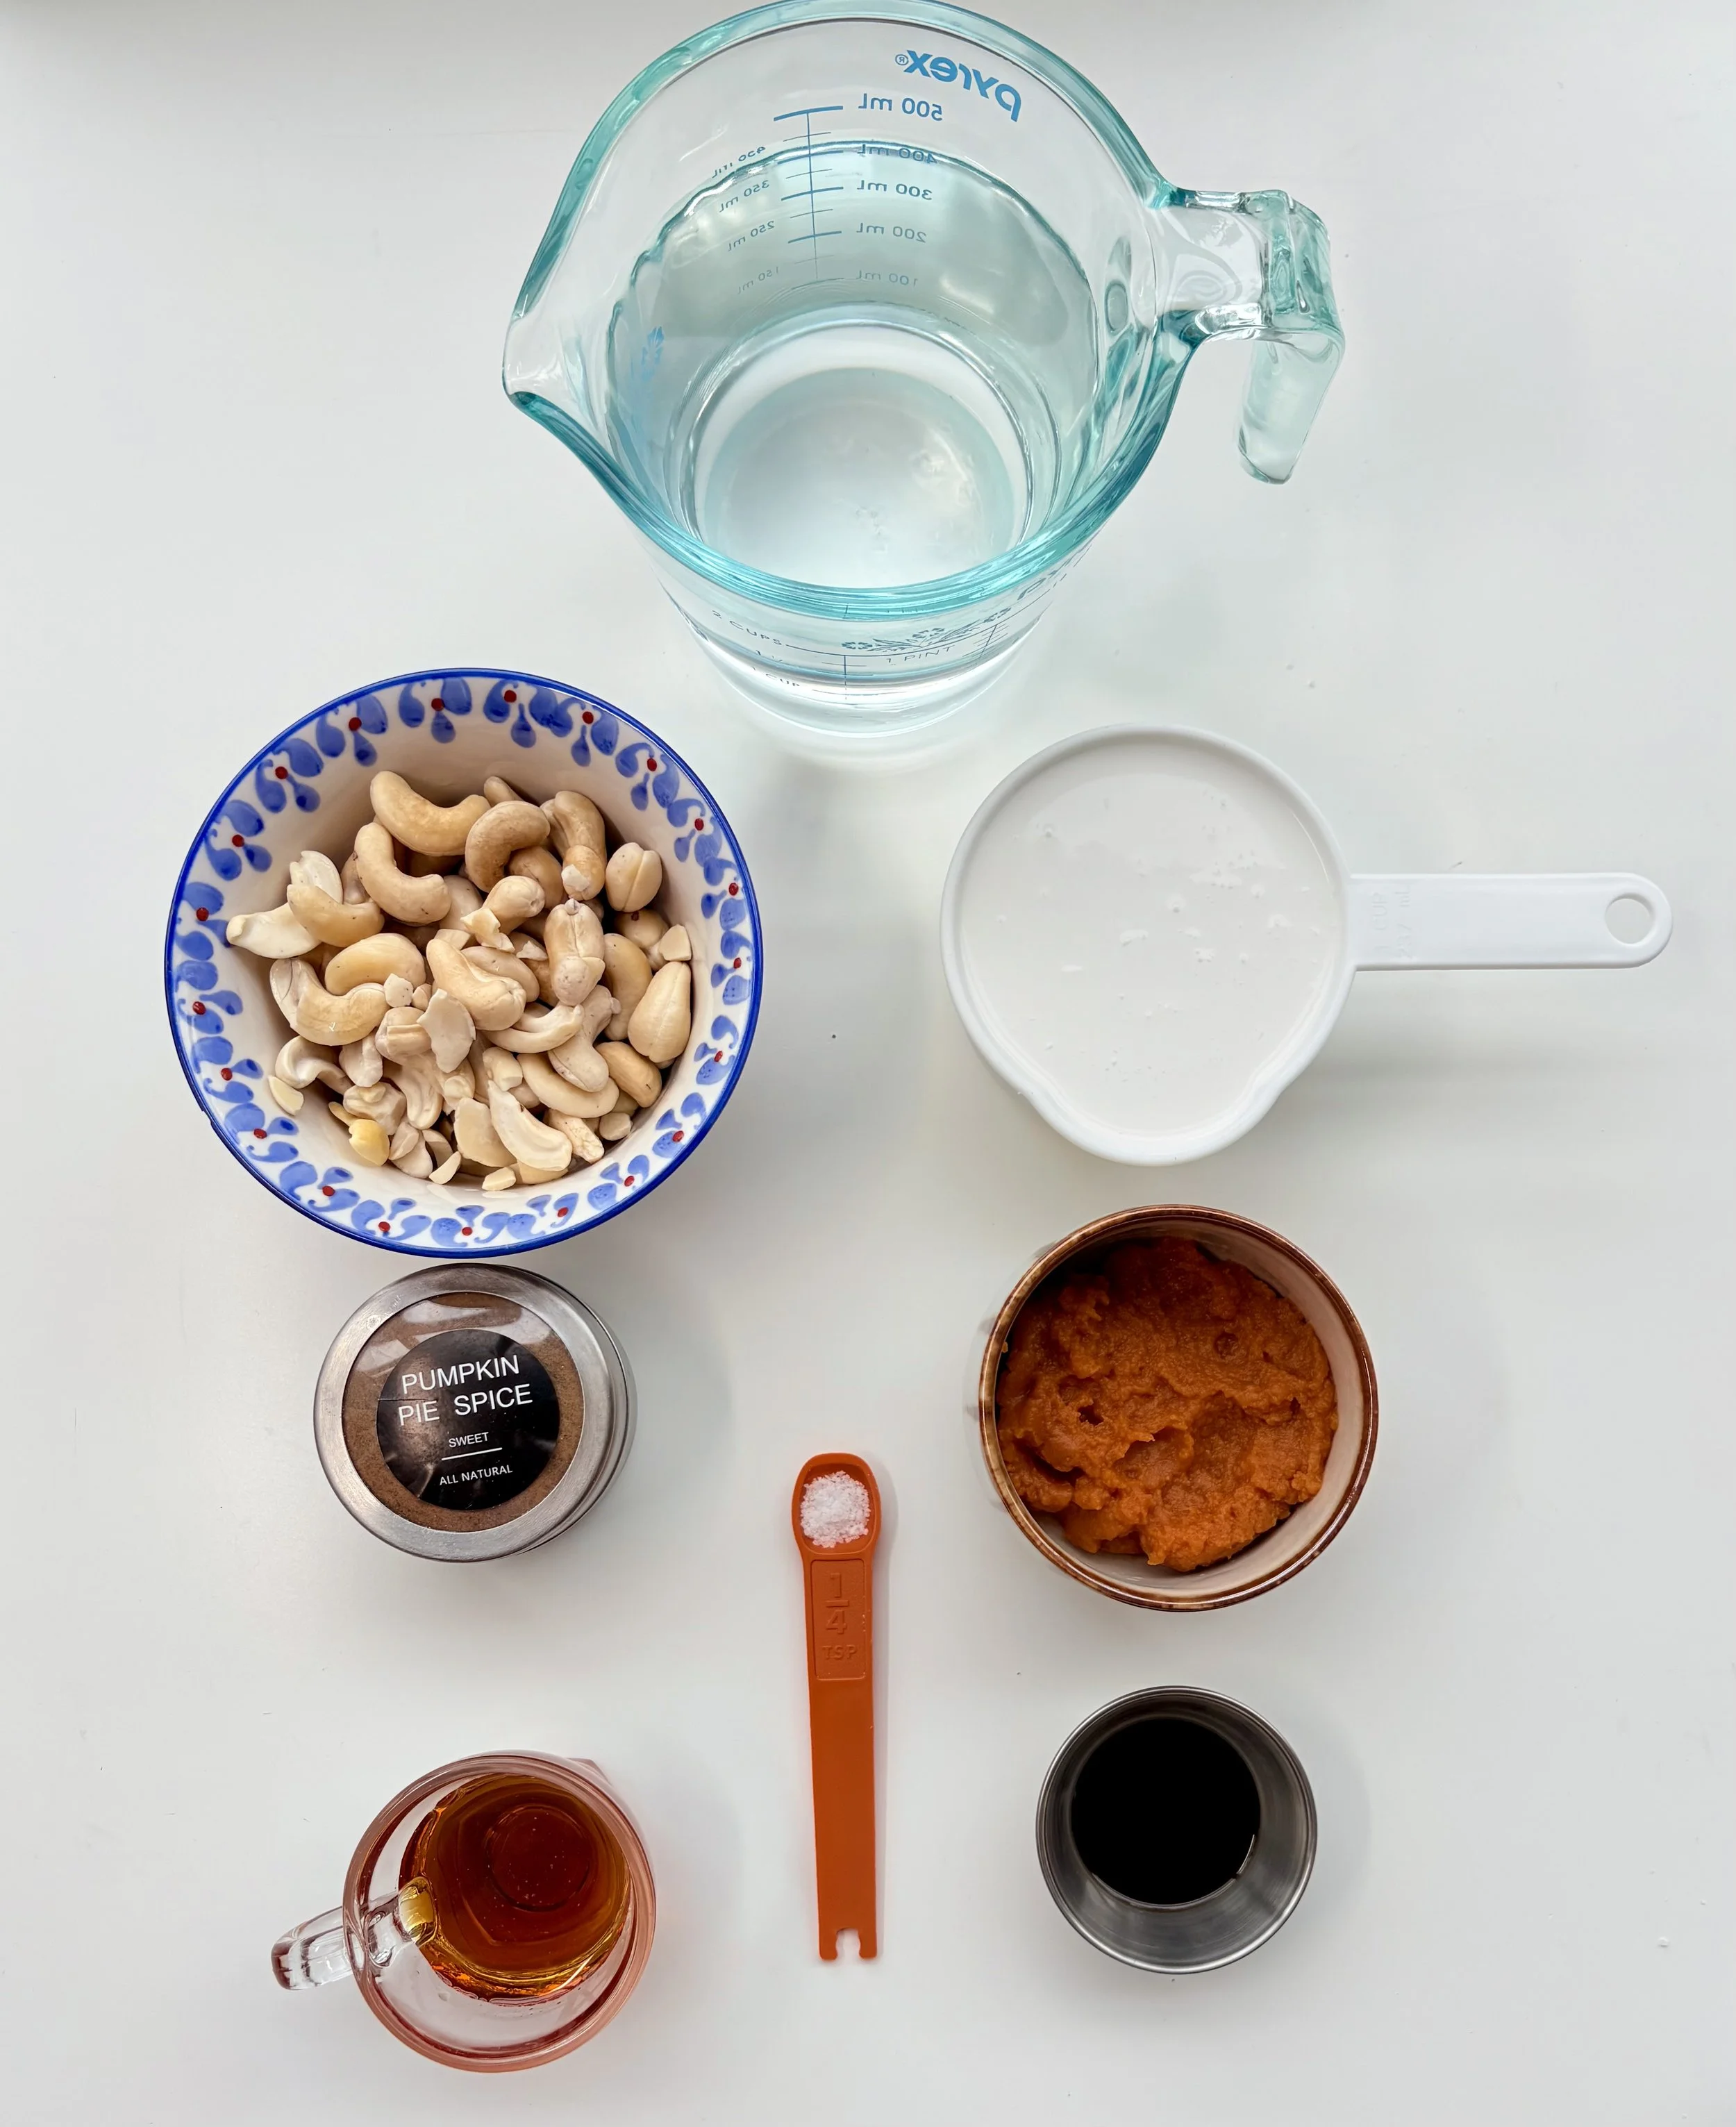
Pumpkin Spice Creamer (Dairy-Free, Naturally Sweetened)
When cooler mornings hit, there’s nothing like a warm cup of coffee — especially when it tastes like pumpkin pie. Most store-bought pumpkin spice creamers are loaded with refined sugar, gums, and artificial flavorings, which can leave you feeling foggy or jittery.

This homemade version is creamy, subtly sweet, and made with ingredients that actually nourish your brain and body. Cashews provide healthy fats and magnesium for calm focus, pumpkin adds fiber and vitamin A, and cinnamon helps regulate blood sugar — so you can enjoy that cozy fall flavor without the crash.
It’s simple, wholesome, and completely customizable — add more or less sweetness depending on your taste, and keep it vegan or dairy-free with ease.
Nutrition Notes
Cashews → Healthy fats + magnesium for calm focus and energy stability
Pumpkin → Rich in beta-carotene (vitamin A) and fiber to support gut and brain health
Cinnamon → Helps balance blood sugar, which supports steady mood and attention
Coconut milk → Adds creaminess and healthy fats for lasting satiety
Together, they create a balanced blend that supports focus, energy, and that “ahh” moment with every sip.

Pumpkin Spice Creamer Recipe
Ingredients
½ cup raw cashews, soaked for 4 hours (or 15 minutes in boiling water) and rinsed
1 cup coconut milk
2 cups water
⅓ cup pure pumpkin purée
1–3 tbsp maple syrup, to taste
1 tbsp vanilla extract
2 tsp pumpkin spice (or 1½ tsp cinnamon + ¼ tsp nutmeg + ¼ tsp clove)
¼ tsp sea salt
Directions
Soak cashews for 4 hours (or use the quick boil method: cover with hot water for 15 minutes). Drain and rinse.
Add all ingredients to a high-speed blender: cashews, coconut milk, water, pumpkin purée, maple syrup, vanilla, pumpkin spice, and salt.
Blend on high until completely smooth and creamy — about 45–60 seconds.
Taste and adjust: add more maple syrup for sweetness or a pinch more cinnamon for warmth.
Store in a sealed jar in the fridge for up to 5 days. Shake before using.

Serving Ideas
Add to your morning coffee or chai for a cozy pumpkin spice latte vibe.
Froth it for a creamy, café-style finish.
Pour over black tea for a warming afternoon pick-me-up.
Stir into oatmeal or overnight oats for extra fall flavor.
Storage Tips
Keep your pumpkin spice creamer in a sealed glass jar or bottle in the fridge for up to 5 days. Shake or stir before each use — separation is natural. You can also freeze it into ice cubes for smoothies or future lattes.

This pumpkin spice creamer is simple, cozy, and way more satisfying than anything store-bought. It takes just a few minutes to make, lasts all week, and adds that perfect touch of fall warmth to your morning coffee.
Once you make it from scratch, it’s hard to go back — creamy, lightly sweet, and just the right amount of spice.
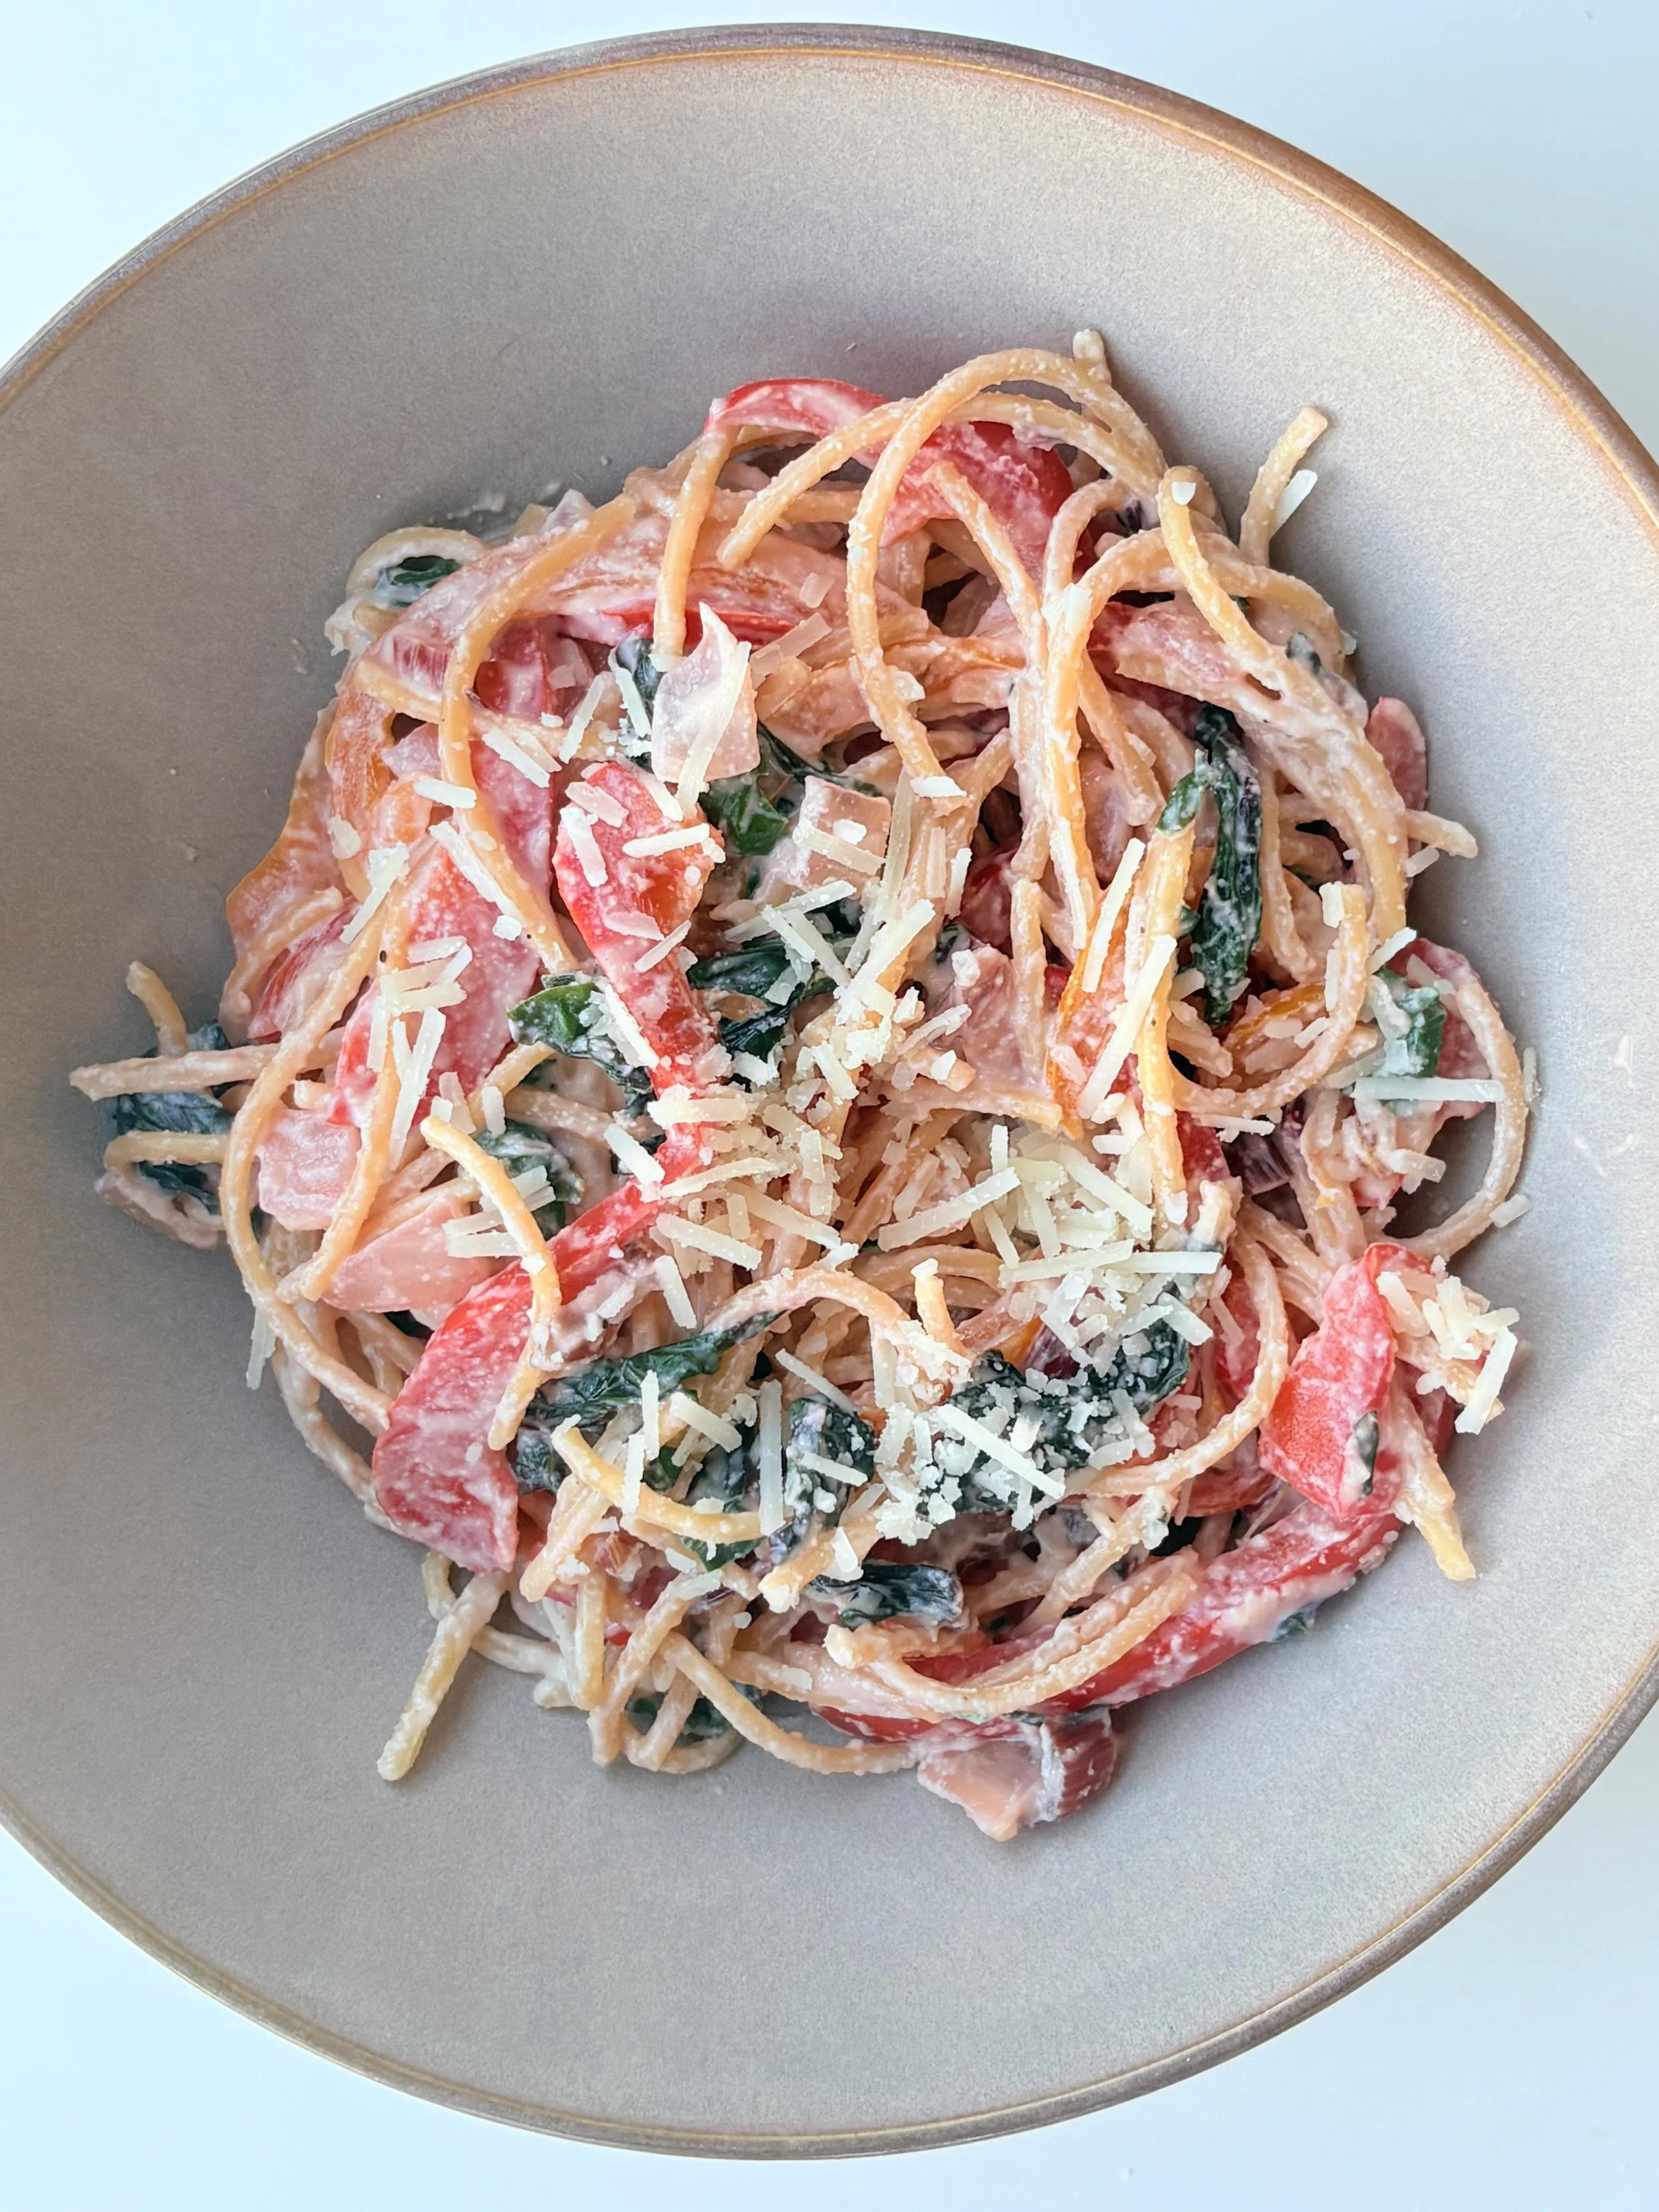
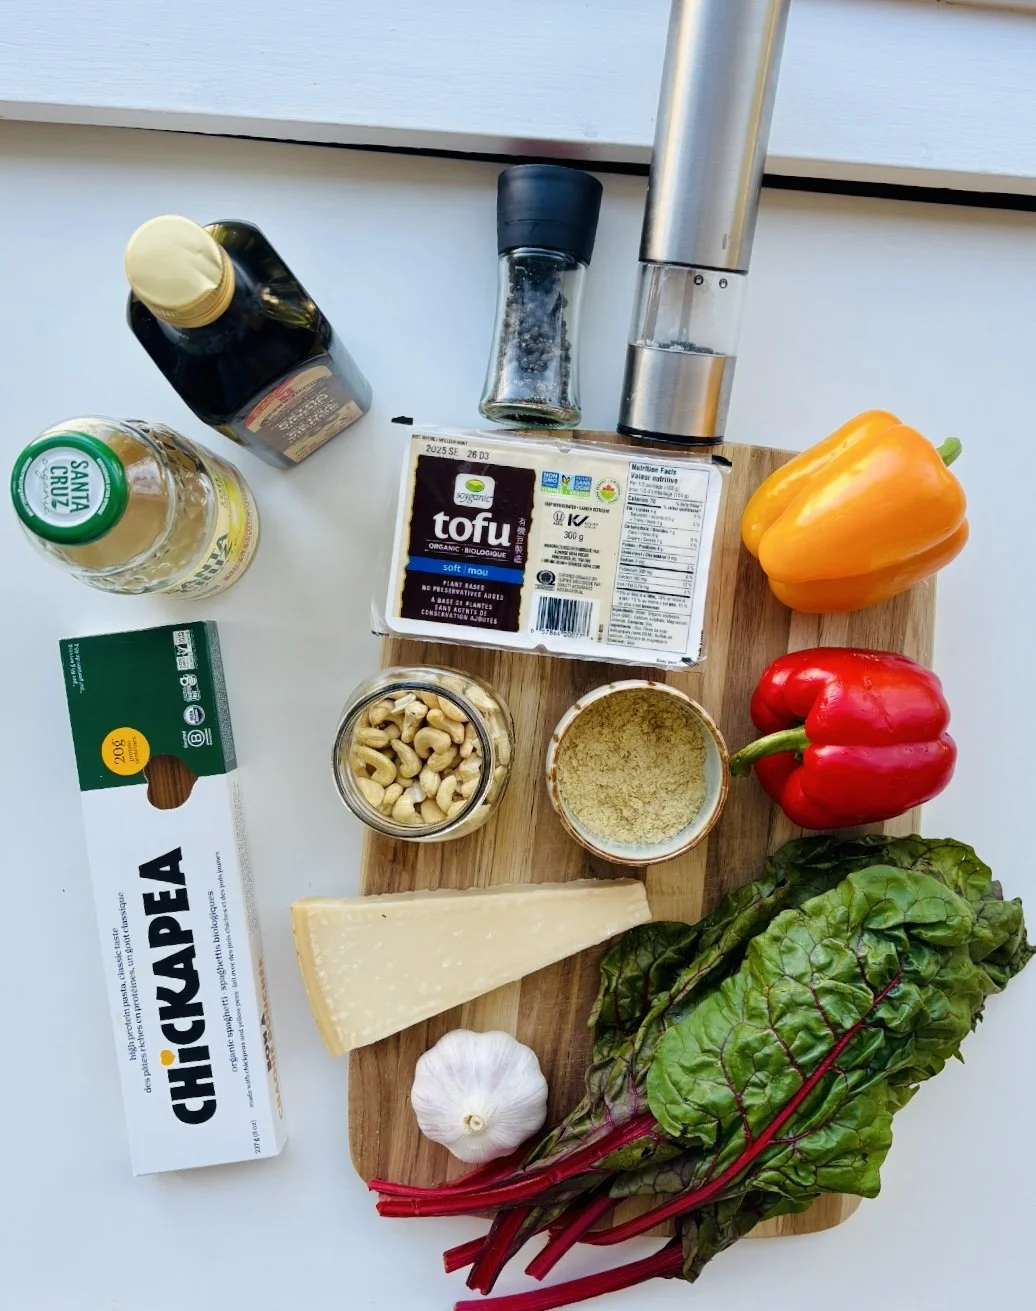
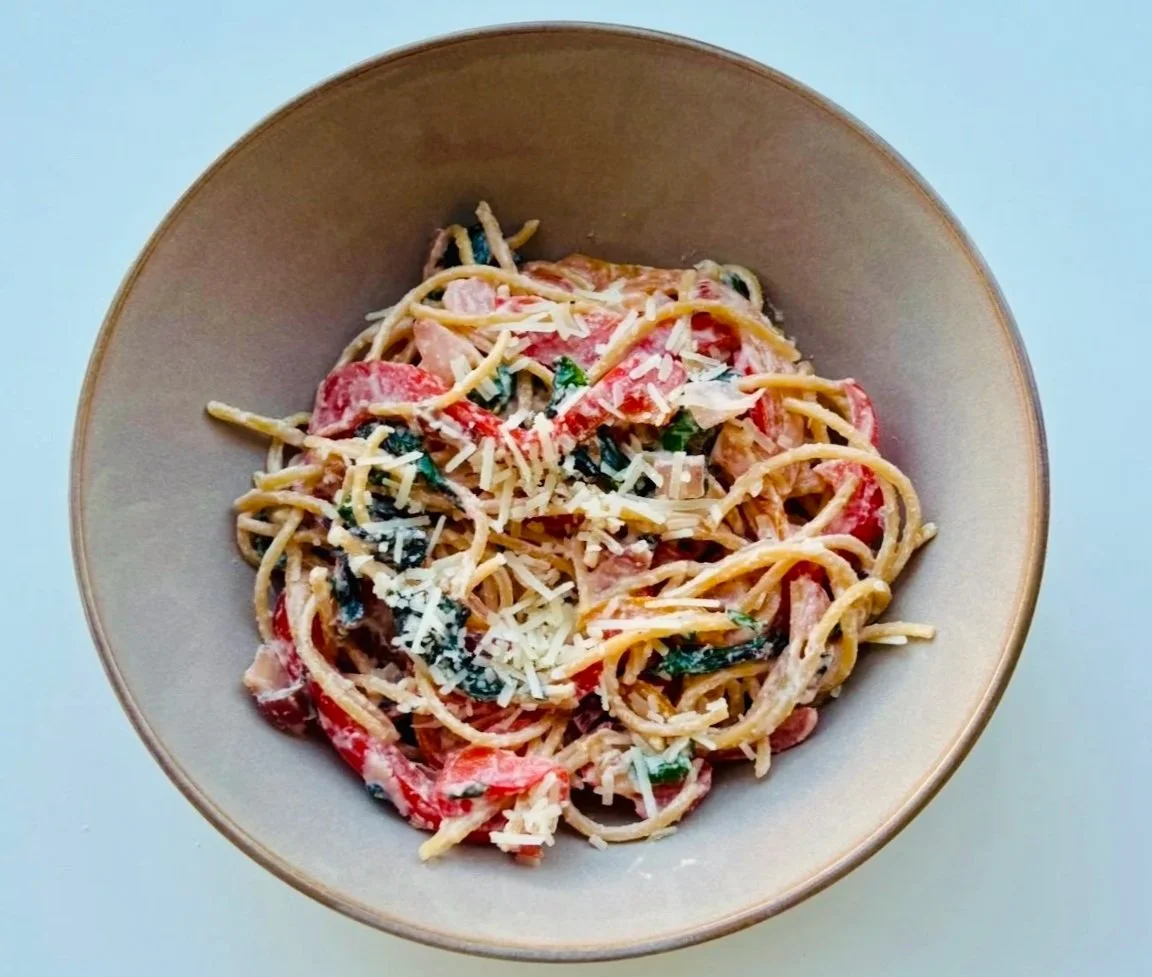
Creamy Tofu-Cashew Garlic Pasta
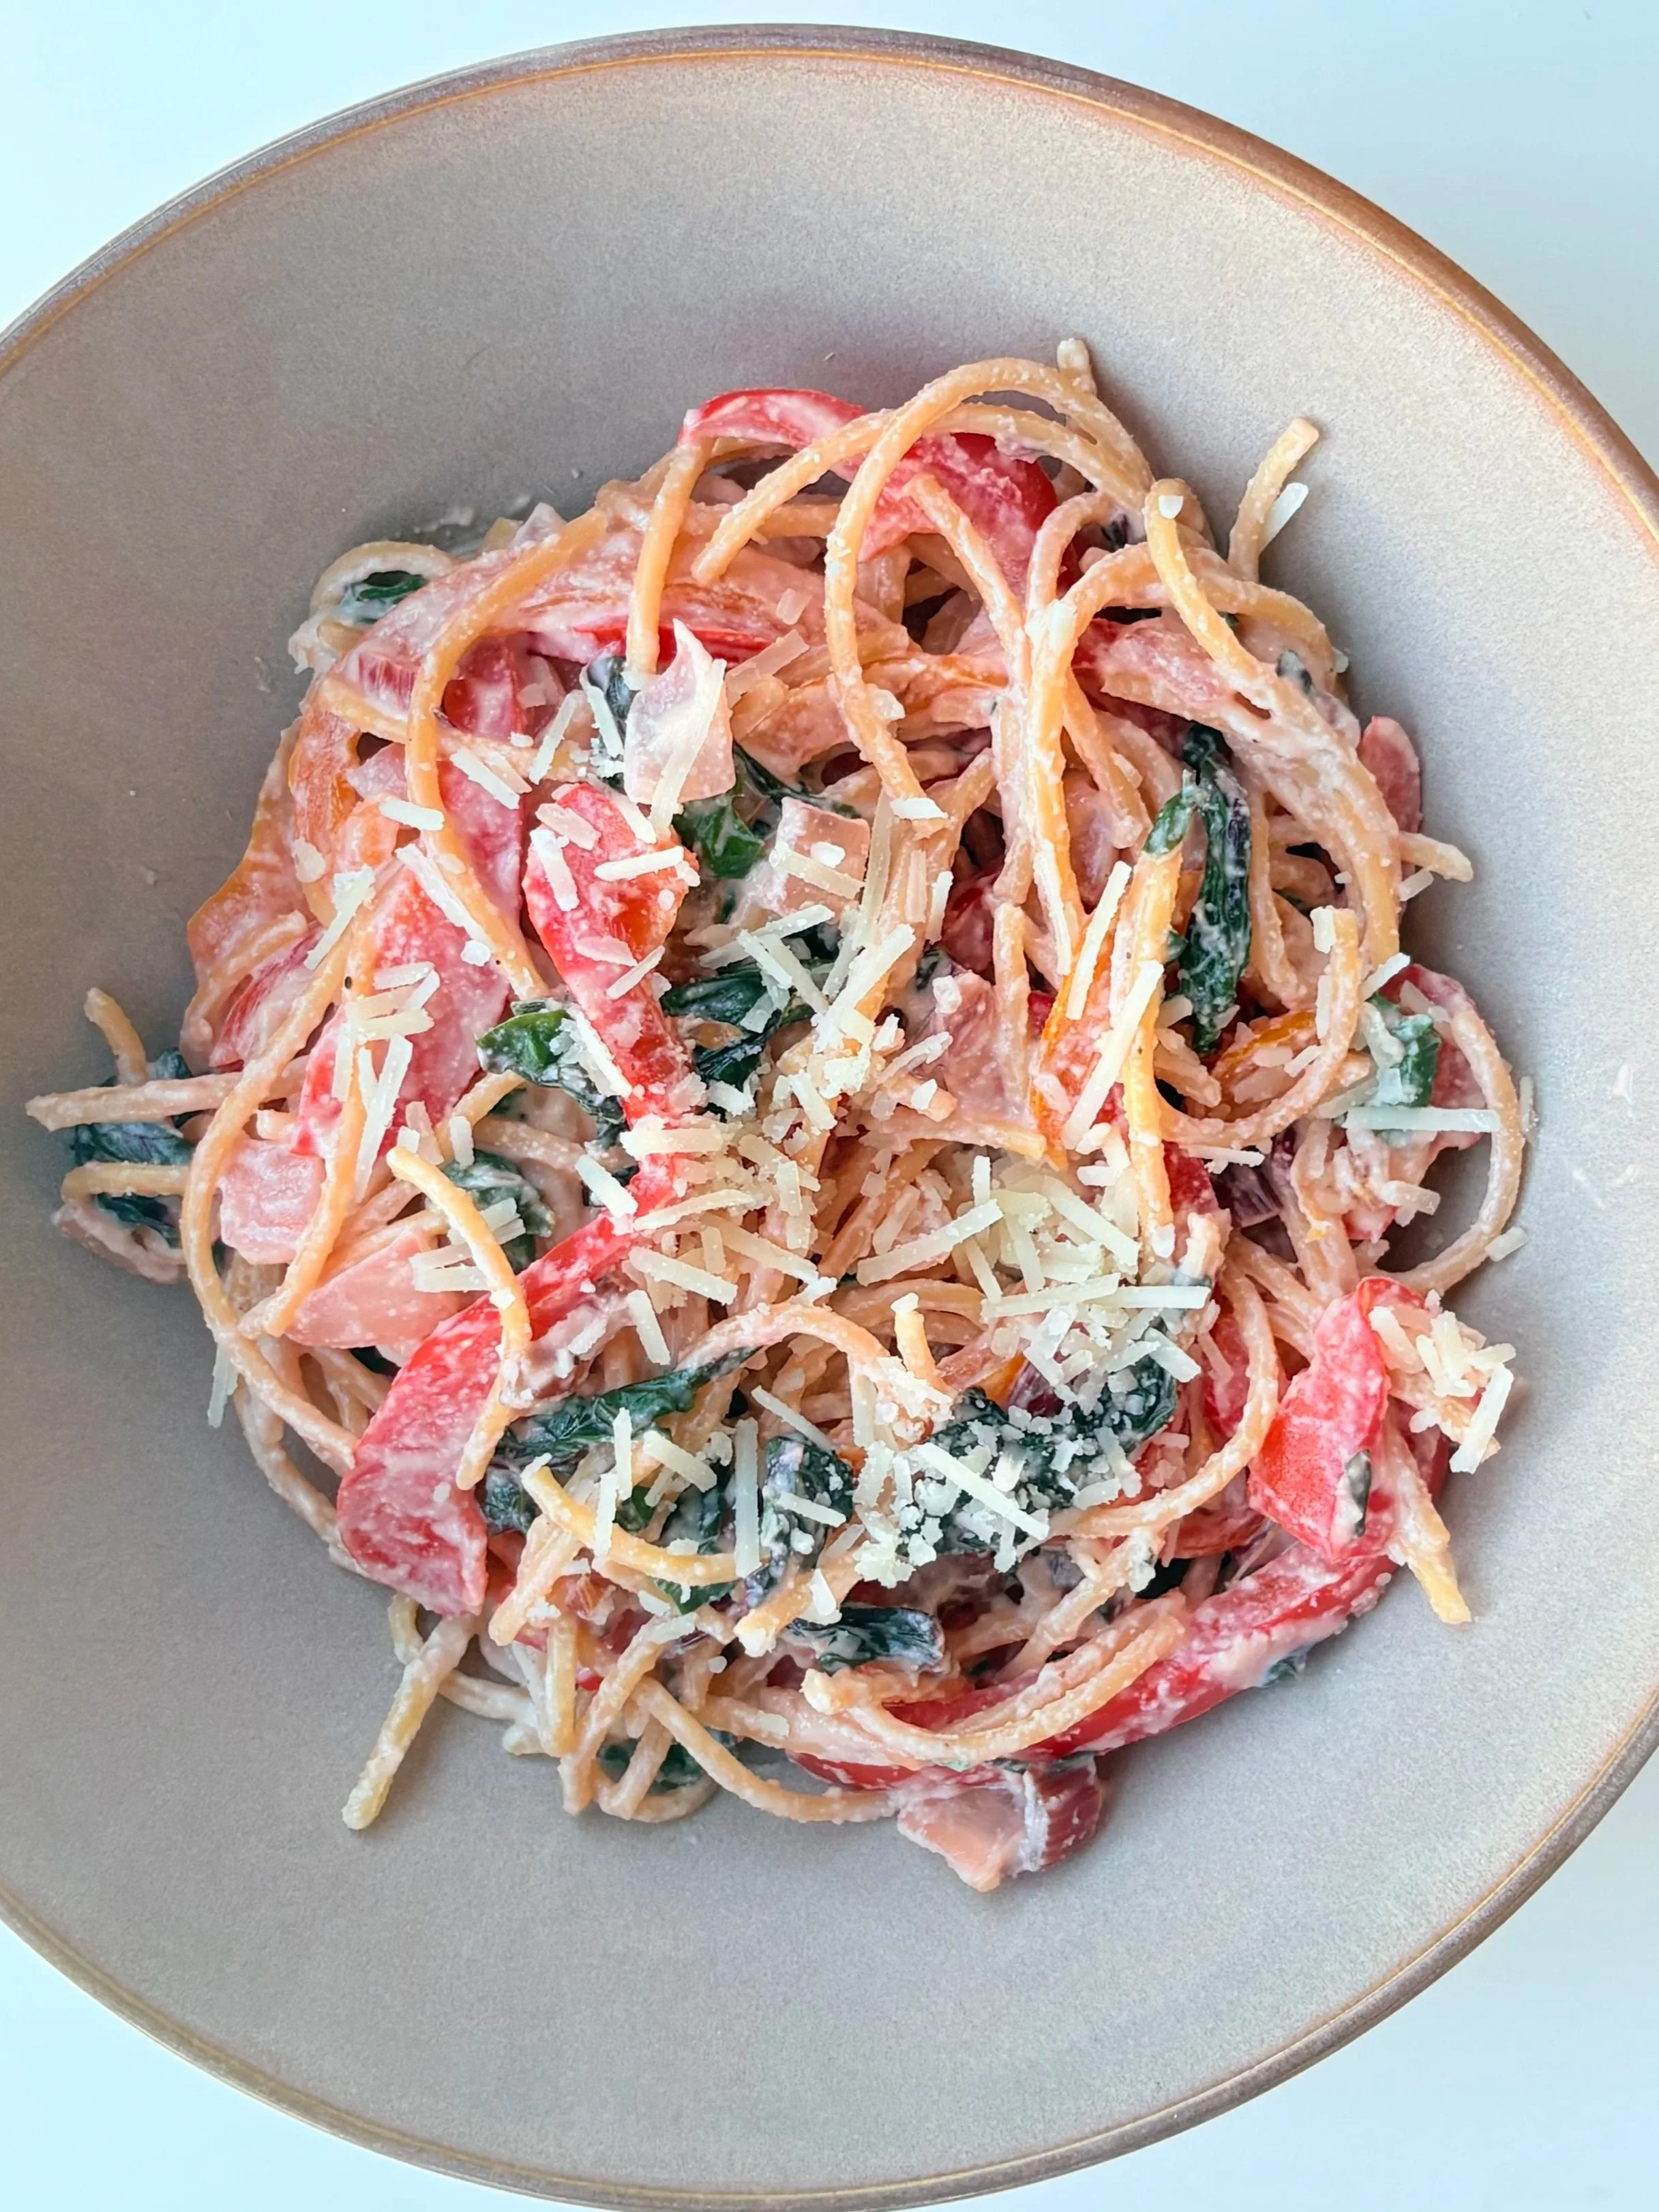
There’s nothing more comforting than a creamy pasta, but most versions leave me feeling heavy and low on energy. I wanted a sauce that had the same silky texture without relying on cream — something nutrient-dense, balanced, and filling. That’s how this recipe was born.
By blending tofu and cashews, you not only get a smooth, rich base, but also a complete source of plant-based protein. Cashews provide healthy fats and minerals like magnesium and zinc, while tofu adds lean protein and calcium. Paired with chickpea pasta, this dish packs a powerful protein punch and keeps you satisfied for hours.
I also love using nutritional yeast (sometimes called “nooch”) in sauces. Beyond its nutty, cheesy flavor, it’s often fortified with B vitamins, including B12, which is especially important for plant-forward diets. It also provides fiber and antioxidants to support overall wellness.
This recipe is flexible — you can use whatever vegetables you have on hand and adjust the toppings to fit your preferences. Creamy, garlicky, nutrient-balanced, and weeknight-easy.
Nutrition Highlights
Protein combining: Cashews, tofu, and chickpea pasta work together to create a balanced meal with plant-based protein and essential amino acids.
Healthy fats: Cashews and olive oil add satiety and support nutrient absorption.
B vitamins: Nutritional yeast often contains B12, along with other B vitamins to support energy metabolism.
Greens & veggies: Swiss chard and peppers bring fiber, vitamin C, and antioxidants.
👉 Save this recipe for busy weeknights when you want something creamy, filling, and nourishing — no heavy cream required.
Creamy Tofu-Cashew Garlic Pasta Recipe
Prep Time: 15 mins | Cook Time: 20 mins | Total Time: ~35 mins Servings: 4
Ingredients
Sauce
½ cup cashews, soaked 2–3 hours and rinsed (or 15 minutes in hot water)
300 g soft tofu
¼ cup nutritional yeast
3 cloves garlic
3 tbsp lemon juice
¼ cup shredded Parmesan (optional; omit for vegan)
Salt & black pepper, to taste
Veg & Pasta
1 tbsp olive oil or avocado oil
~3 cups vegetables (I used 2 bell peppers, 1 bunch Swiss chard, ½ cup chopped white onion)
1 package pasta (I used chickpea pasta for extra protein)
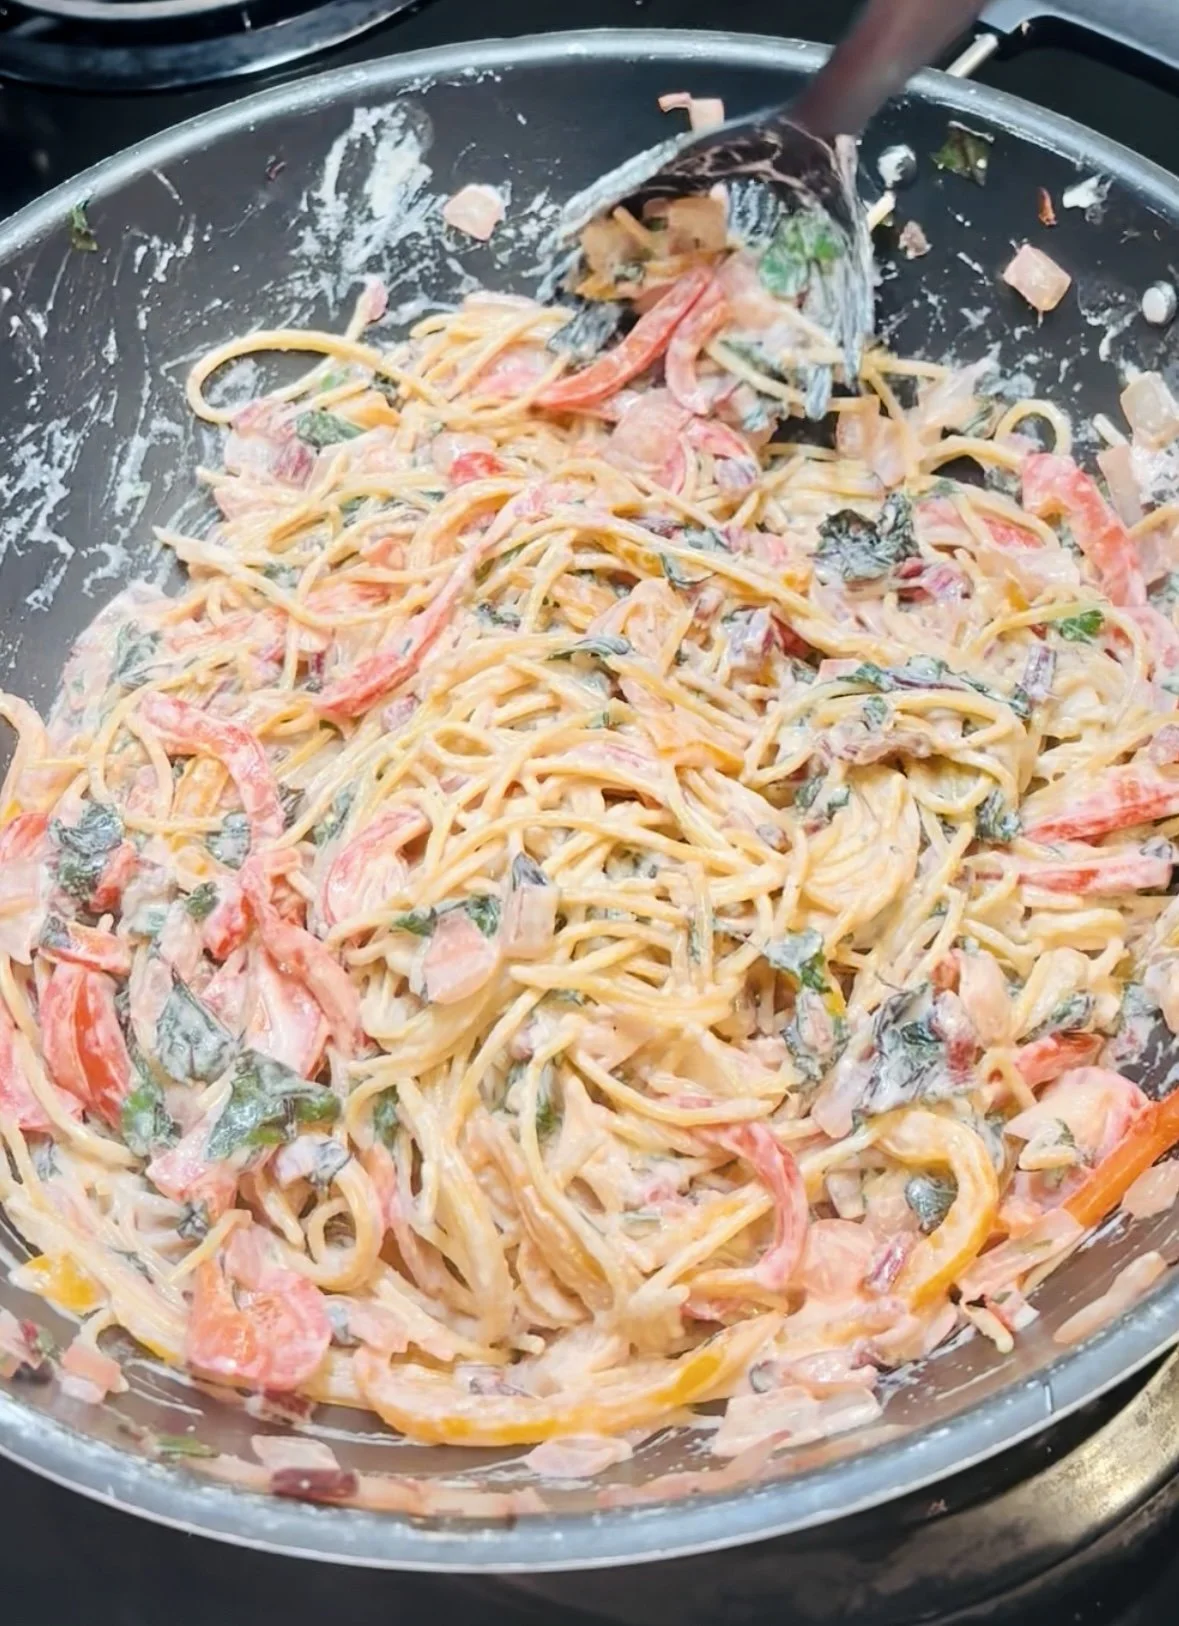
Directions
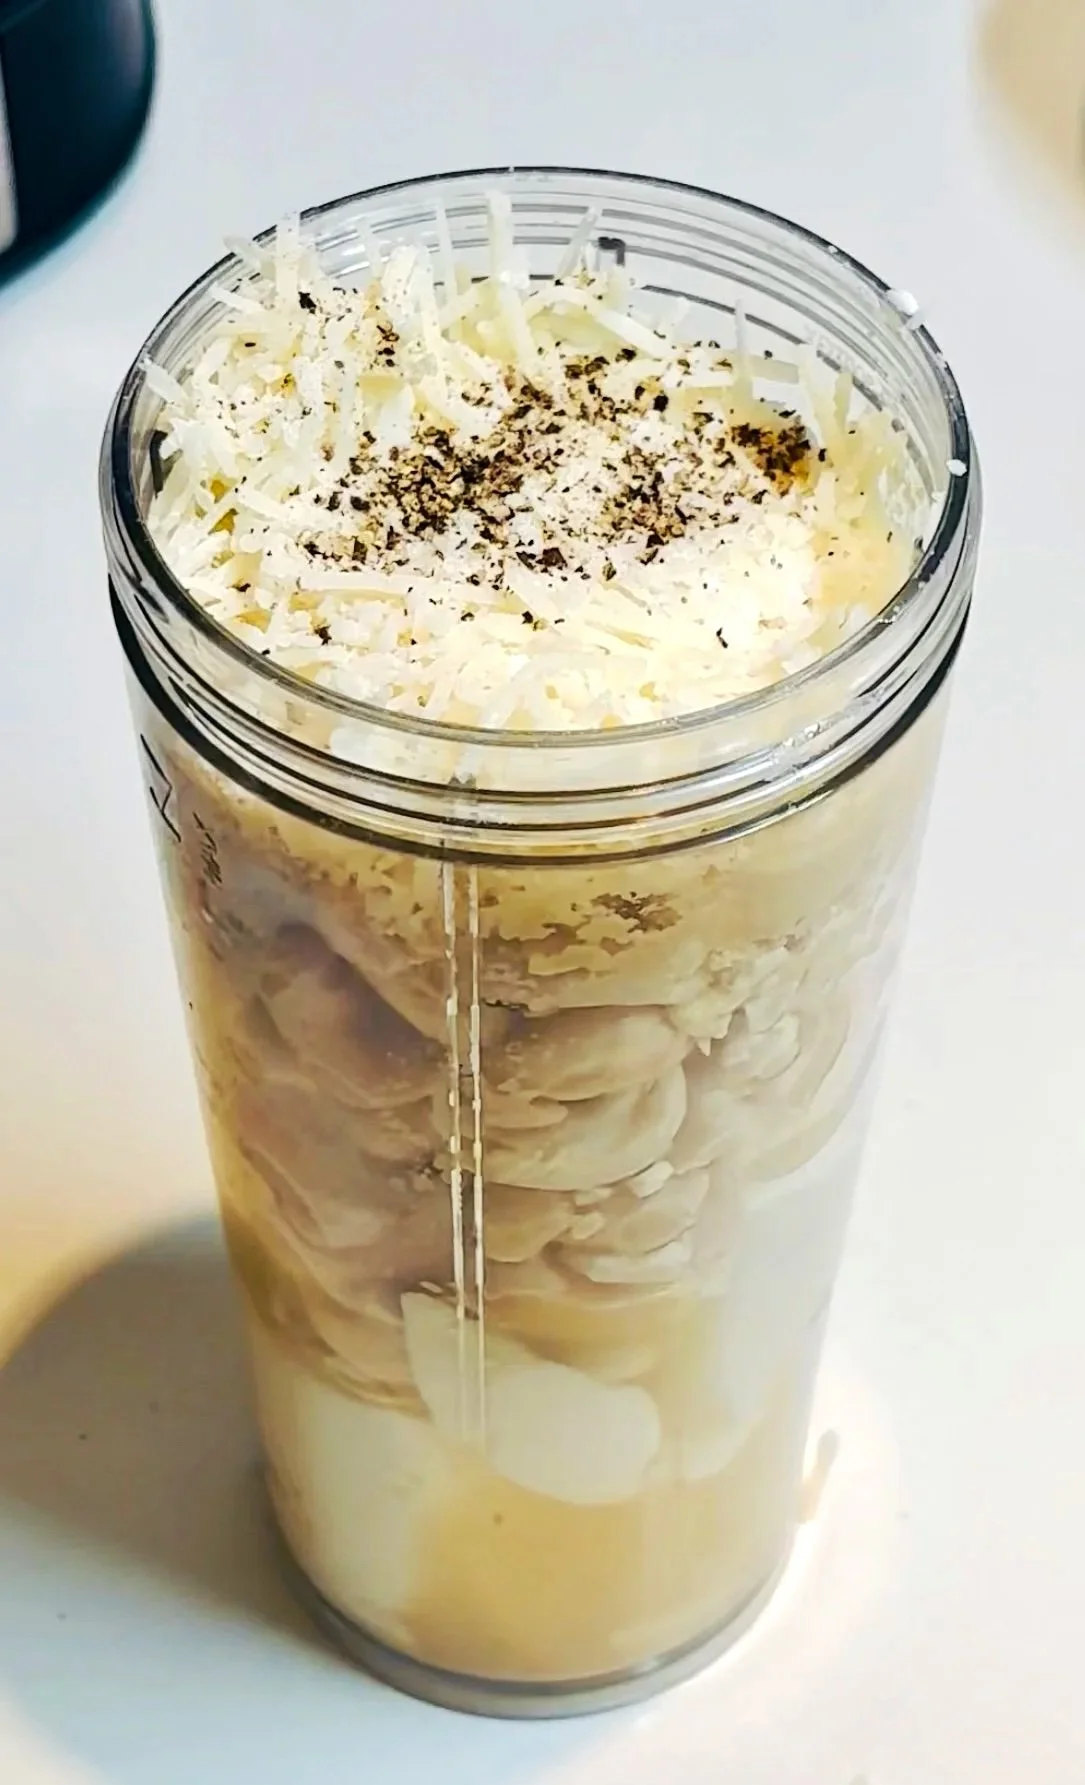
Make the sauce: Add cashews, tofu, nutritional yeast, garlic, lemon juice, Parmesan (if using), salt, and pepper to a blender. Blend until smooth and creamy. Taste and adjust seasoning.
Cook pasta: Bring a large pot of salted water to a boil. Cook pasta until al dente. Reserve ½ cup of pasta water, then drain.
Prep the vegetables: Chop onion; separate Swiss chard stems from leaves and slice; slice bell peppers.
Sauté: Heat oil in a large pan over medium-high. Add onion and Swiss chard stems; cook for 2–3 minutes. Add bell peppers; cook 3–4 minutes until just tender. Add Swiss chard leaves and cook until wilted.
Combine: Lower heat to medium. Add pasta and sauce to the pan with veggies. Toss well, loosening with reserved pasta water as needed.
Finish: Adjust seasoning. Serve topped with extra Parmesan, fresh basil, or cracked pepper if desired.
Variations & Substitutions
Vegan: Omit Parmesan; add ½–1 tsp white miso or a dash of soy sauce/tamari for extra umami.
Gluten-free: Use GF or chickpea pasta.
Nut-free: Swap cashews for silken tofu + 1–2 tbsp olive oil, or use shelled sunflower seeds (soaked) for a similar body.
Veg swaps: Spinach, zucchini, broccoli, peas, mushrooms, or sun-dried tomatoes are all great.
Extra protein: Add white beans, edamame, or sautéed mushrooms.
Make-Ahead, Storage & Reheat
Fridge: Store in an airtight container up to 3–4 days.
Reheat: Warm gently on the stove with a splash of water or plant milk to loosen the sauce.
Meal prep tip: Keep a little extra sauce aside to stir in at reheat time for peak creaminess.
FAQs
Can I skip soaking the cashews?
If you have a high-speed blender, you can get away with a quick 10–15 minute hot-water soak. Otherwise, soak 2–3 hours for the smoothest texture.
Will firm tofu work?
Soft/silken is best for a silky sauce. If using firm, add a few tablespoons of water or plant milk and blend longer.
Is Parmesan necessary?
No—omit it for a vegan version. Nutritional yeast supplies savory, cheesy notes; you can add a pinch of miso for deeper umami.
👉 Save this recipe for busy weeknights when you want something creamy, filling, and nourishing — no heavy cream required.
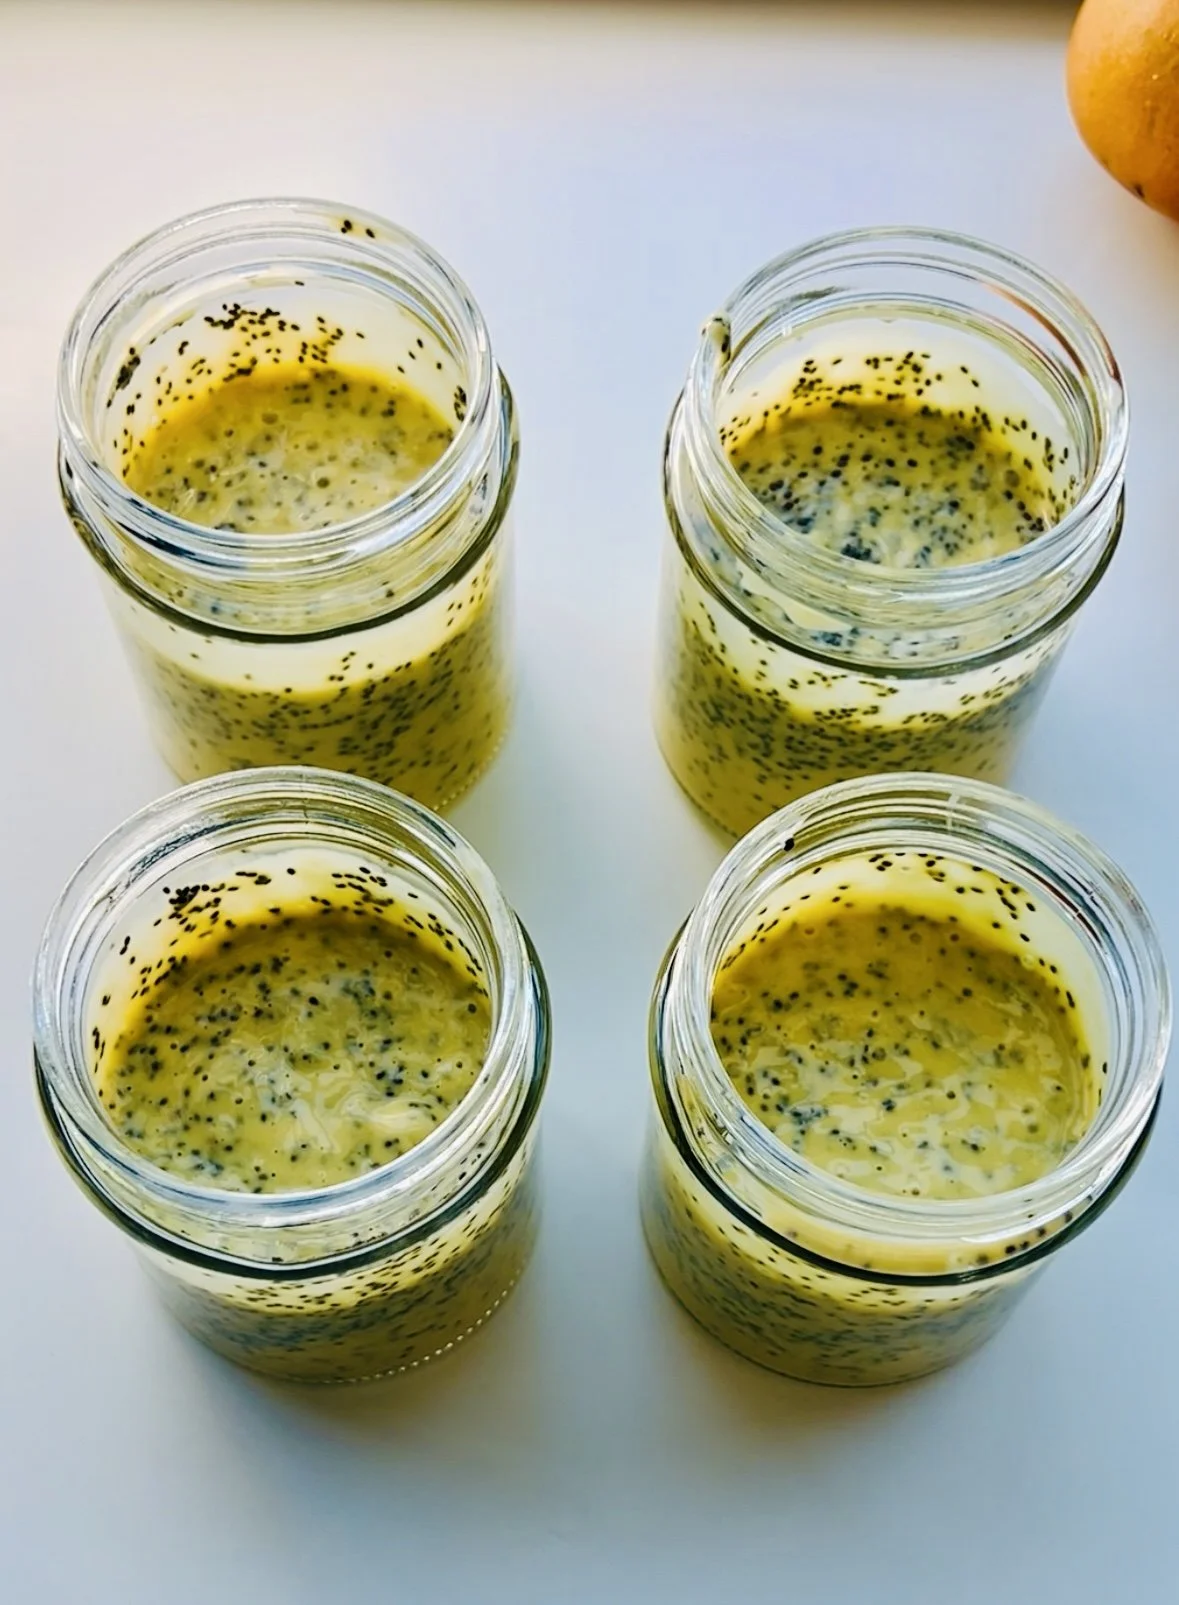
Mango Chia Seed Pudding: A Nourishing Make-Ahead Breakfast
If you’re looking for a healthy breakfast that’s quick, delicious, and actually keeps you full, this Mango Chia Seed Pudding is for you. It’s naturally sweetened with mango, creamy from coconut milk, and has a touch of turmeric for an extra anti-inflammatory boost.

Chia seeds are rich in fiber and omega-3 fatty acids, which help stabilize blood sugar, improve digestion, and support focus and brain health. Paired with mango’s vitamin C and antioxidants, this recipe is both vibrant and nourishing.
The best part? You can prep it the night before, and it’s ready to grab-and-go in the morning.
I love adding a crunchy topping of my homemade banana nut granola—the sweet and nutty clusters pair perfectly with the creamy mango base. You can also serve it with yogurt, shredded coconut, or fresh fruit.
Mango Chia Seed Pudding Recipe
Servings: 4 | Prep Time: 10 minutes | Chill Time: 6+ hours (overnight)
Ingredients
1 can full-fat coconut milk
1 large mango (fresh or thawed frozen, about 1.5 cups)
1 tsp honey or maple syrup (optional)
1 tsp pure vanilla extract
½ tsp turmeric
⅔ cup chia seeds
Directions
Add all ingredients except chia seeds to a blender and blend until smooth.
Pour mixture into a large jar or bowl and stir in chia seeds.
After 30–60 minutes, give the jar a shake or stir again to prevent clumping.
Chill overnight or for at least 6 hours.
Serve with toppings of choice: yogurt, nuts, shredded coconut, fresh fruit, or homemade granola.

If you enjoyed this recipe, try pairing it with my Banana Nut Granola for the ultimate healthy breakfast combo.

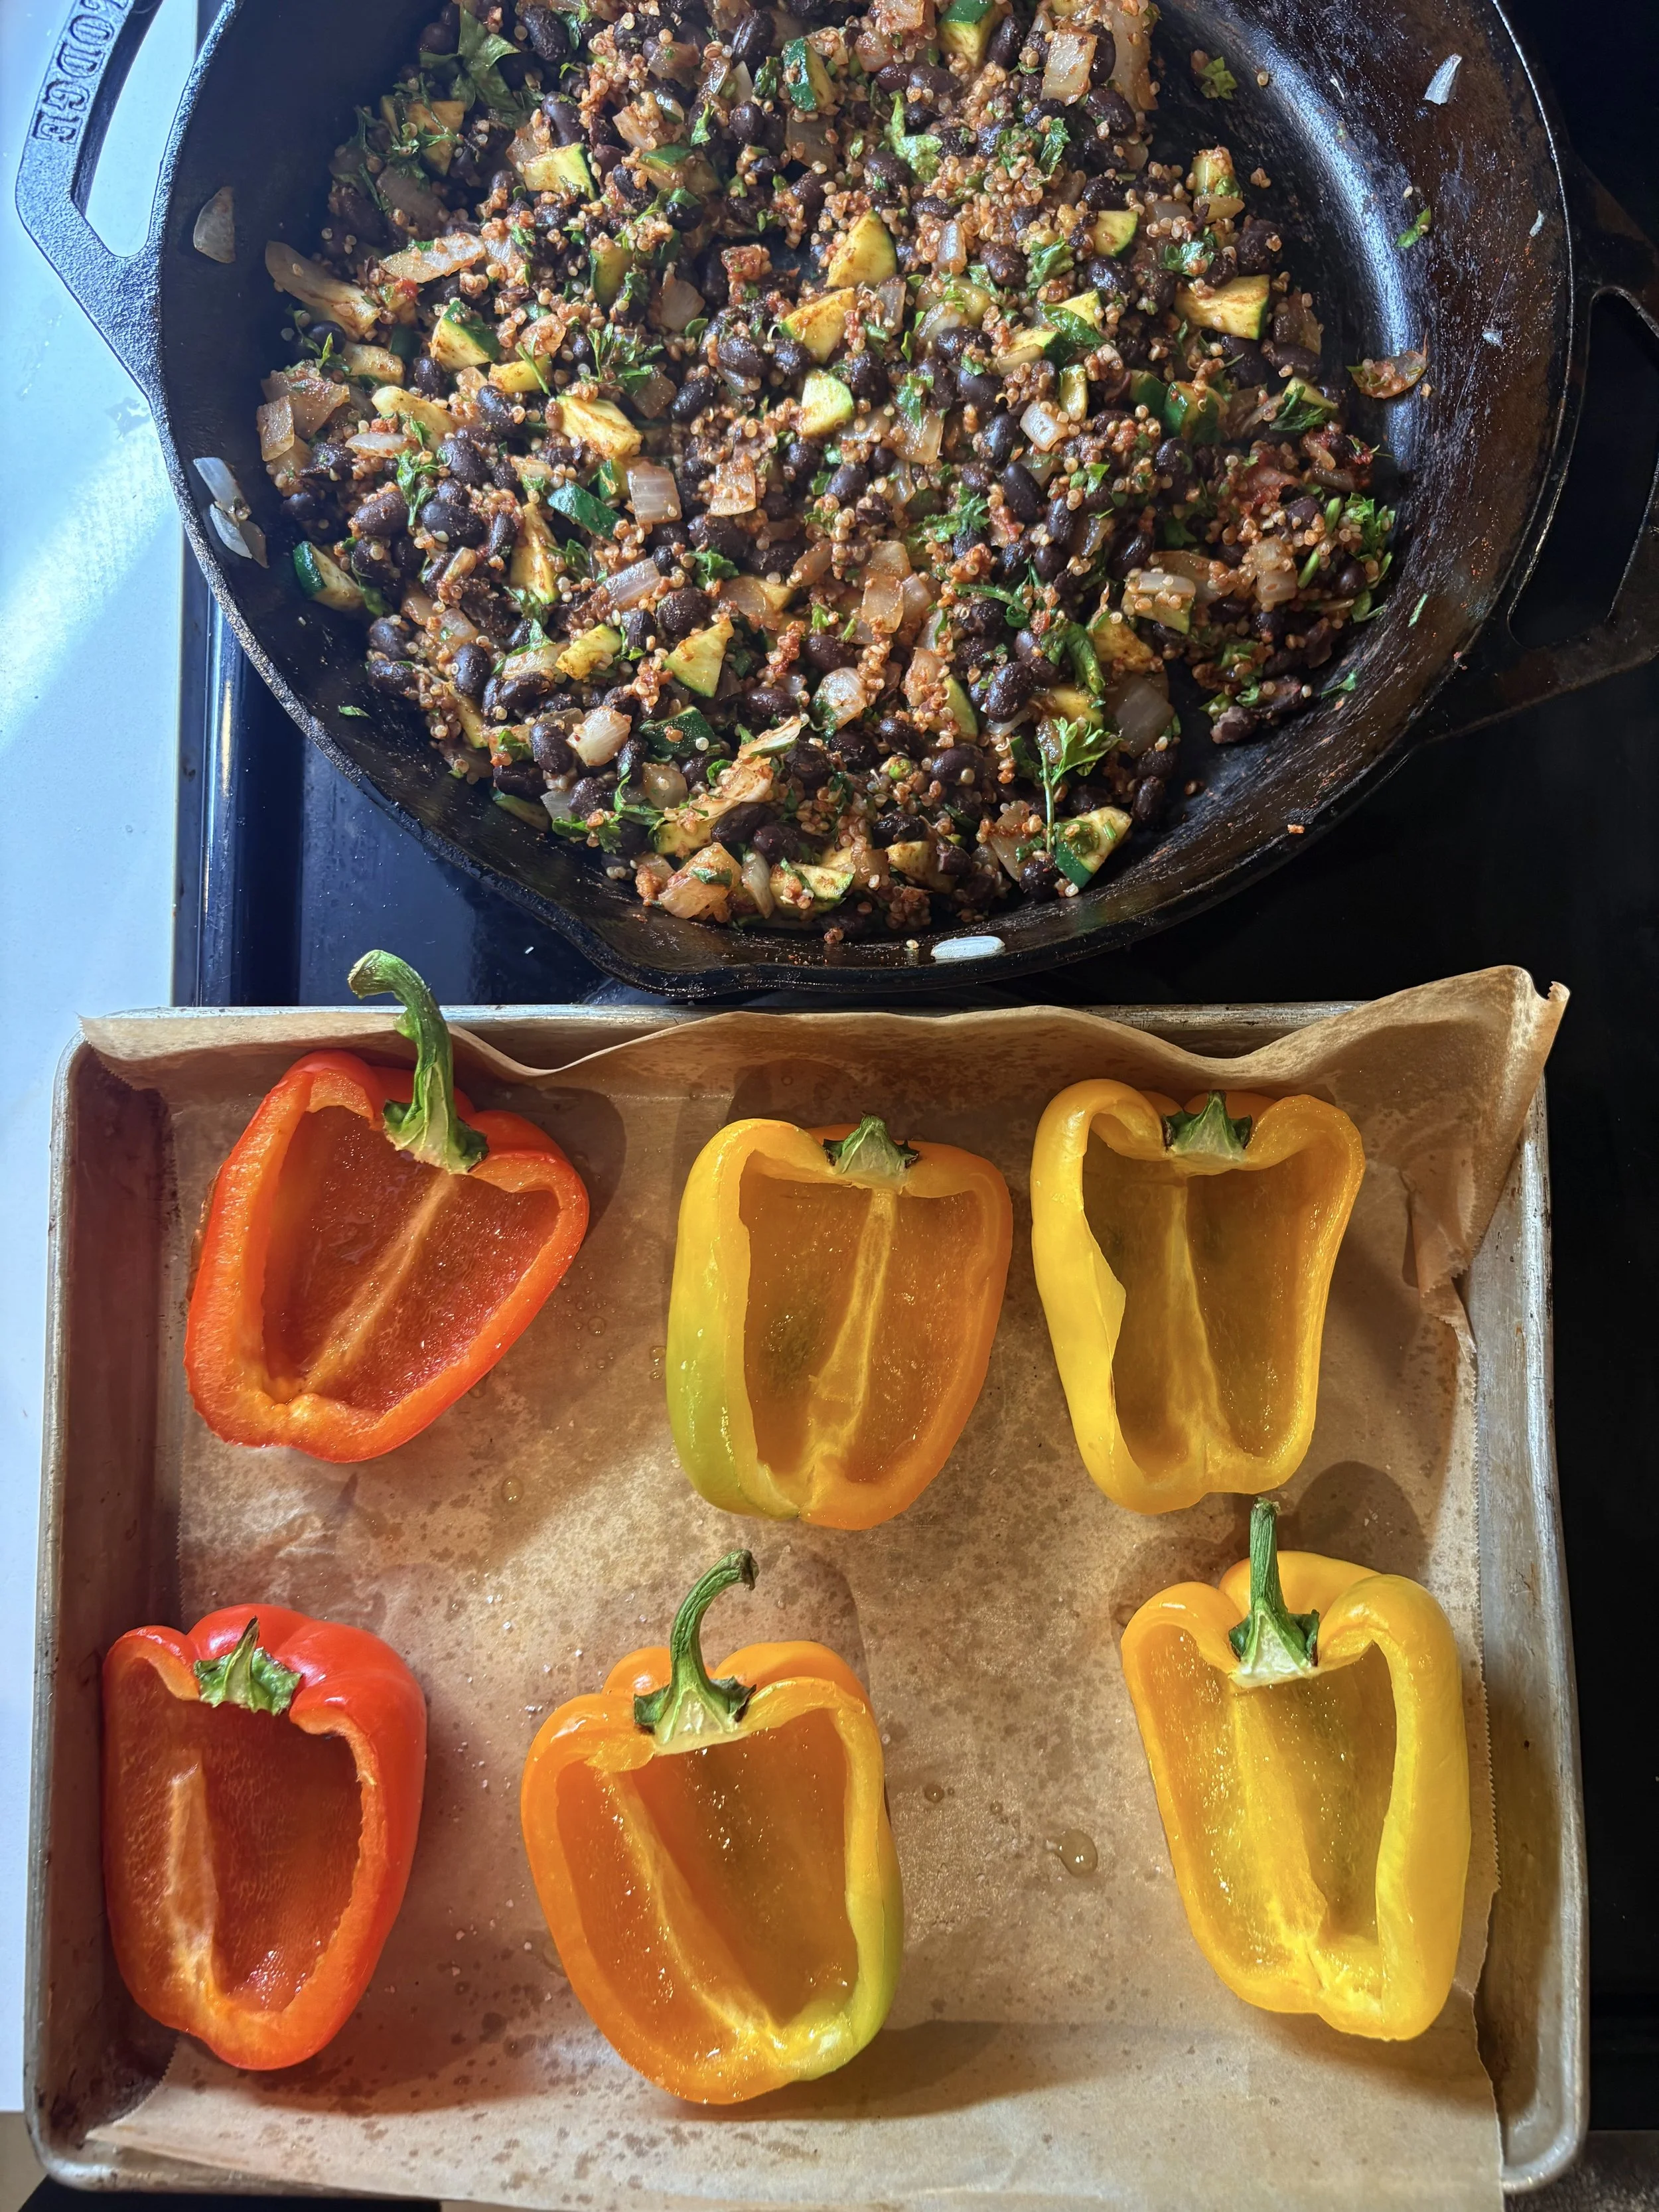
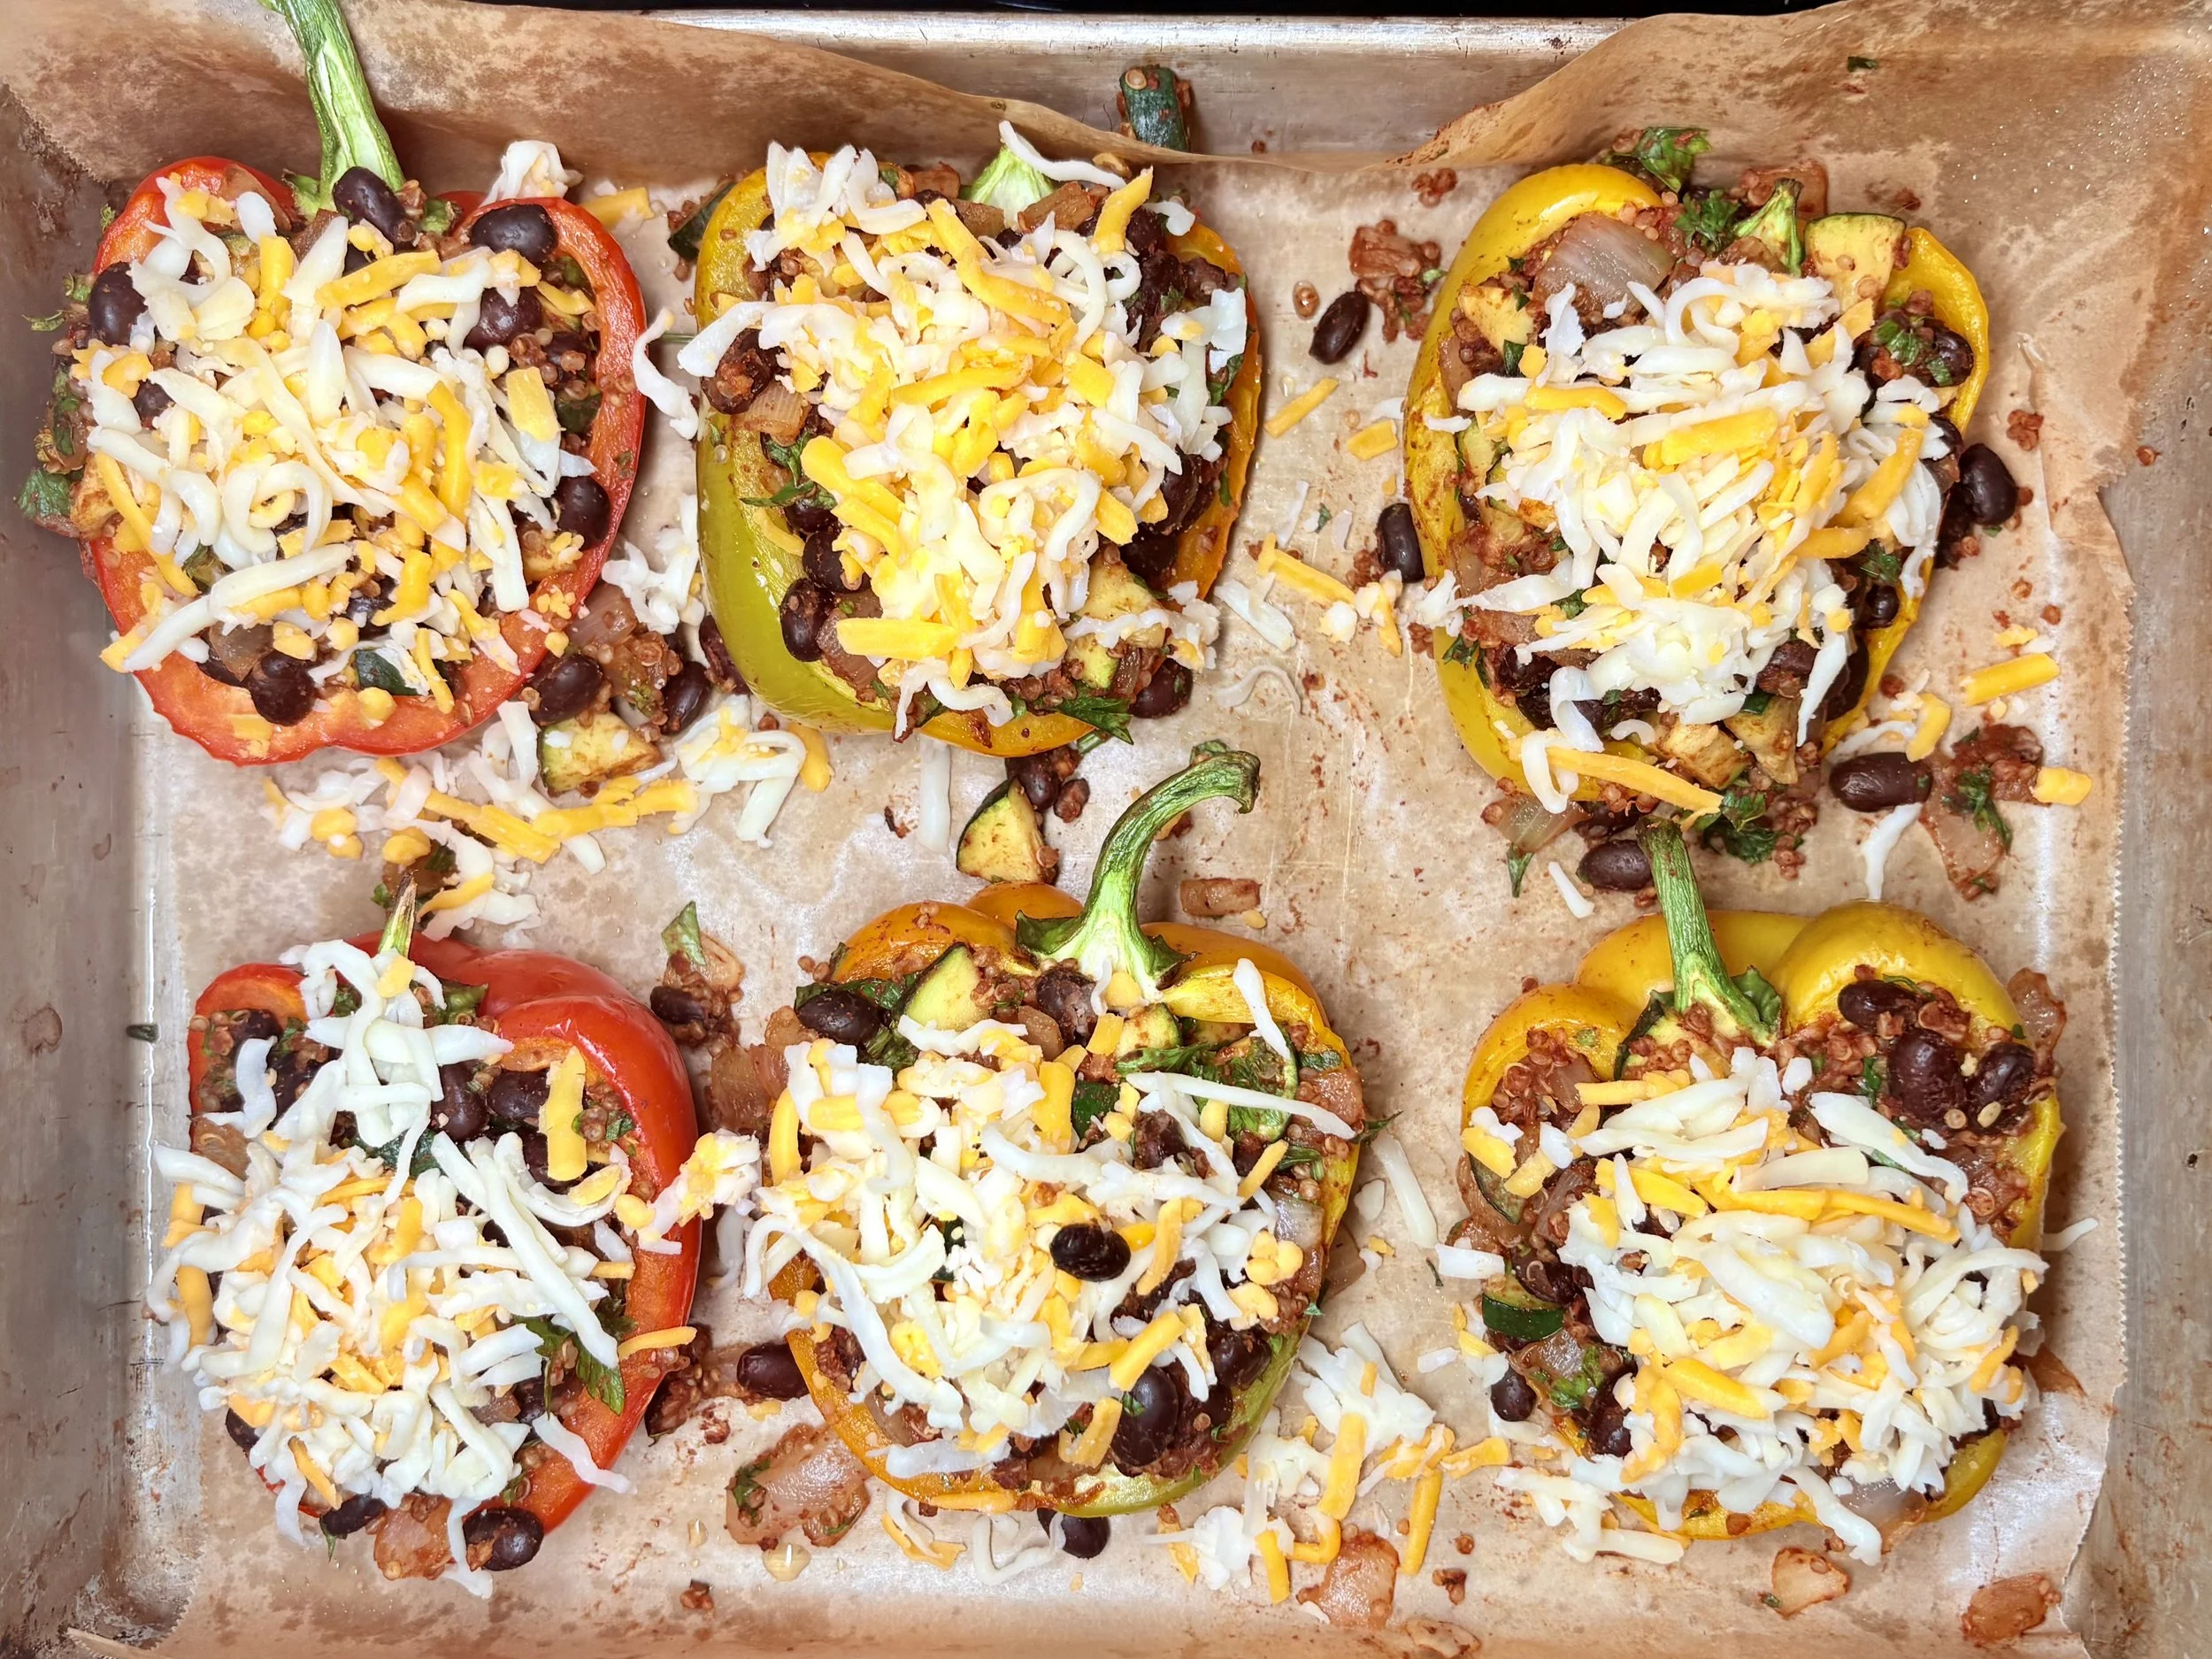
Stuffed Bell Peppers with Quinoa & Black Beans
If you’re looking for a flavorful, nutrient-rich dinner that’s easy to make and satisfying enough to stand on its own, these stuffed bell peppers are perfect. With protein-packed quinoa and black beans, bold spices, and a cheesy topping, this recipe is a weeknight staple that’s as nourishing as it is delicious.
The best part? You can easily customize the flavors—swap the parsley for cilantro for a more Mexican-inspired style, or add toppings like avocado, Greek yogurt, or salsa to make it your own.
Why You’ll Love This Recipe
Balanced & filling: Protein + fiber + healthy fats keep you satisfied.
Versatile: Works as a main dish or a hearty side.
Customizable: Use cheddar or feta, parsley or cilantro, add avocado or sour cream—your choice!
Meal-prep friendly: Make ahead and reheat for busy nights.

Key Ingredient Benefits
Bell peppers: Packed with vitamin C and antioxidants for immune support.
Quinoa: A complete plant protein with fiber for digestion and blood sugar balance.
Black beans: Great source of protein, iron, and magnesium to support energy and brain health.
Spices: Anti-inflammatory and digestion-friendly, plus tons of flavor.
Zucchini: Low-calorie and hydrating, adds extra fiber and antioxidants.
Avocado oil: A heart-healthy fat that supports vitamin absorption.

Stuffed Bell Peppers with Quinoa & Black Beans Recipe
Servings: 6 halves | Prep Time: 15 minutes | Cook Time: 30 minutes | Total Time: 45 minutes
Ingredients
3 bell peppers
½ yellow onion
½ medium zucchini
2 cloves garlic, minced
2 tbsp tomato paste
⅔ cup chopped parsley (or cilantro for a Mexican twist)
Juice from 1 lime
1 tsp avocado oil
1 can black beans, drained and rinsed
1 cup cooked quinoa
2 tsp cumin
2 tsp smoked paprika
1 tsp chili powder
1 tsp salt
1 cup shredded cheddar or feta cheese
Directions
Preheat oven to 450°F. Slice peppers in half, remove seeds, and place on a parchment-lined baking sheet. Brush with avocado oil. Bake for 10 minutes.
Heat a skillet over medium-high. Add onion and sauté for 2 minutes. Add zucchini and garlic, cook for another 2 minutes.
Stir in black beans, tomato paste, quinoa, parsley/cilantro, and spices. Remove from heat and stir in lime juice.
Drain excess liquid from peppers and fill each half with mixture. Top with cheese.
Reduce oven to 400°F. Bake stuffed peppers for 15–20 minutes.
Serve warm with avocado, extra herbs, or sour cream.
These stuffed peppers are an easy way to enjoy a balanced, veggie-packed dinner that doesn’t skimp on flavor. They’re also versatile enough to fit different cuisines—keep them herby with parsley or make them Mexican-inspired with cilantro and toppings like salsa or avocado.
Whether you enjoy them fresh out of the oven or reheat them for meal prep, they’ll quickly become a go-to in your dinner rotation!

Banana Walnut Pancakes – A Nourishing Breakfast for Brain & Body
There’s something so comforting about pancakes on a slow morning — but these Banana Walnut Pancakes are more than just cozy comfort food. They’re filled with nutrient-dense ingredients that support your energy, mood, and focus, making them a delicious way to start the day.
With ripe bananas for natural sweetness, omega-3-rich walnuts, and protein from Greek yogurt and eggs, thUnlike store-bought pancake mixes, which often rely on refined flour and sugar, this recipe uses simple, whole-food ingredients to give you a balanced meal that nourishes both your body and your mind.

Why These Pancakes Are Good for You
✨ Bananas – Naturally sweet and packed with potassium, bananas support healthy blood pressure, aid digestion, and provide slow-digesting carbohydrates for steady energy. They also contain vitamin B6, which plays a role in serotonin production — important for mood balance.
✨ Walnuts – These brain-shaped nuts really live up to their look! Walnuts are one of the best plant-based sources of omega-3 fatty acids, which are linked to improved focus, memory, and reduced inflammation. They also add a satisfying crunch and healthy fats to keep you full longer.
✨ Greek Yogurt – A protein powerhouse, Greek yogurt helps stabilize blood sugar, supports muscle repair, and promotes gut health thanks to probiotics. It also keeps these pancakes moist and fluffy without the need for excess oil.
✨ Eggs & Flax – Eggs provide choline, a nutrient vital for brain health, while flax adds extra omega-3s and fiber. Together, they help create structure and richness in the pancakes.
✨ Cinnamon & Vanilla – These natural flavor boosters not only taste amazing but also add antioxidants. Cinnamon, in particular, has blood sugar-stabilizing benefits.

Banana Walnut Pancake Recipe
Ingredients
2 overripe bananas, mashed
⅓ cup plain Greek yogurt
3 eggs
1 tbsp ground flax
1 tsp pure vanilla extract
1 tsp cinnamon
1 ½ cups flour (I used a gluten-free flour mix)
1 tsp baking powder
¼ cup chopped walnuts
Instructions
In a large bowl, mash bananas until smooth.
Whisk in Greek yogurt, eggs, flax, vanilla, and cinnamon until well combined.
Add flour and baking powder, stirring gently until just incorporated. Fold in walnuts.
Heat a non-stick skillet or griddle over medium heat and lightly grease with oil.
Pour batter in ¼ cup portions and cook until bubbles form, then flip and cook until golden brown.
Serve warm with fresh berries, a drizzle of maple syrup, or a spoonful of almond butter.
Tips & Variations
Gluten-Free: Swap in a gluten-free flour blend (I used one here and they turned out fluffy).
Nut-Free: Substitute walnuts with pumpkin or sunflower seeds for crunch.
Extra Protein: Add a scoop of protein powder (reduce flour slightly if needed).
Meal Prep: Freeze pancakes with parchment between each one. Reheat in a toaster or skillet for quick weekday breakfasts.

Why You’ll Love These Pancakes
Quick to whip up (perfect for weekends or busy mornings)
Balanced with protein, healthy fats, and carbs
Kid-friendly, freezer-friendly, and endlessly customizable
A brain-boosting breakfast that still feels like a treat
If you’re looking for more wholesome breakfast ideas that fuel your focus and mood, try my Chocolate Peanut Butter Overnight Oats.
💚 Did you make this recipe? Tag me @growingmindsnutrition on Instagram so I can see your stack!

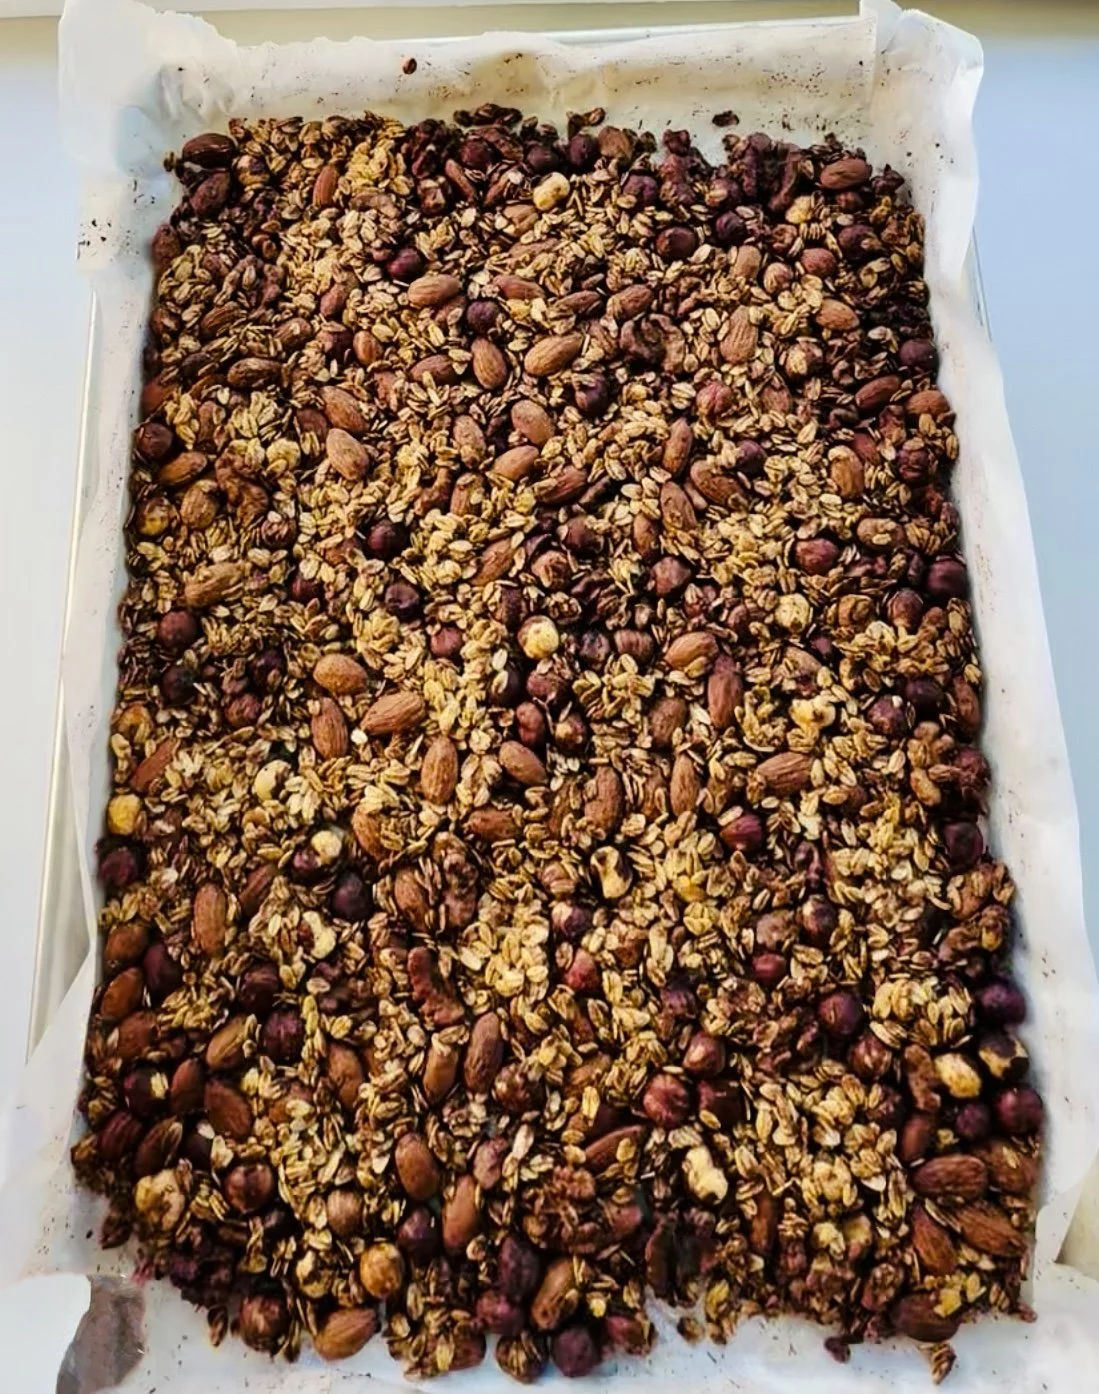
Homemade Banana Nut Granola
There’s nothing quite like the crunch of fresh, homemade granola. This banana nut granola is naturally sweetened, loaded with healthy fats and fiber, and bakes into perfect crispy clusters that store beautifully. Whether you sprinkle it over yogurt, enjoy it with milk, or grab a handful as a snack, this recipe is a pantry staple you’ll want to keep on repeat.
The mashed banana not only adds natural sweetness but also helps the granola stick together into those crave-worthy clusters. Pressing the mixture into the pan before baking is the secret to getting that bakery-style crunch.
Why You’ll Love This Recipe
Naturally sweetened with banana and honey or maple syrup—no refined sugar.
Crunchy clusters thanks to the press-down baking method.
Nutrient-dense with nuts, healthy fats, and fiber.
Meal-prep friendly—keeps fresh in an airtight jar for up to 3 weeks.

Key Ingredient Benefits
Banana: Adds natural sweetness, potassium, and prebiotic fiber for gut health.
Coconut oil: Provides healthy fats that support brain function and satiety.
Maple syrup or honey: Natural sweeteners with minerals and antioxidants.
Nuts (hazelnuts, walnuts, almonds): Provide protein, omega-3s, vitamin E, and sustained energy.
Cinnamon: Anti-inflammatory and helps balance blood sugar.
Oats (if added): Rich in soluble fiber to support digestion and heart health.
Banana Nut Granola Recipe
Serving Size: ~6 cups | Prep Time: 10 minutes | Cook Time: 30-35 minutes | Total Time: 40-45 minutes
Ingredients
1 overripe banana, mashed
¼ cup refined coconut oil, melted
¼ cup honey or maple syrup
3 cups steel cut rolled oats
3 cups mixed nuts (I use 1 cup hazelnuts, 1 cup walnuts, 1 cup almonds)
1 tbsp vanilla extract
1 tbsp cinnamon
½ tsp salt
Directions
Preheat oven to 350°F and line a baking sheet with parchment paper.
In a bowl, mix banana, melted coconut oil, honey/maple syrup, and vanilla.
Stir in nuts, cinnamon, and salt until fully coated.
Spread mixture onto baking sheet and press down firmly so there are no gaps—this helps create crispy clusters.
Bake for 30–35 minutes, until golden and fragrant.
Cool completely before breaking into clusters. Store in an airtight container for up to 3 weeks.

This homemade banana nut granola is a delicious way to upgrade your breakfast or snack routine. It’s naturally sweetened, crunchy, and nourishing—perfect on yogurt, smoothie bowls, or just by the handful.
Once you try it, you’ll never go back to store-bought granola again!

Simple Greek Yogurt Breakfast Bowl (Protein-Packed & Brain-Boosting)
When it comes to healthy breakfasts, simple is often best. This Greek Yogurt Breakfast Bowl is one of my favorite ways to start the day—it’s quick to make, nutrient-dense, and keeps me energized all morning long.
Unlike many store-bought breakfast options that are loaded with sugar, this bowl balances protein, healthy fats, and fiber. That balance is key for steady energy, blood sugar support, and improved focus throughout the day.

Why this bowl is nourishing:
Greek Yogurt → High in protein to keep you full, plus probiotics to support gut health.
Chia Seeds → A great source of fiber and omega-3 fatty acids that benefit brain health.
Cinnamon → Helps regulate blood sugar and adds natural sweetness.
Natural Sweetener → I love homemade fig jam for antioxidants and fiber, but maple syrup or honey works too.
Granola + Fruit → Provides crunch, extra fiber, and slow-digesting carbs for lasting energy.

Simple Greek Yogurt Breakfast Bowl Recipe
Ingredients (1 serving)
1 cup plain Greek yogurt
1 tbsp chia seeds
½ tsp cinnamon
1–2 tsp natural sweetener (homemade fig jam, maple syrup, or honey)
¼–½ cup fresh fruit (berries, banana, or apple slices work well)
¼ cup granola (homemade or store-bought)
Directions
Stir together Greek yogurt, chia seeds, cinnamon, and sweetener.
Top with fruit and granola.
Enjoy immediately!
Variations
Swap chia seeds for hemp hearts for extra protein.
Use seasonal fruits for variety.
Add a spoonful of nut butter for more healthy fats.
This breakfast takes just minutes to prepare but delivers steady fuel for both your body and brain—helping you feel focused, satisfied, and ready for the day ahead.

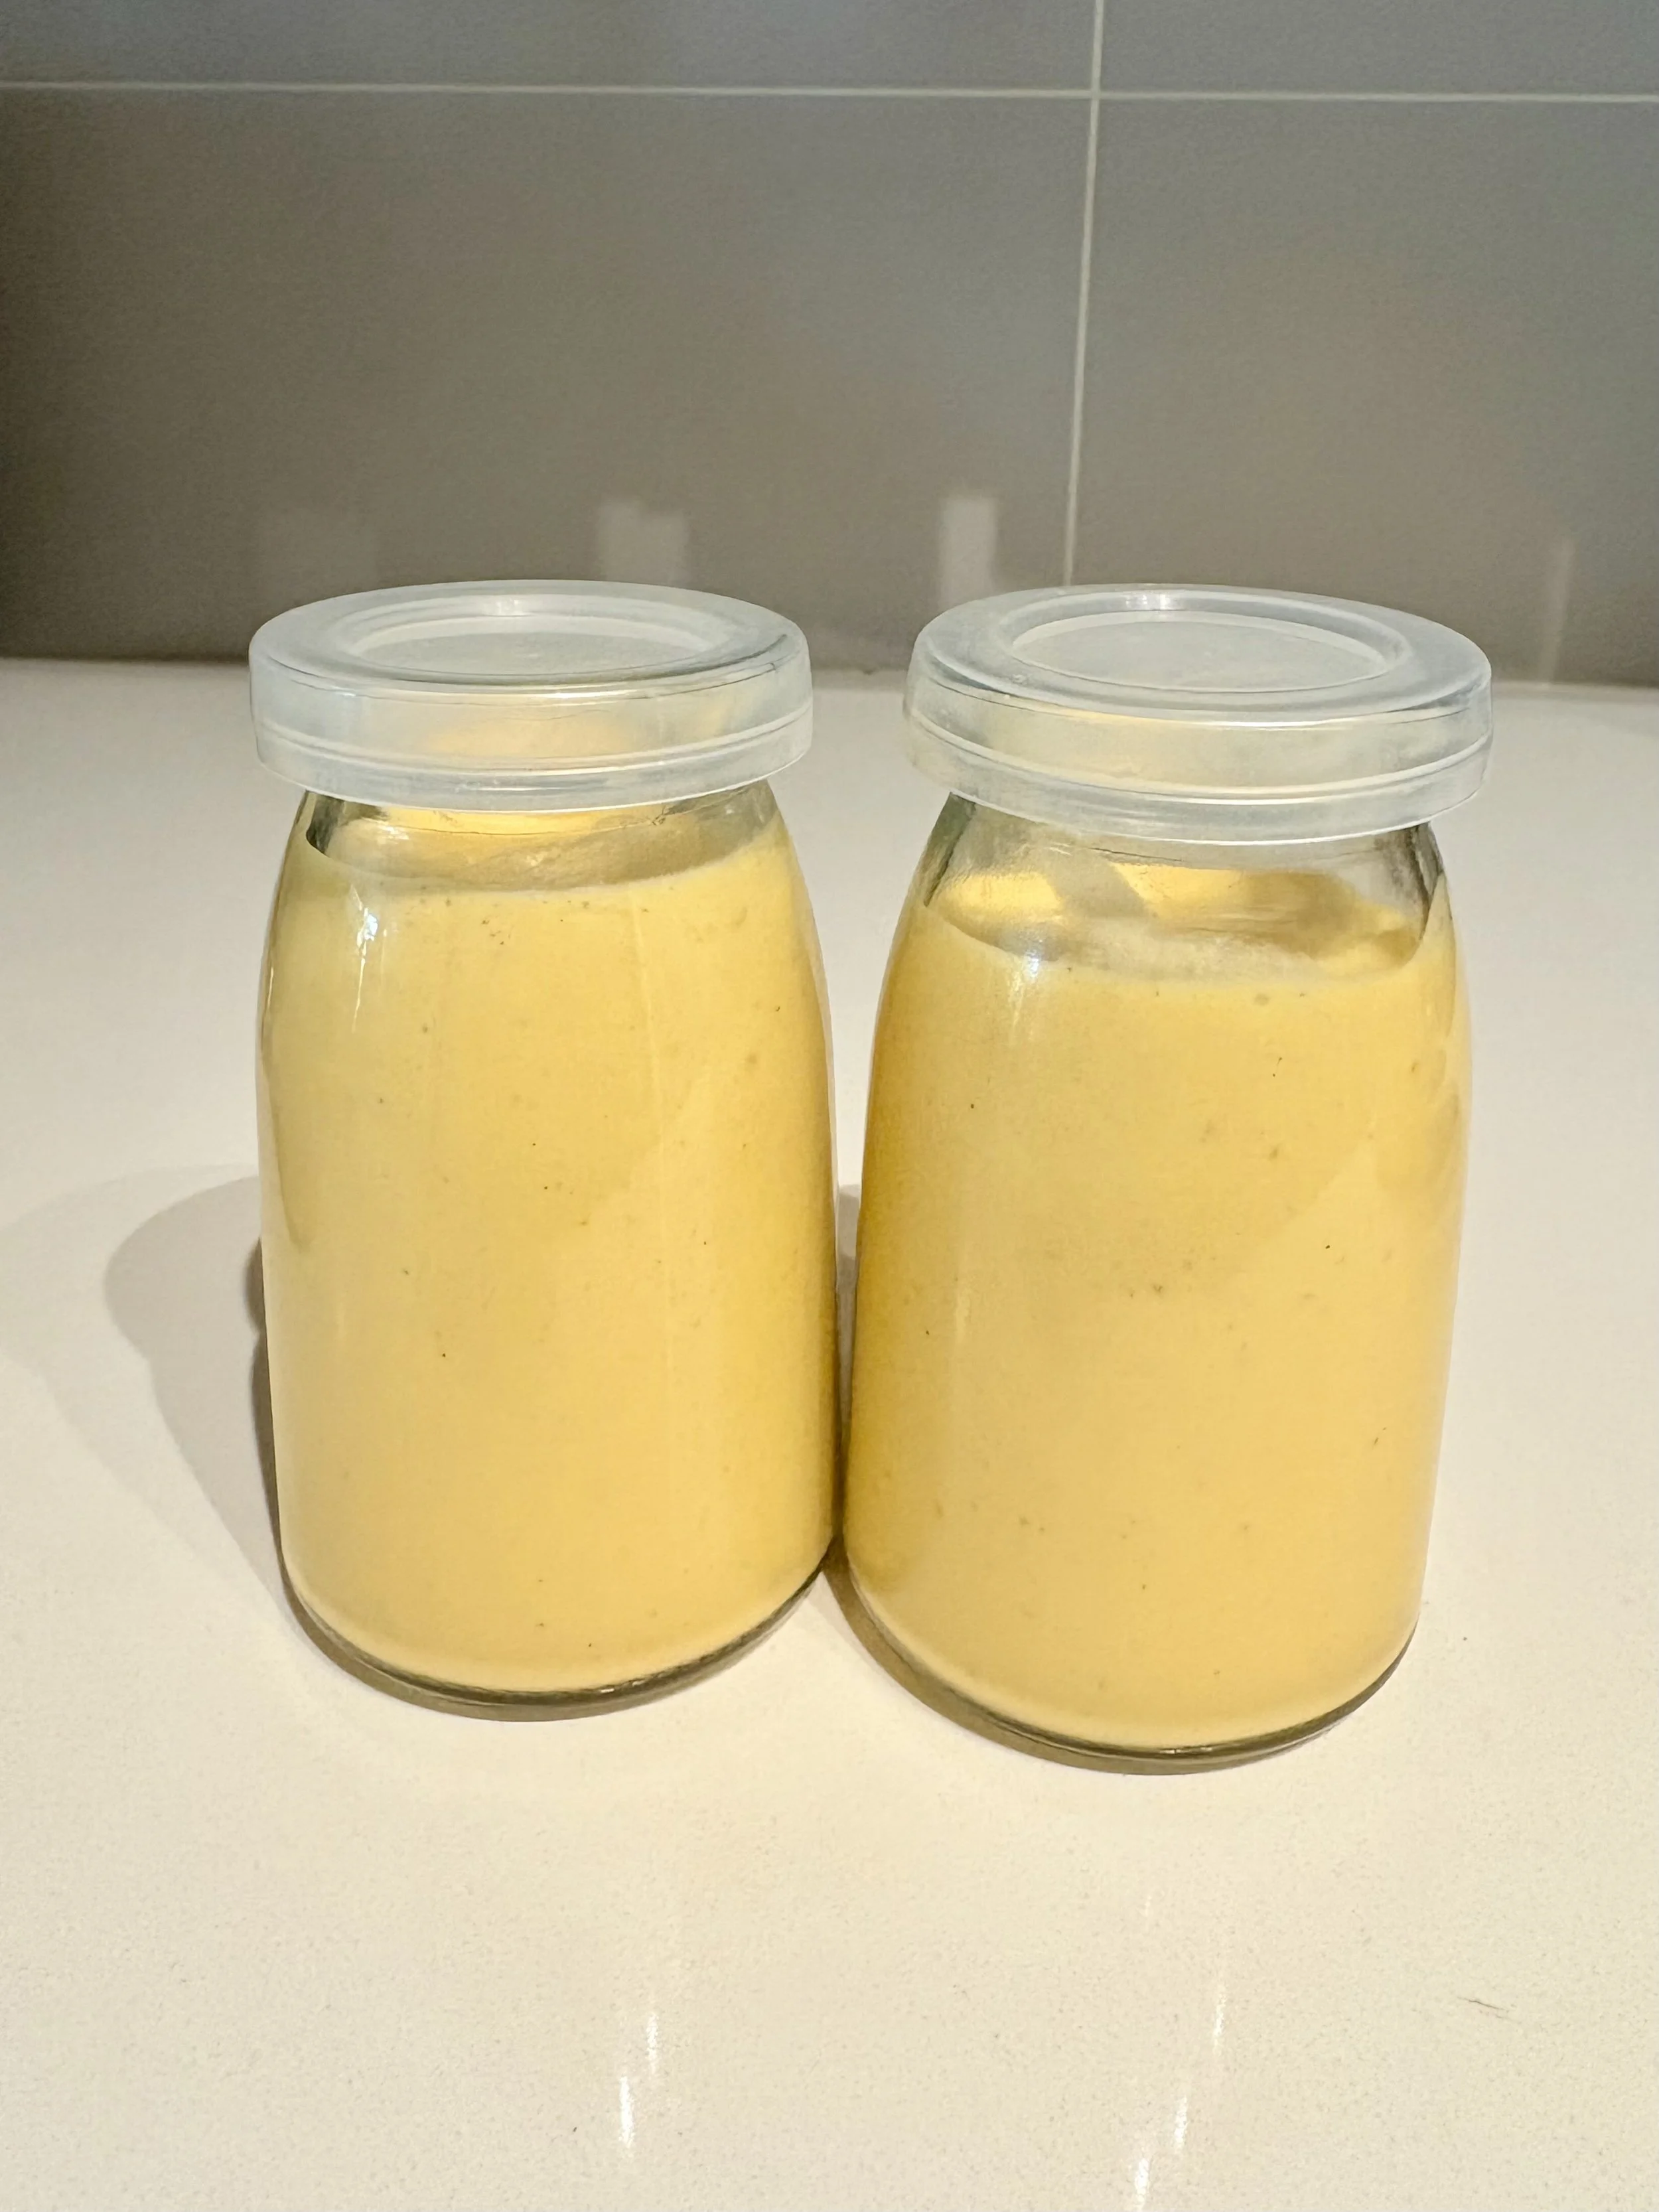
Vanilla Cashew Coconut Milk
Homemade, creamy, and nourishing for brain and body

If you’ve ever picked up a carton of plant milk at the store, you’ve probably noticed a long list of gums, stabilizers, and added sugars. While convenient, these additives can leave us feeling bloated and don’t always support our health the way real, whole-food ingredients do. That’s why I love making my own plant-based milks at home.
This Vanilla Cashew Coconut Milk is one of my favorites—it’s smooth, naturally sweet, and packed with nutrients that support energy, focus, and mental well-being.
Why this milk is nourishing:
Cashews → provide plant-based protein, magnesium, and zinc—nutrients that play a role in brain function and mood regulation.
Coconut milk → rich in medium-chain triglycerides (MCTs), healthy fats that can be quickly used by the brain for energy.
Maple syrup → a natural sweetener with trace minerals like manganese and zinc.
Vanilla + sea salt → balance the flavor and make it taste like a treat.
Ingredients
1 can coconut milk
4 cups water
1 cup cashews, soaked for 4–6 hours and drained
1 tbsp vanilla extract
2 tbsp maple syrup
Pinch of sea salt
Directions
Add all ingredients to a high-speed blender.
Blend on high for 2–3 minutes, until completely smooth and frothy.
Store in a glass jar in the fridge for up to 4 days.
No straining needed—the cashews blend right in for a silky texture.
Variations
Sweeten with dates or honey instead of maple syrup.
Add cinnamon, nutmeg, or cardamom for a cozy spiced milk.
Reduce water slightly for a richer, creamier version.
Enjoy this dairy-free milk in your morning coffee, smoothies, oatmeal, or simply poured into a glass for a refreshing drink.
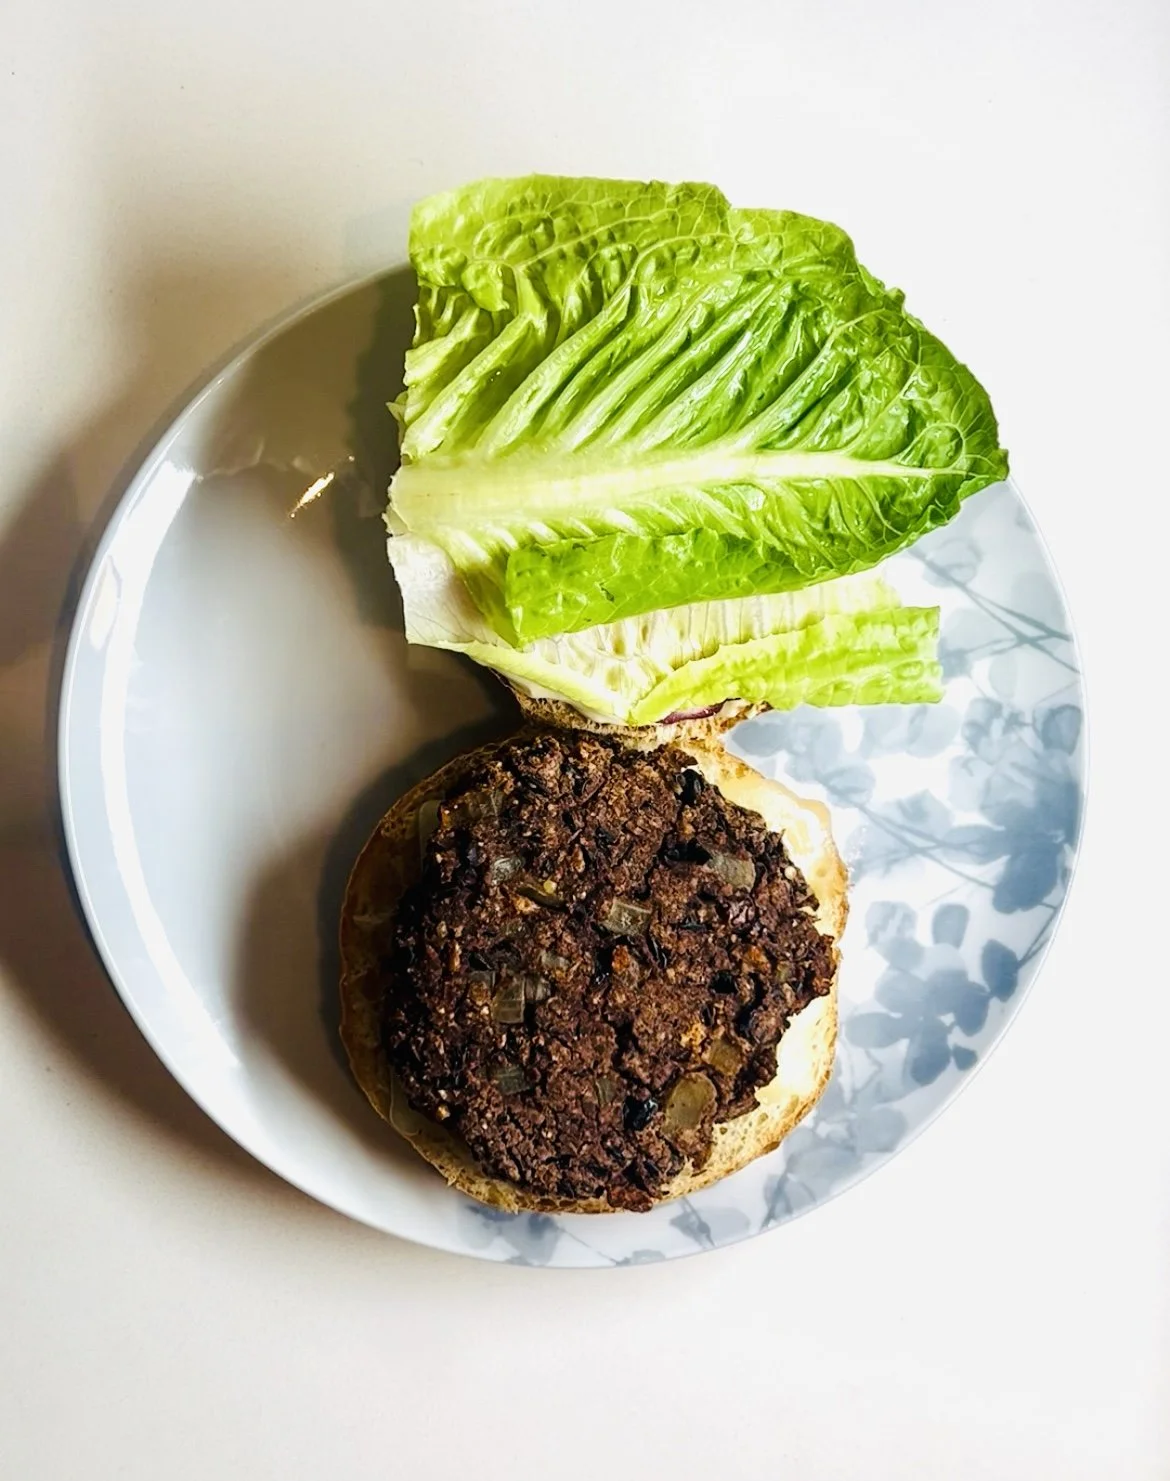
Homemade Black Bean Veggie Patties (Easy & Nourishing)
Rhianna Kwan, CNP | Growing Minds Nutrition

If you’ve been searching for a wholesome, high-protein veggie burger recipe that’s both delicious and simple to make, these black bean veggie patties are it! Unlike many store-bought versions loaded with fillers, sodium, and additives, these patties are made with whole food ingredients that support energy, focus, and overall well-being.
Not only are they budget-friendly and meal-prep approved, but they also pair perfectly with my homemade avocado oil mayo (link here) for a creamy, nutrient-dense topping.
Why You’ll Love These Black Bean Veggie Patties
Packed with plant-based protein + fiber for steady energy
Made with pantry staples you already haveKid and family-friendly
Freezer and meal-prep friendly
Customizable with add-ins like feta or extra veggies

Black Bean Veggie Patty Recipe
Servings: 8-10 patties | Prep Time: 20 minutes | Cook Time: 14 minutes
Ingredients
½ large yellow onion, chopped & caramelized
2 cans (398 ml each) black beans, rinsed & drained
(~3 cups cooked black beans if making from scratch)3 slices whole grain or Ezekiel bread, toasted & processed into breadcrumbs
2 tsp garlic powder
1 tsp onion powder
Salt & pepper, to taste
Optional: ¼ cup feta cheese for flavor
Optional: ¼ cup flour (helps patties hold together better)
Instructions
Caramelize the onion in a pan over medium heat with a little oil until golden and fragrant.
In a large bowl, mash the black beans until mostly smooth (leave some texture).
Add in caramelized onion, breadcrumbs, garlic powder, onion powder, salt, pepper, and optional feta or flour. Mix until combined.
Form into patties (about 6–8 depending on size).
To cook:
Air fryer: Spray each side lightly with oil, cook at 375°F for 7 minutes per side (or until crisp).
Pan-fry: Heat oil in skillet, cook 4–5 minutes per side until golden brown.
Serve on a whole grain bun, in a burger bowl, or with roasted veggies. Top with avocado, greens, and a spoonful of homemade mayo!

Serving Suggestions
In a burger bowl with quinoa, avocado, and fresh salsa
Tucked into a wrap with crunchy veggies
Crumbled over a salad for a protein boost
With a side of roasted sweet potato fries
Final Thoughts
These black bean veggie patties are proof that healthy eating doesn’t have to be complicated. Packed with protein, fiber, and flavor, they’ll quickly become a staple in your weekly rotation.
👉 Try pairing them with my homemade avocado oil mayo for the ultimate brain-boosting combo!
👉 Looking for more meal prep ideas? Check out my recipe hub for simple, nourishing meals designed to support energy, focus, and mental health.
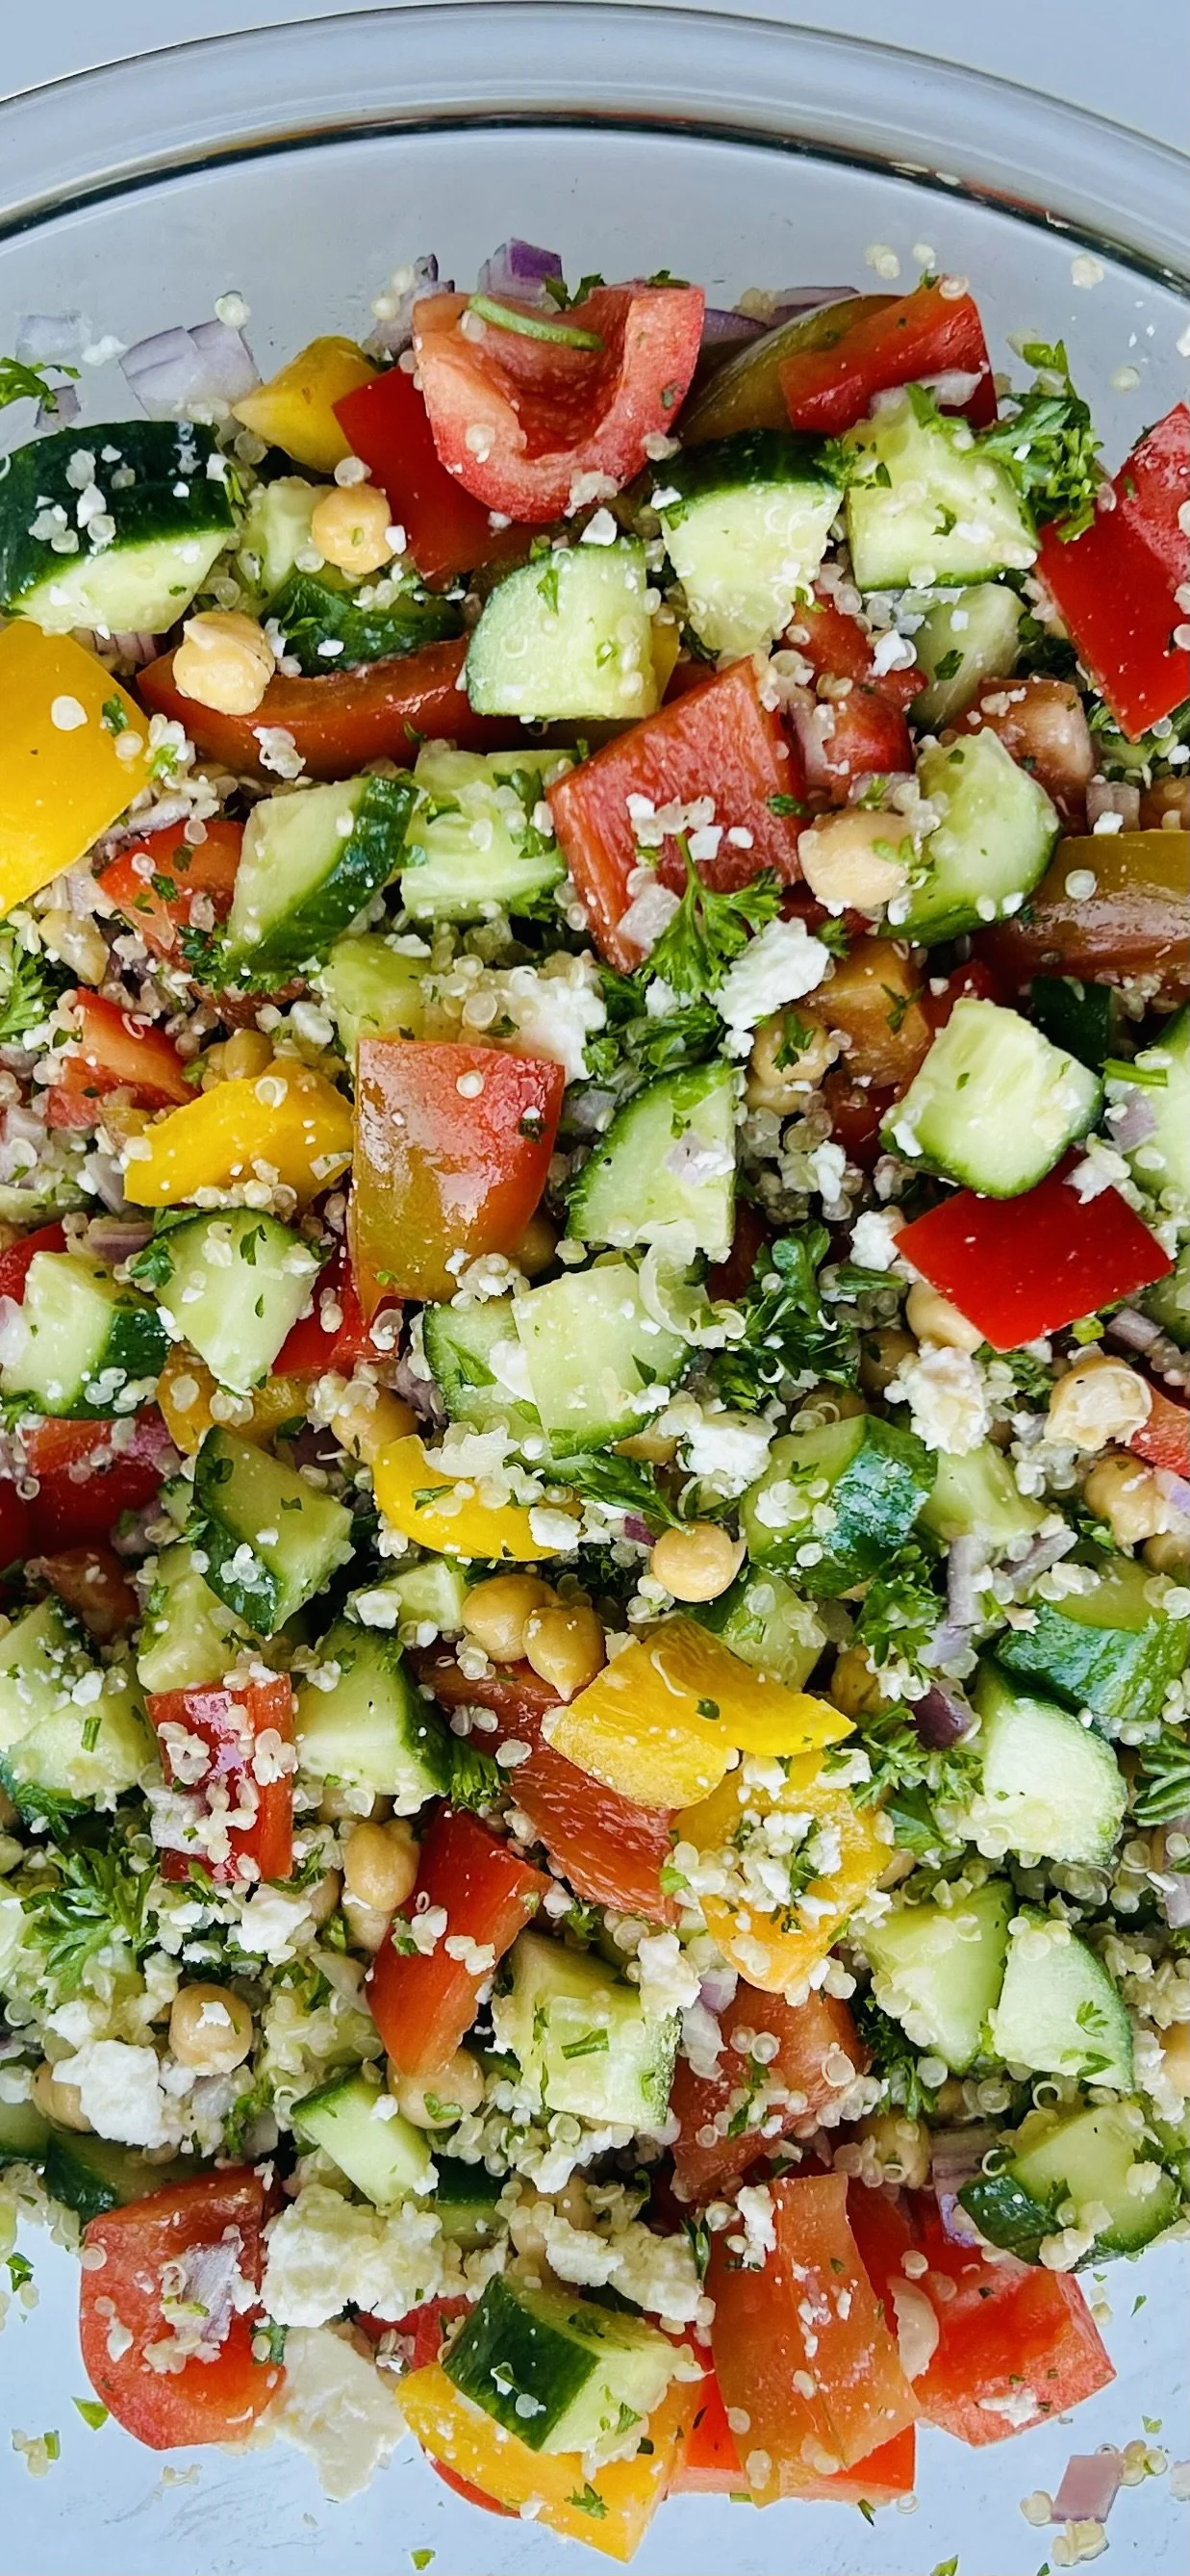
Simple Chickpea Salad Recipe (Fresh + Protein-Packed)
If you’re looking for a quick, nourishing, and budget-friendly meal, this simple chickpea salad is one you’ll want on repeat. It’s crunchy, refreshing, and full of plant-based protein to keep you energized and focused throughout the day.
This recipe makes a great make-ahead lunch, side dish, or even a light dinner — plus it’s naturally gluten-free and can easily be made dairy-free by skipping the optional feta.

Ingredients
1 cucumber, chopped
2 bell peppers, chopped
1 cup parsley, finely chopped
¼ cup red onion, finely chopped
1 can chickpeas, rinsed & drained
Juice from 1 lemon (or 2–3 tbsp lemon juice)
3 tbsp olive oil
1 large clove garlic, minced
Salt & pepper to taste
(Optional) ¼ cup feta cheese
Instructions
In a large bowl, combine chickpeas, cucumber, bell peppers, parsley, and red onion.
In a small bowl, whisk together lemon juice, olive oil, garlic, salt, and pepper.
Pour dressing over the salad and toss until everything is well coated.
Top with feta (if using).
Serve immediately, or store in the fridge for up to 3 days.

Why You’ll Love This Recipe
Fast & easy – ready in under 10 minutes
Balanced – fiber, protein, and healthy fats keep you satisfied
Brain-healthy – parsley, olive oil, and chickpeas are rich in nutrients that support focus + energy
Meal prep friendly – stays fresh for several days in the fridge
Looking for more brain-boosting recipes? Be sure to check out my recipe hub or join my Food for Thought Friday newsletter for weekly inspiration straight to your inbox!